

Before you start - critical requirements for the service to work
Check these requirements BEFORE beginning the installation. Missing any of these will cause the installation to fail.✅ Installation checklist
- Winbooks version 7 or higher is installed
- You have administrator access to the server where Winbooks is installed
- The server is always online with internet access (24/7)
- .NET Framework 4.8 is installed on the server (Download here if needed)
- You know your Winbooks username and password
- If using a network drive: You know the network path (more explanations below)
Understanding network drives vs. local drives
This is the most common source of installation problems. Please read carefully. What is the difference? Local Drive:- Looks like:
C:\\WinbooksorD:\\Data\\Winbooks - The files are stored directly on the server where you’re installing
- Looks like:
P:\\orZ:\\Shared\\Winbooks - The files are stored on a different server and accessed over the network
- Look at your Winbooks folder location
- If the drive letter is anything other than C: or D:, you’re probably using a network drive
- What you see:
P:\Winbooks - UNC path:
\\ServerName\SharedFolder\Winbooks
- Right-click on the network drive in Windows Explorer
- Look at the properties or hover over the drive
- You should see something like
\\server-name\folder-name - Write this down - you’ll need it later
Part 1: Gather required information
Before starting the installation, collect this information from your Winbooks account:Step 1: Find your accounting folder code
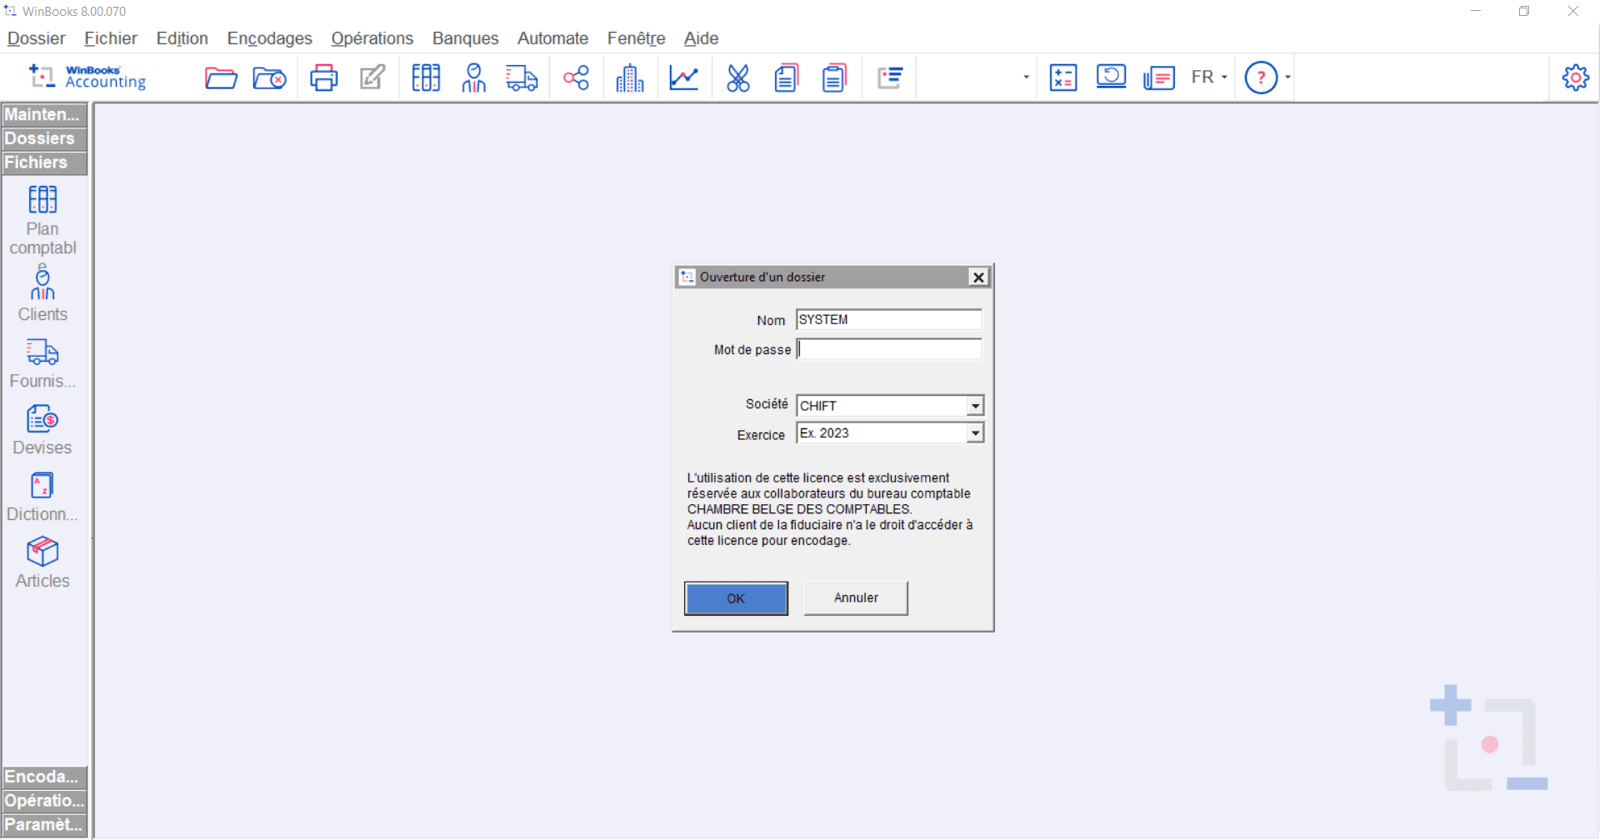
- Log into your Winbooks account
- Look for your folder code (usually visible in the interface)
- Write it down - Example:
DEMO01orCOMP2024
Step 2: Select your analytics plan
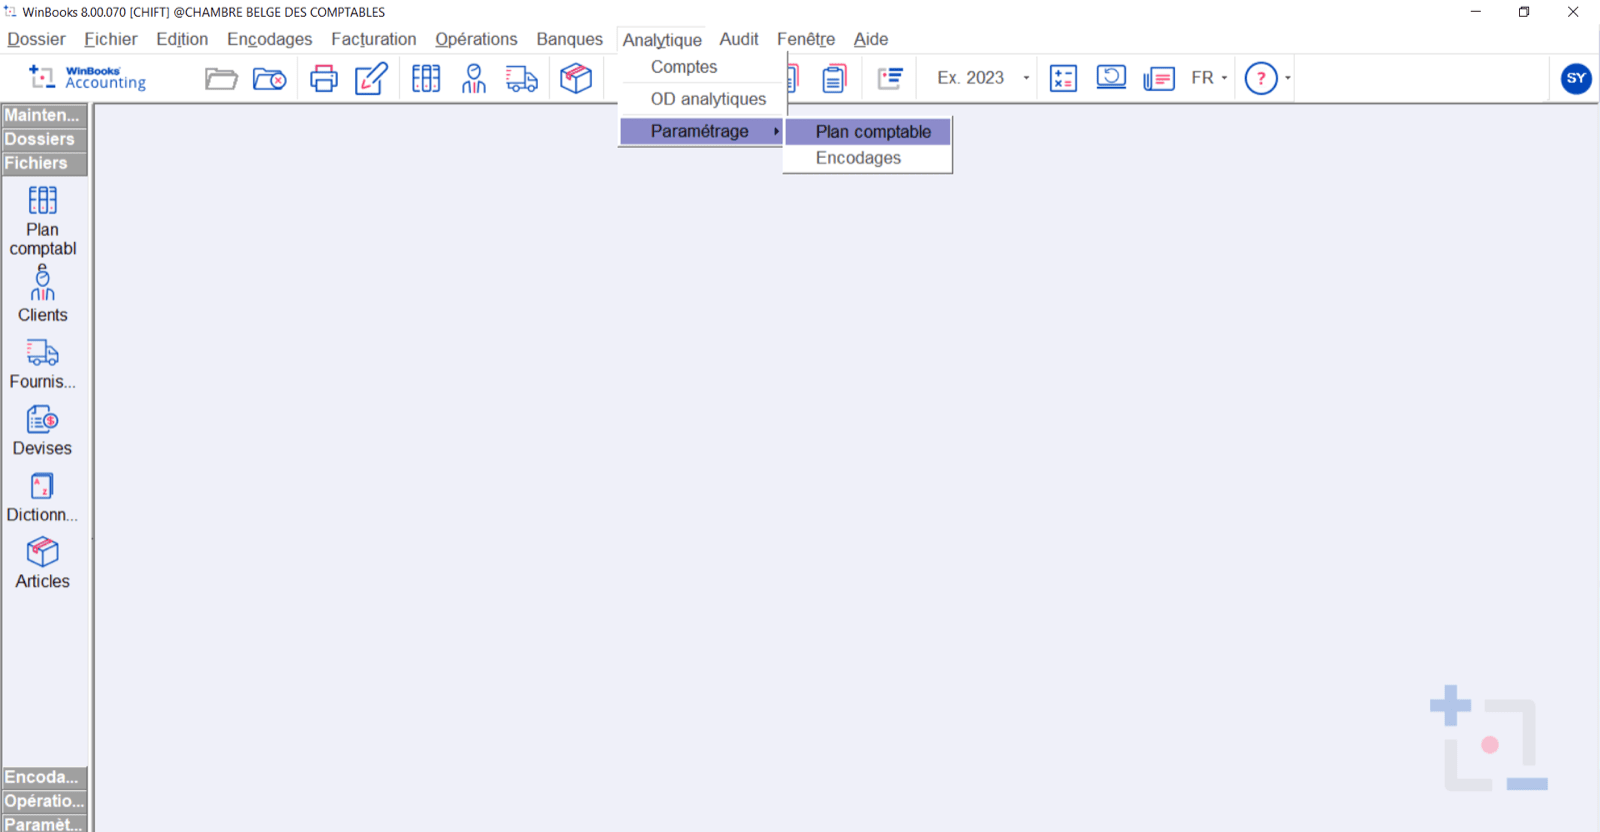
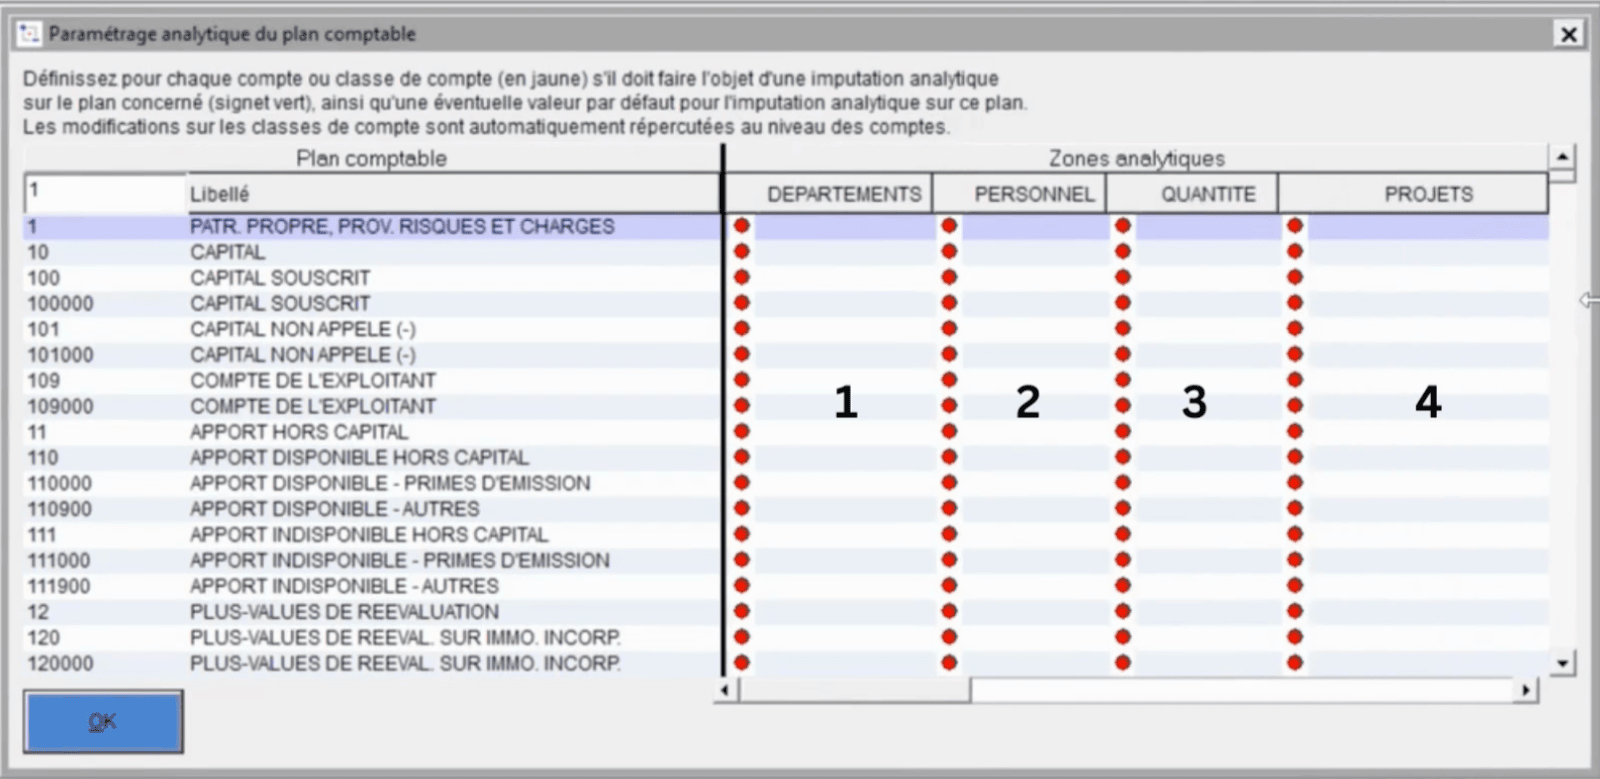
- In Winbooks, go to: Analytics tab → Parameters → Accounting Plan
- Note which analytics plan you want to use by default
- Write down the number that matches with the accounting plan that you want to use in the connection
Step 3: Find your Winbooks installation path
This is where your Winbooks software files are stored.- Open Windows Explorer on the server
- Search for the file:
Winbooks.ini - Once found, copy the full path to the folder containing this file
- Local drive:
C:\Winbooks - Network drive UNC path:
\\ServerName\Winbooks
- If your path starts with a letter like
P:\orZ:\, you MUST convert it to a UNC path - If you’re not sure, use the UNC path format to be safe
- Your folder code
- Your analytic plan
- The full path to Winbooks (UNC format if on network)
Part 2: Create the connection
Step 1: Name your connection
- Go to the connector setup page
-
Enter a descriptive name for this connection
- Example: “Main Office Winbooks” or “Company Accounting”
Step 2: Enter configuration details
- Analytics Plan: Select the plan you noted earlier
-
Winbooks Path: Enter the full path you found in Part 1, Step 3
- ✅ Correct:
C:\Winbooksor\\ServerName\Winbooks - ❌ Wrong:
P:\Winbooks(if P: is a network drive)
- ✅ Correct:
Step 3: Download the connector
- Click the Download button
- A ZIP file will download
-
Important: Transfer this ZIP file to the server where Winbooks is installed
- If you’re already on that server, proceed to Step 4
- If not, copy the file using Remote Desktop, network share, or USB drive before going to Step 4
Step 4: Enter your folder code
- Enter the accounting folder code you noted in Part 1, Step 1
- Double-check it matches exactly (case-sensitive)
Step 5: Submit
Click Submit to complete the connection setup. ✅ Checkpoint: Connection created. ZIP file downloaded and on the Winbooks server.Part 3: Install the Windows service
⚠ This must be done ON THE SERVER where Winbooks is installed, not on your local computer ⚠ Do not start Part 3 if you have not performed all steps described in Part 2 Here is a short video showing every action from step 1 to step 3:Step 1: Extract the ZIP file
- Locate the ZIP file you downloaded
- Right-click → Extract All
- Choose a location on the server (Desktop is fine for now)
Step 2: Run the installer
- Open the extracted folder
- Find the file:
WinbooksServiceSetup.exe - Right-click on it → Run as Administrator
- Follow the installation wizard
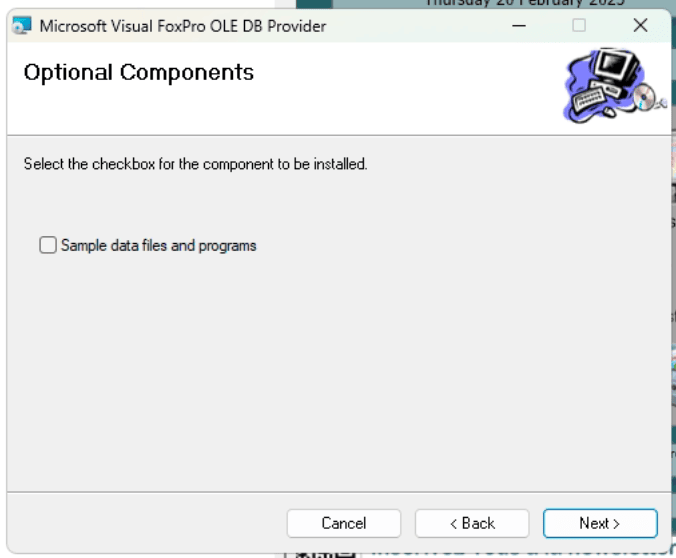
Step 3: Install VFPOLEDB (critical!)
The installer will automatically launch VFPOLEDB setup. This is required for the service to work. ⚠ IMPORTANT - Follow these settings exactly:- Do not check “Sample data files and programs” (DO NOT install sample data)
-
Select “Everyone” (NOT “Just me” selected by default)
- This is critical - the service runs as a system user and needs access for everyone
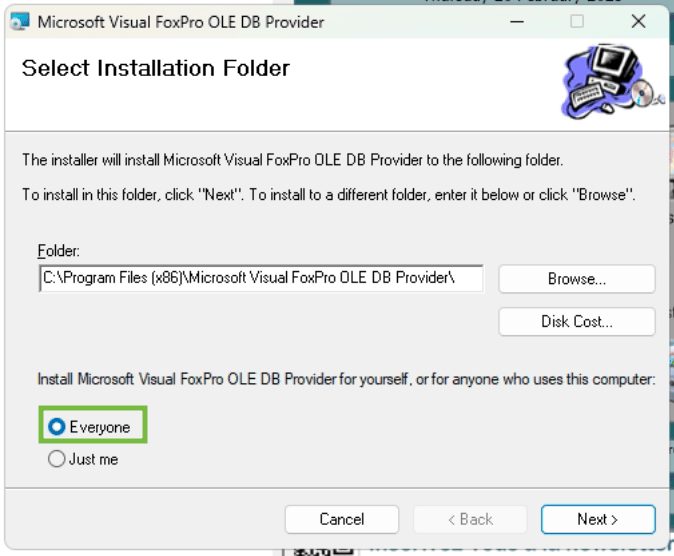
- Click Install
- Wait for completion
- VFPOLEDB installed
- “Sample data” was NOT checked
- “Everyone” option WAS selected
Step 4: Verify service installation
- Press
Windows Key + R - Type:
services.mscand press Enter - Look for WinbooksService in the list
- It should show “Status: Running”
- Right-click → Start
- If it fails to start, proceed to Part 4 (Troubleshooting)
Part 4: Configure for network drives (if applicable)
Skip this section if Winbooks is installed on a local drive (C:\ or D:) If your Winbooks files are on a network drive, you need to complete these additional steps:Step 1: Update settings file
- Navigate to:
C:\Program Files (x86)\WinbooksService\ - Find and open:
settings.json(use Notepad) - Look for these lines:
"toReplace": null, "replaceWith": null
- Update them with your network drive information:
P:\ and the UNC path is \\ServerName\WinbooksData, change to:
json
"toReplace": "P:\\", "replaceWith": "\\\\ServerName\\WinbooksData"
⚠ Note the double backslashes: In JSON files, each \\ must be typed as \\\\
It is VERY important to make sure those backslashes are doubled
Then save the file to make sure those changes are applied by the service.
Step 2: Configure service user account
Why this matters: The service runs under a Windows user account. That account needs permission to access both Winbooks and the network drive.-
Press
Windows Key + R -
Type:
services.mscand press Enter - Find WinbooksService
- Right-click → Properties
- Go to the “Log On” tab
- Select “This account”
-
Click Browse and select a user account that has:
- Access to the Winbooks folder
- Access to the network drive
- Ideally, this should be a service account or administrator account
- Enter the password for this account
- Click OK
Step 3: Restart the service
- Still in services.msc, find WinbooksService
- Right-click → Restart
- Verify it starts successfully (Status: Running)
- settings.json updated with correct paths (if applicable)
- Service account configured with network access
- Service restarted successfully
Part 5: Test the connection
- Go back to the connector web interface
- Look for your connection status
- You should see a green indicator showing the connection is active
Troubleshooting common issues
The service creates detailed logs that can help identify problems:-
Navigate to:
C:\Program Files (x86)\WinbooksService\Log\- The name of this folder in your C drive can slightly differ based on your server, on the version of windows you are using, on the language configured on your computer, …
-
Open
log.htmlin your web browser - Scroll to the bottom (most recent entries)
- Look for error messages in red
- The service hasn’t processed any requests yet
- Try triggering a sync from the web interface
- Make sure that the user running the service has the permissions to write in the folder you just navigated to
- Wait a few minutes and check again
Issue: “The given company does not exist” What this means: The service cannot find your accounting folder. Solutions to try (in order):
Solution 1: Verify the path
- Check the path you entered in the connection form
- Navigate to that path in Windows Explorer
- Confirm the
Winbooks.inifile exists there
- You may have entered a local path (like
P:\) instead of a UNC path - Go back to the connection form and update to the UNC path
- Example: Change
P:\Winbooksto\\ServerName\SharedFolder\Winbooks
Solution 2: Check Winbooks.ini file
- Open
Winbooks.iniin Notepad - Look for a line starting with
UsersPath= - Check that this path exists and is accessible
- This often happens when the connector is installed on a proxy server instead of the main Winbooks server
- The connector MUST be installed on the same server where Winbooks is running
Solution 3: Verify Users.dbf file
- Navigate to the folder specified in
UsersPath - Check for a file called
Users.dbf - This file contains your list of accounting folders
- The service creates a temporary decrypted version at:
C:\Program Files (x86)\WinbooksService\tmp\ - This file only appears when the service is running and processing a request
- Contact support if you need help verifying your folder code is in this file
Solution 4: Check user permissions
The Windows user account running the service must have:- Read access to all Winbooks folders
- Read access to any network drives
- Write access to the service log folder
- Check which user is running the service (services.msc → Properties → Log On tab)
- Log in as that user (or have IT verify)
- Try to access the Winbooks folders manually
- If access is denied, update the service account (see Part 4, Step 2)
-
Navigate to:
C:\\Program Files (x86)\\WinbooksService\\ -
Find:
VFPOLEDBSetup.exe -
First, uninstall the existing version:
- Right-click → Run as Administrator
- Select Uninstall
- Complete the uninstallation
-
Then reinstall:
- Run
VFPOLEDBSetup.exeagain as Administrator - Uncheck “Sample data files and programs”
- Select “Everyone” (critical!)
- Complete installation
- Run
-
Restart the WinbooksService:
- services.msc → Right-click WinbooksService → Restart
- Open Event Viewer (search “Event Viewer” in Windows)
- Go to: Windows Logs → Application
- Look for errors from “WinbooksService”
- The error message will indicate what’s wrong
- Missing .NET Framework 4.8
- VFPOLEDB not installed correctly
- User account doesn’t have necessary permissions
- Network path not accessible
Quick reference: Installation summary
- ✅ Verify all prerequisites (Part 1)
- ✅ Gather folder code, analytics plan, and Winbooks path
- ✅ Create connection in web interface
- ✅ Download ZIP file to Winbooks server
- ✅ Install service (Run as Administrator)
- ✅ Install VFPOLEDB (Uncheck samples, select Everyone)
- ✅ If using network drives: Update settings.json and service account
- ✅ Restart service
- ✅ Test connection
Appendix: Understanding UNC paths
What is a UNC path? UNC stands for “Universal Naming Convention” - it’s the standard way to specify network locations in Windows. Format:\\ServerName\ShareName\FolderPath
Example conversions:
Why UNC paths matter:
- Windows services (like WinbooksService) run in a different context than your user account
- They don’t automatically see mapped drives (P:, Z:, etc.)
- They need the full network address (UNC path) to find network files
- Open Windows Explorer
- Right-click on the network drive
- Select “Properties”
- Look for “Location” or “Target” - this shows the UNC path