

Overview Legend 🧭
Overview Legend 🧭
Introduction
NetSuite is a cloud business suite covering accounting, ERP, CRM and ecommerce. It is often used by companies running several subsidiaries, and Chift supports OneWorld multi-subsidiary accounts.Activate NetSuite
Partner keys
You can use Chift’s app, or ask Chift for a dedicated one under your own brand.Use Chift's app
Ask your Chift point of contact for the Client ID and Client Secret, and enter them once at the connector level. They work across all your end users’ NetSuite accounts.
Use your own app
Chift builds a dedicated bundle carrying your own OAuth credentials, so end users see your brand. Ask your Chift point of contact to set it up.
1
Request the credentials
Ask your Chift point of contact for the Client ID and Client Secret.
Activate NetSuite in your Chift account
In Connectors › NetSuite, enter your Client ID and Client Secret. There is nothing to configure per end user.
Connector settings
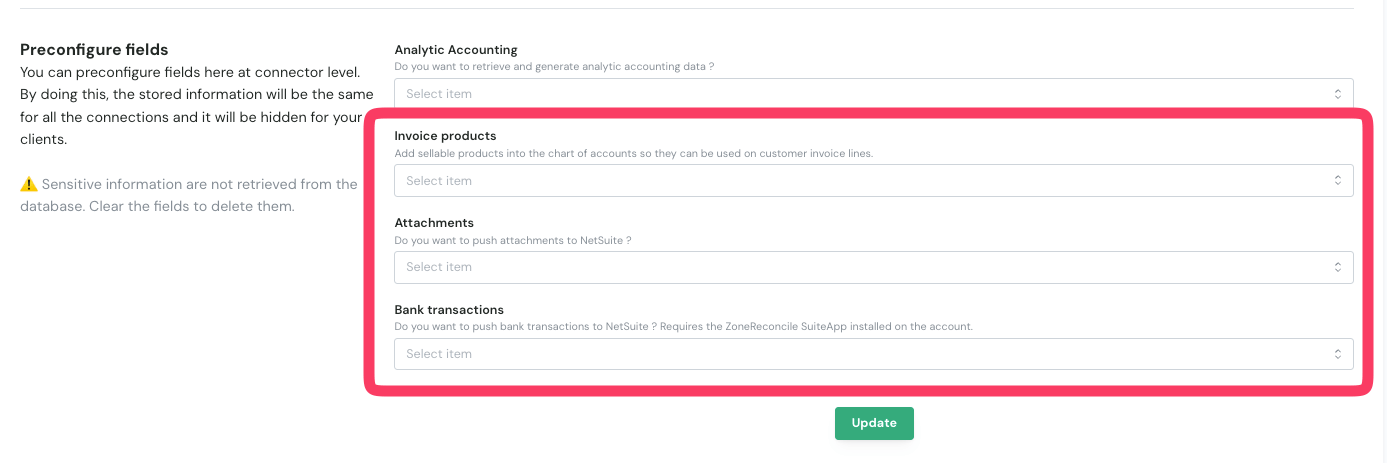
- Not active (default): only supplier invoices are supported.
- Active: customer invoices are supported too.
- Not active (default): attachments are not pushed.
- Active: attachments can be pushed.
- Not active (default): bank transactions are not pushed.
- Active: bank transactions can be pushed.
- ZoneReconcile installed on the NetSuite account: statements are written to ZoneReconcile, the bank reconciliation SuiteApp from Zone & Co.
- ZoneReconcile not installed: statements go through NetSuite’s own bank data import and show up in Match Bank Data.
Leave a field inactive if you don’t use it. With Attachments or Bank transactions active, Chift checks at connection time that the integration bundle is installed. With Bank transactions active and no ZoneReconcile, it also checks the NetSuite bank data import setup. Enable it only once your end users can do that setup.
Test NetSuite
Vendor fees
Software editor (you)
Paid sandbox — about 10–20% of the annual NetSuite subscription, and only sold to NetSuite customers. Software vendors can also get development accounts through NetSuite’s SuiteCloud Developer Network (SDN).
End user
No fees. For bank transactions, ZoneReconcile is a paid SuiteApp from Zone & Co, used only if they already have it. Without it, NetSuite’s own bank data import uses the Bank Statement Parsers SuiteApp from Oracle NetSuite, which is free.
Connect NetSuite
NetSuite setup guide for end users
The full step-by-step, with screenshots.
- an Administrator role, or a role with the SuiteApp Marketplace permission, to install the bundle, whose Bundle ID is
703899 - these NetSuite features enabled: client and server SuiteScript, OAuth 2.0, REST Web Services and Custom Records. Server SuiteScript must be on before the bundle is installed
- install the Chift Integration Bundle
- assign the bundled role to the user who connects
- authorize, entering only their NetSuite Account ID
- choose which subsidiaries to connect, and the folder for attachments if attachments are enabled
- choose the Financial institution for bank statements, if bank transactions are enabled and they don’t use ZoneReconcile
Bank transactions setup
If you push bank transactions, your end users prepare NetSuite in one of two ways. Which one depends only on whether ZoneReconcile is installed on their account.With ZoneReconcile
- Full access, on the role they connect with, to ZoneReconcile’s bank statement records, and to Perform Search, granted before connecting.
- A Bank Account Configuration in ZoneReconcile for each bank account you push to.
- Matching and processing preferences set in ZoneReconcile.
With NetSuite's bank data import
- The integration bundle in version 1.4 or later.
- The Bank Statement Parsers SuiteApp from Oracle NetSuite, bundle ID
293699, and its plug-ins enabled. - A Financial Institution with one format profile: Chift Bank Statement Import as connectivity method, CSV Plugin Implementation as transaction parser.
- Each bank account enabled for Match Bank Data and Reconcile Account Statement.
- That financial institution chosen after connecting.
What the Chift Integration Bundle installs
The bundle is a SuiteBundle installed in one click. It does not change how NetSuite behaves; it packages what Chift needs to read and write data.- A RESTlet script and deployment, for attachments and bank transactions, which NetSuite’s native REST API cannot handle.
- Two custom roles: Chift Integration, for read and write, and Chift Integration (Read Only).
- The OAuth 2.0 integration record, installed enabled, with Chift’s OAuth app embedded.
- A Chift Attachments File Cabinet folder, the default target for attachments. It can be changed in the post-connection settings.
- The Chift Bank Statement Import plug-in and a Chift Bank Statements File Cabinet folder, for bank statements without ZoneReconcile. They come with version 1.4 of the bundle.
Roles and permissions
The connection runs with the role the end user authorizes with, so that role decides how much access Chift has:- Chift Integration — full read and write. Use it when Chift creates data: invoices, journal entries, bank transactions, attachments.
- Chift Integration (Read Only) — read-only access.
- Their own role — an existing or custom NetSuite role scoped to the features they use. It must include the Manage own OAuth 2.0 Client Credentials certificates permission, otherwise the connection fails.
Compatibility and requirements
- Attachments and the standard accounting endpoints all work over the single OAuth 2.0 token.
- OneWorld accounts, with several subsidiaries: the bundled role has Subsidiary Restrictions set to All, so Chift sees every subsidiary. Restricting it to User Subsidiary, or disabling Include Sub-Subsidiaries, hides child subsidiaries.
- Custom segments used as analytic dimensions: enable the SuiteCloud Custom Segments feature and grant the matching permission on the role, otherwise analytic dimensions come back empty.
Rate limits
NetSuite applies a concurrency cap: it limits how many web services and RESTlet requests can run at the same time, per NetSuite account. The cap covers every integration on the account, not only Chift, and an administrator can set aside part of it for one integration.
Each SuiteCloud Plus license adds 10 concurrent requests, except on development and partner accounts. Legacy service tiers range from 2 to 20.
When the limit is exceeded, NetSuite rejects the request:
Chift automatically manages these limits to optimize performance and prevent interruptions. However, once the API rate limit is reached, Chift cannot bypass these limitations.
See NetSuite’s concurrency governance documentation.
Limitations & specificities
Journal entries
Journal entries
- Journal entries can only use general accounts.
- Manual journal entries can only be created in the general journal, whose
journal_idis5. - Transaction dates must fall between 30 years in the past and 10 years in the future.
Payments & matching
Payments & matching
To use a payment method on an invoice payment, the payment method must be linked to a bank account in NetSuite. Invoice payments are created with
POST invoices/payments.Set this on each payment method you plan to use. Otherwise, the request fails.Bank feed
Bank feed
Bank transactions are pushed with
POST bank-transactions, one bank statement per call. Where they land depends on the end user’s account, and cannot be changed:- ZoneReconcile installed: Chift writes the statement to ZoneReconcile.
- ZoneReconcile not installed: Chift uses NetSuite’s own bank data import.
- The bank account is found by its NetSuite internal ID, then by its account number. It must be a bank or credit card account.
currencymust be the bank account’s currency.- Every line gets the statement’s
bank_statement_date. A period with several dates needs one call per date. - Chift only pushes the lines. Matching them to invoices and payments happens in NetSuite or ZoneReconcile.
With ZoneReconcile
- The role the end user connects with needs Full access to ZoneReconcile’s bank record types,
customrecord_bank_statementandcustomrecord_ba_transactions, and to Lists › Perform Search. - The statement is linked to the account’s ZoneReconcile Bank Account Configuration when there is one. ZoneReconcile only matches statements linked to it.
- Nothing is matched on its own. For each statement, the end user opens it in ZoneReconcile, clicks Run Match, then Edit and Save. Run Match alone posts nothing.
general_ledger_accountis optional. When sent, it must exist in the chart of accounts. With an integration bundle older than 1.2, it is required on every line.- A statement whose
external_bank_statement_idalready exists is rejected. fee_amount,counterpartandpdfare ignored.- A bank account in a foreign currency only pays invoices in that currency. Paying a base-currency invoice from a foreign-currency bank account needs a transit account, see Zone & Co’s Foreign Currencies.
With NetSuite’s bank data import
- Chift writes the statement as a CSV file in the Chift Bank Statements File Cabinet folder. NetSuite then imports it through the format profile, and the lines show up in Match Bank Data.
- Not supported:
opening_balance,pdf,general_ledger_account, and non-zerotax_amountorfee_amount. A request that sends one is rejected. external_transaction_idmust be unique within a statement. The same statement cannot be pushed twice.- The bank account needs an account number with no underscore (
_), used by no other active account. - The ISO Code of the bank account’s currency in NetSuite must be the ISO 4217 code, for example
EUR. - The date format of the format profile’s parser must use month, day and year.
- The bank account must be enabled for Match Bank Data and Reconcile Account Statement. The end user does this in NetSuite, otherwise the push fails.
- On the first push to a bank account, Chift adds it to the format profile’s Account Linking. If that account number is already linked to another account, the push fails.
- A pushed statement is in NetSuite, not yet imported: its lines show up in Match Bank Data after the next import. The first one shows up within minutes. Later ones come with the format profile’s import schedule, which the end user sets (daily by default, or hourly). They can run an import sooner with Update Imported Bank Data, at most once every 60 minutes per financial institution. See Updating Imported Bank Statement Files.
- The response echoes the request. It contains no NetSuite IDs.