> ## Documentation Index
> Fetch the complete documentation index at: https://docs.chift.eu/llms.txt
> Use this file to discover all available pages before exploring further.
# AFAS
# 🚨 VOORWAARDEN
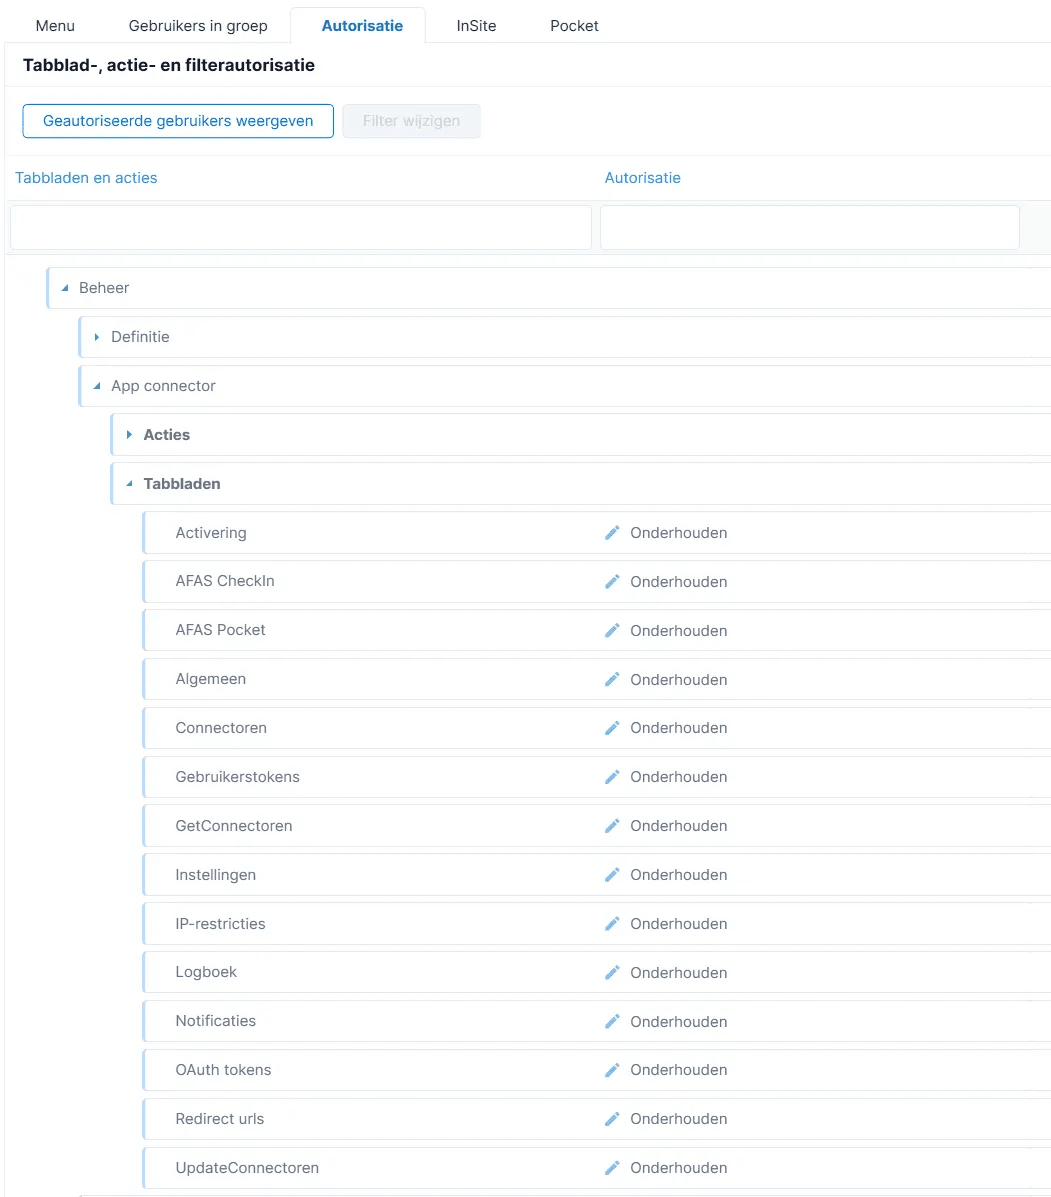
* Heb een AFAS-login met alle beheerdersrechten die in de bovenstaande screenshot staan vermeld.
 * Zorg ervoor dat het zip‑bestand op je computer is gedownload en uitgepakt.
[AFAS\_GetConnectors\_15122025.zip](/images/help/afas/afas-nl-2.zip)
# 💪 VOORBEREIDING
### Stap 1 : Een Chift App maken :
Ga naar [AFAS Online Login](https://idp.afasonline.com/Account/Login?) en log in met uw AFAS inloggegevens.
⚠️ **Belangrijk:** Gebruik een Citrix-sessie (niet Citrix in de browser). U kunt later de inloggegevens niet meer kopiëren. ⚠️
* Zorg ervoor dat het zip‑bestand op je computer is gedownload en uitgepakt.
[AFAS\_GetConnectors\_15122025.zip](/images/help/afas/afas-nl-2.zip)
# 💪 VOORBEREIDING
### Stap 1 : Een Chift App maken :
Ga naar [AFAS Online Login](https://idp.afasonline.com/Account/Login?) en log in met uw AFAS inloggegevens.
⚠️ **Belangrijk:** Gebruik een Citrix-sessie (niet Citrix in de browser). U kunt later de inloggegevens niet meer kopiëren. ⚠️
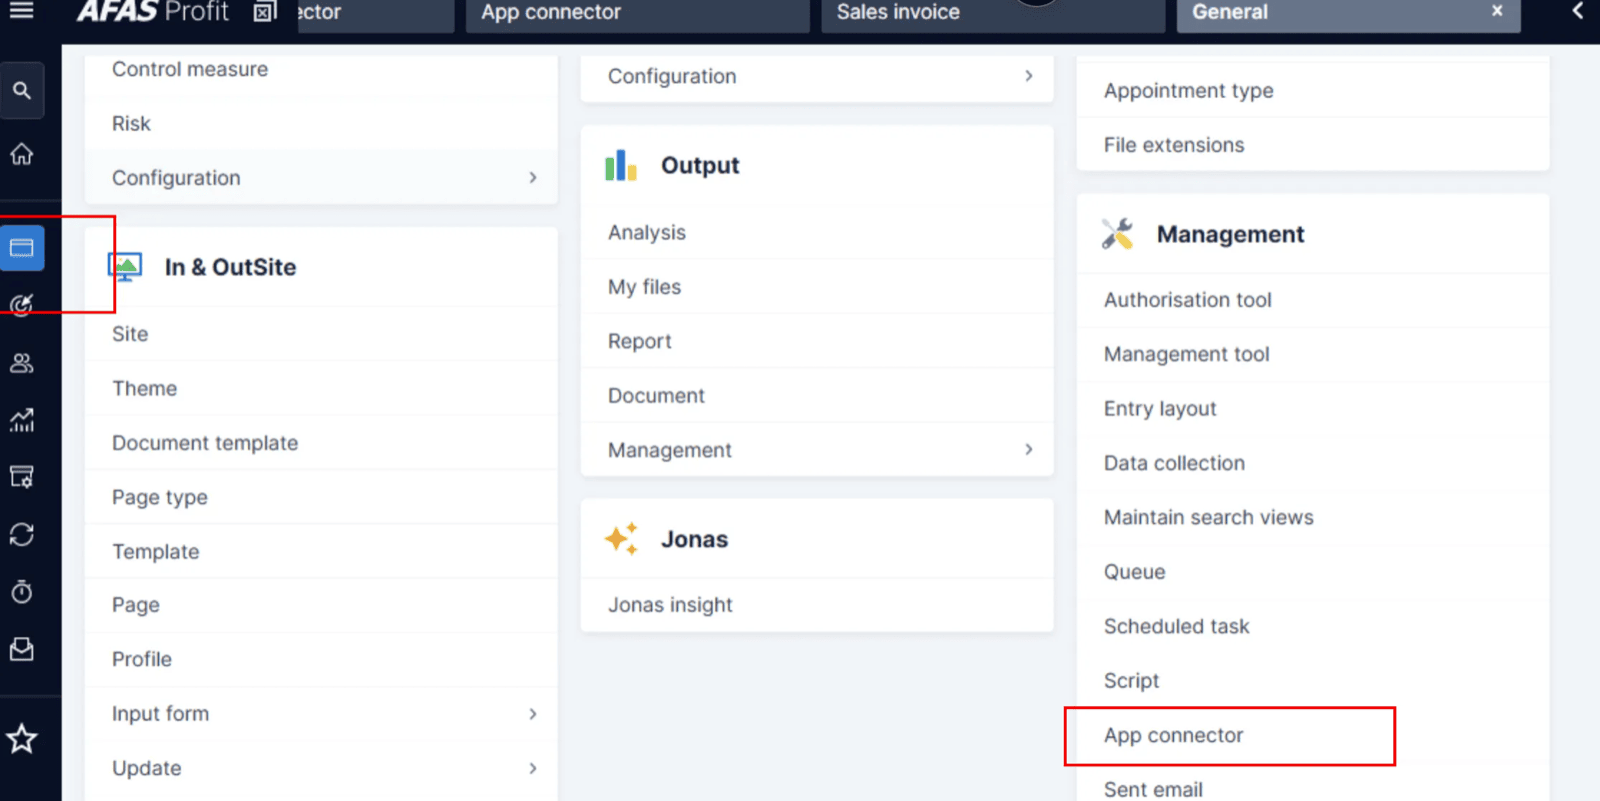 Navigeer naar de **General** pagina en open **App-connector**.
Maak een nieuwe App-connector aan.
Navigeer naar de **General** pagina en open **App-connector**.
Maak een nieuwe App-connector aan.
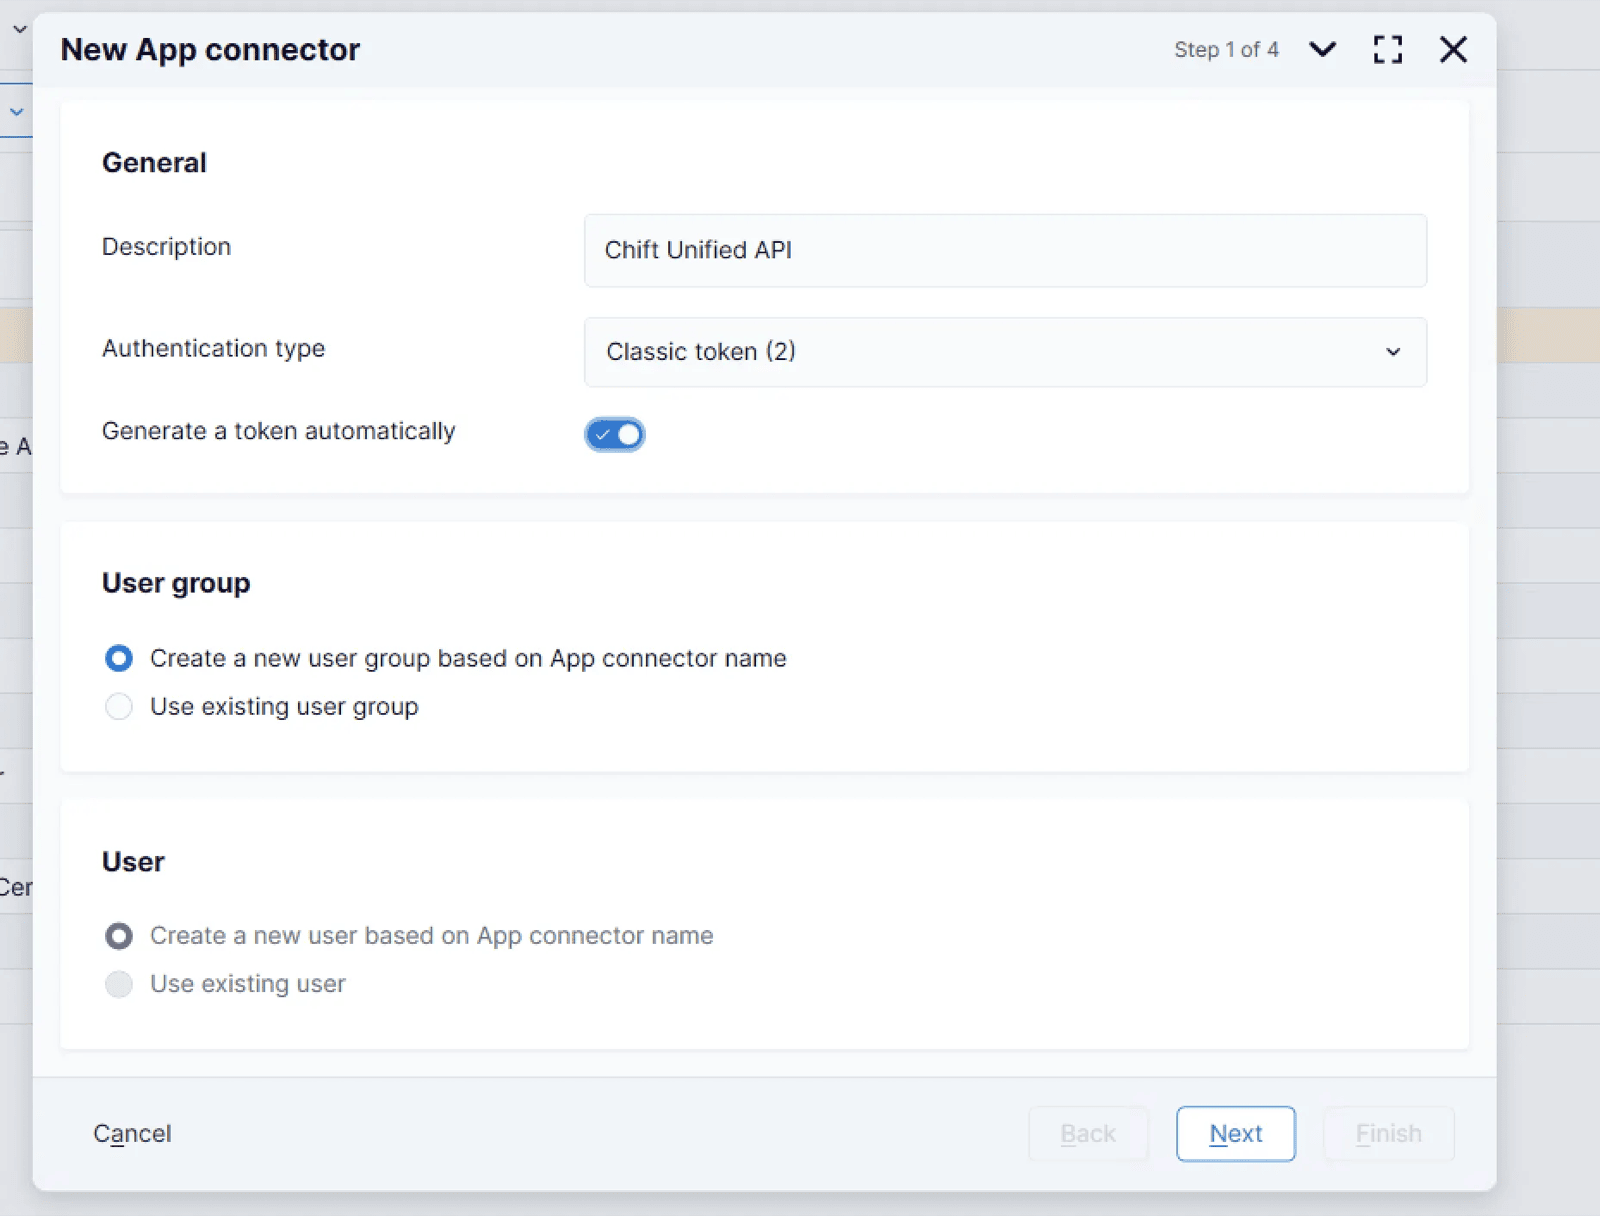
 Configureer de App-connector zoals weergegeven in de onderstaande screenshot:
 ### Stap 2: Voeg de Chift GetConnectors toe aan je App
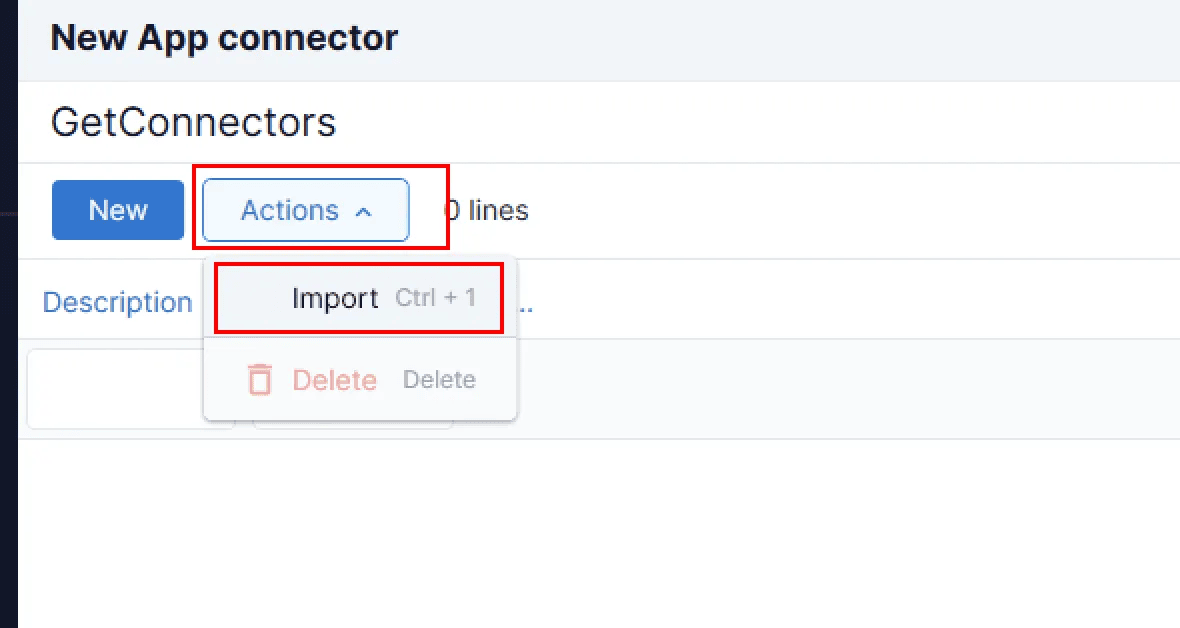
Gebruik de importfunctie om het onderstaande bestand toe te voegen:
[AFAS\_GetConnectors\_15122025.zip](/images/help/afas/afas-nl-6.zip)
(download het en importeer het zoals geïllustreerd in de screenshot hieronder )
### Stap 2: Voeg de Chift GetConnectors toe aan je App
Gebruik de importfunctie om het onderstaande bestand toe te voegen:
[AFAS\_GetConnectors\_15122025.zip](/images/help/afas/afas-nl-6.zip)
(download het en importeer het zoals geïllustreerd in de screenshot hieronder )
 1 - Sla het zip‑bestand lokaal op en pak het uit naar een map.
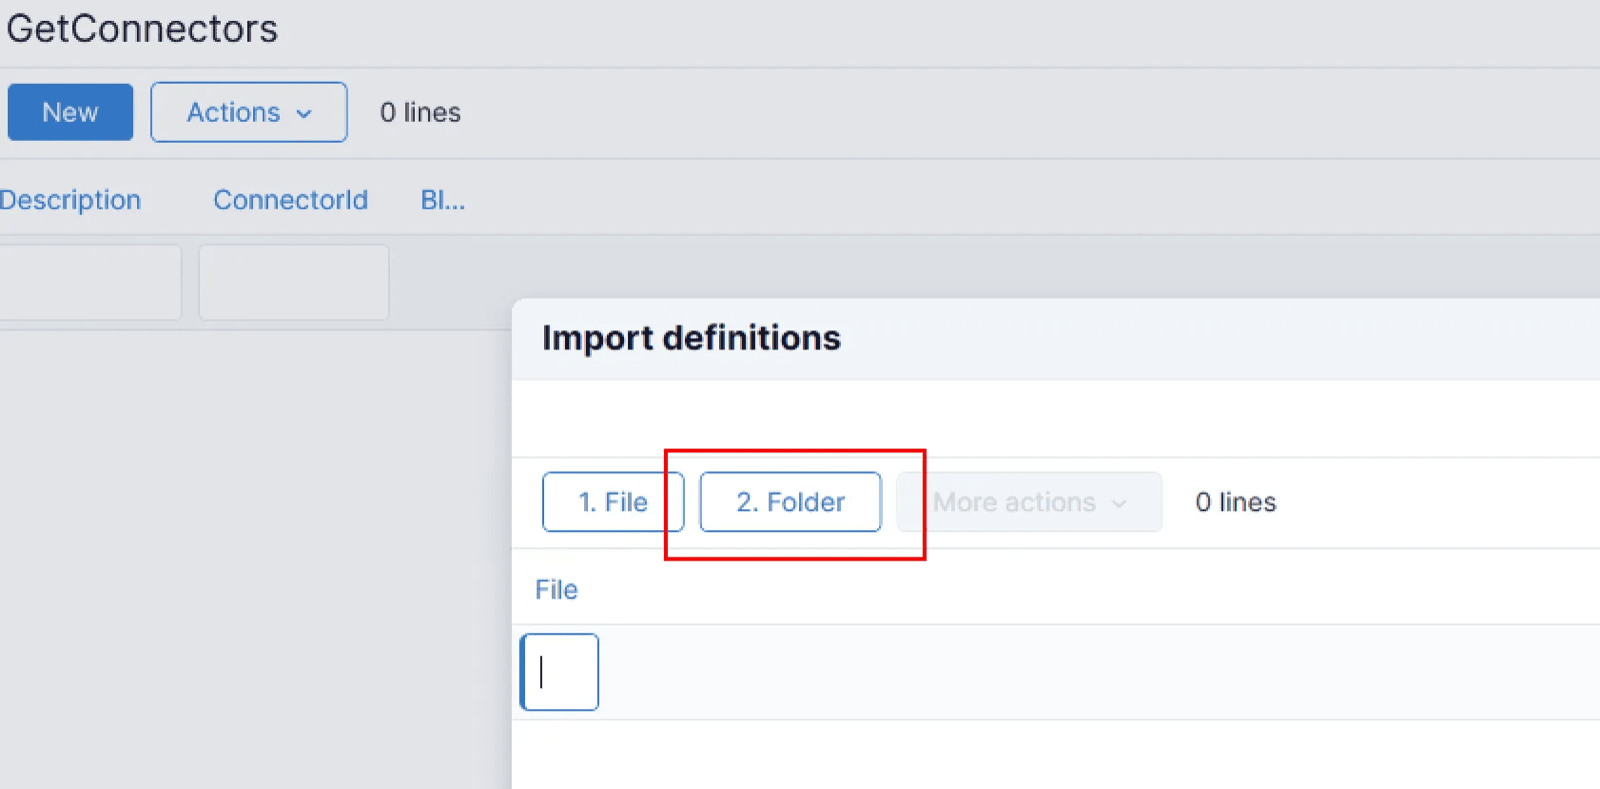 2- Selecteer deze map op uw computer en druk op **Voltooien**.
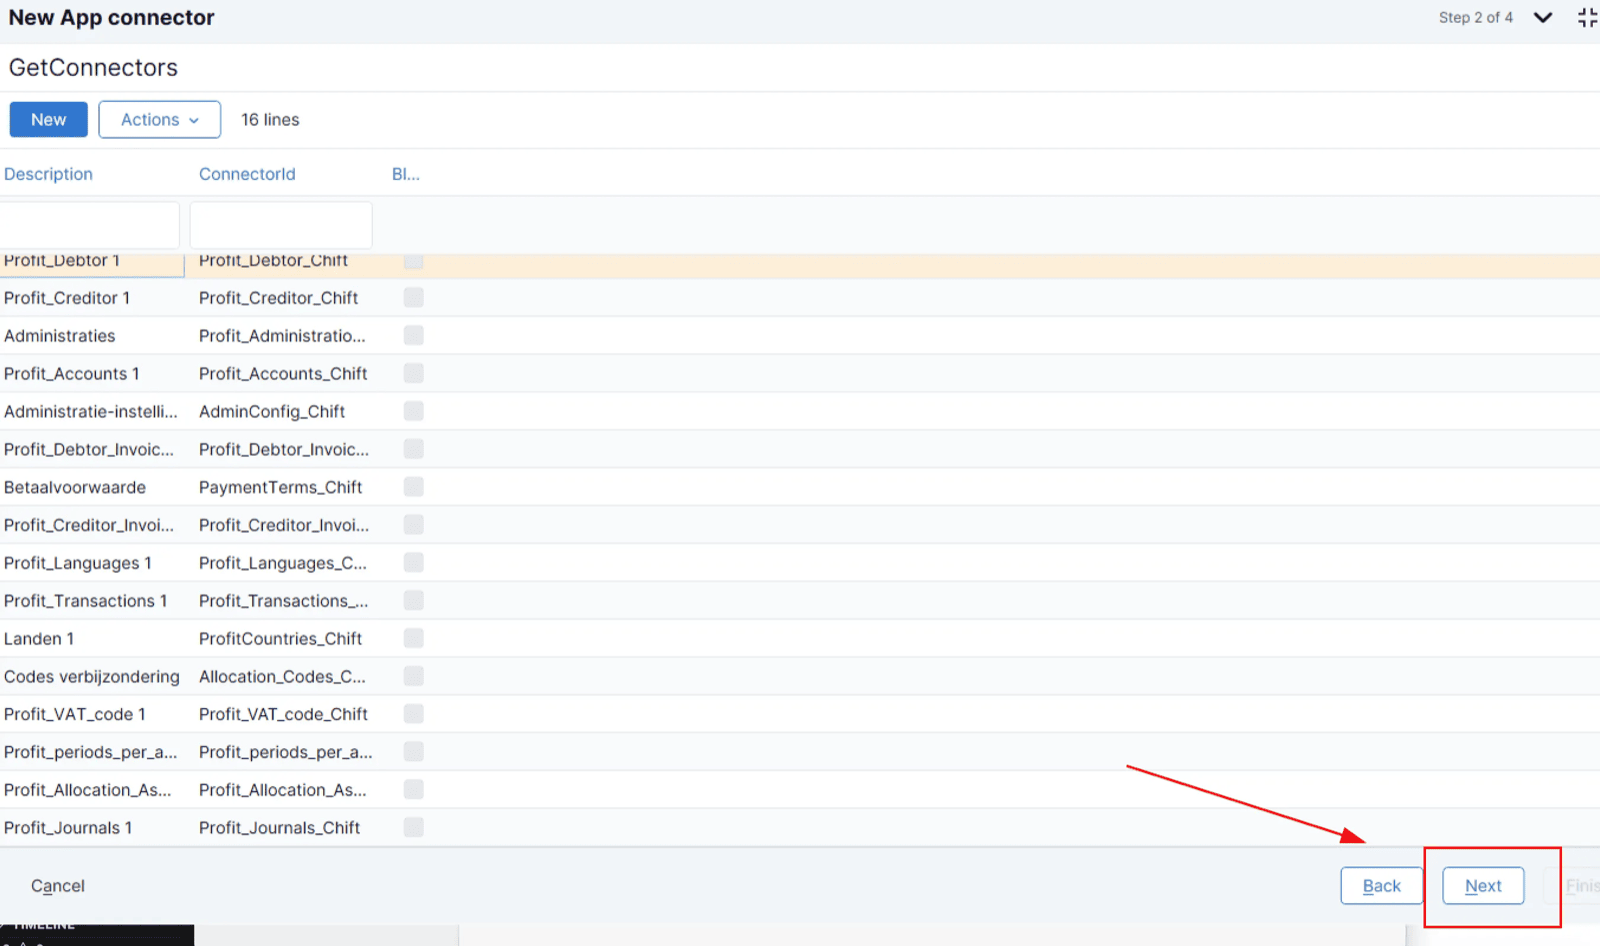
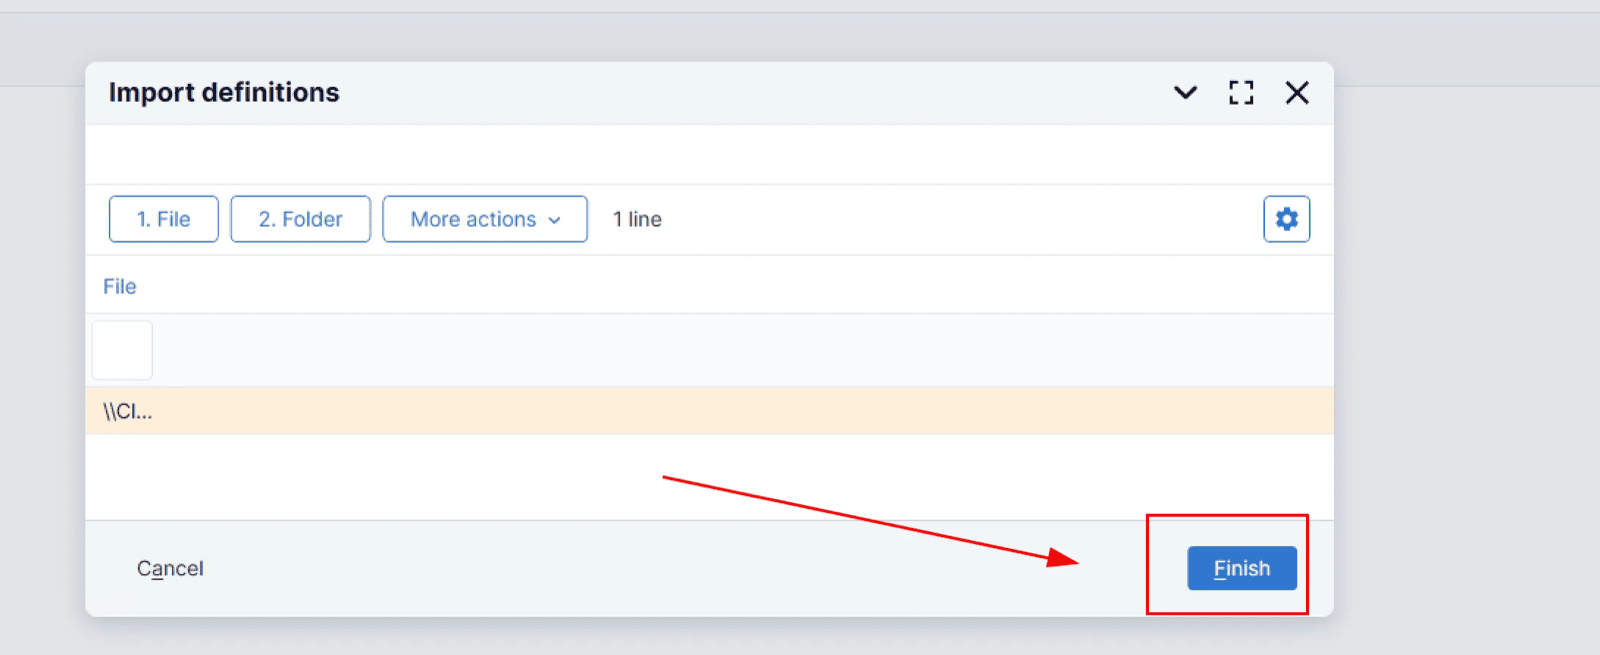 Na het accepteren van het waarschuwingsbericht, zal AFAS de GetConnectors importeren. Zodra dit klaar is, selecteert u **Volgende** :
 ### Stap 3: Voeg de UpdateConnectors toe
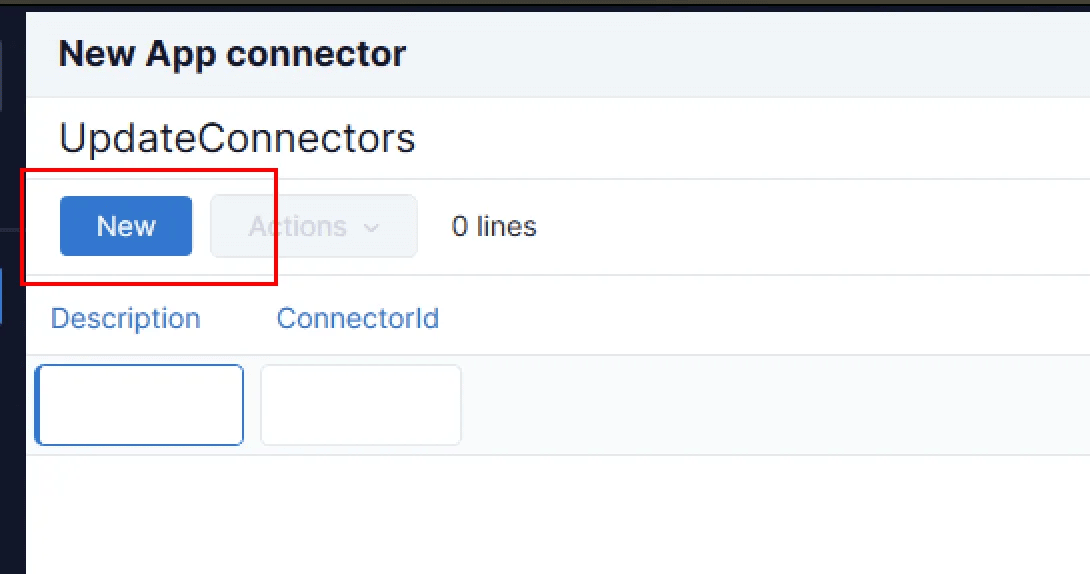 Gebruik de zoekbalk om de volgende UpdateConnectors te vinden en toe te voegen:
* Inkooprelatie organisatie - KnPurchaseRelationOrg
* Inkooprelatie persoon - KnPurchaseRealationPer
* Verkoopsrelatie organisatie - KnSalesRelationOrg
* Verkoopsrelatie persoon - KnSalesRelationPer
* Financiële mutaties - FiEntries
* Code verbijzondering - KnDimCode
Gebruik de zoekbalk om de volgende UpdateConnectors te vinden en toe te voegen:
* Inkooprelatie organisatie - KnPurchaseRelationOrg
* Inkooprelatie persoon - KnPurchaseRealationPer
* Verkoopsrelatie organisatie - KnSalesRelationOrg
* Verkoopsrelatie persoon - KnSalesRelationPer
* Financiële mutaties - FiEntries
* Code verbijzondering - KnDimCode
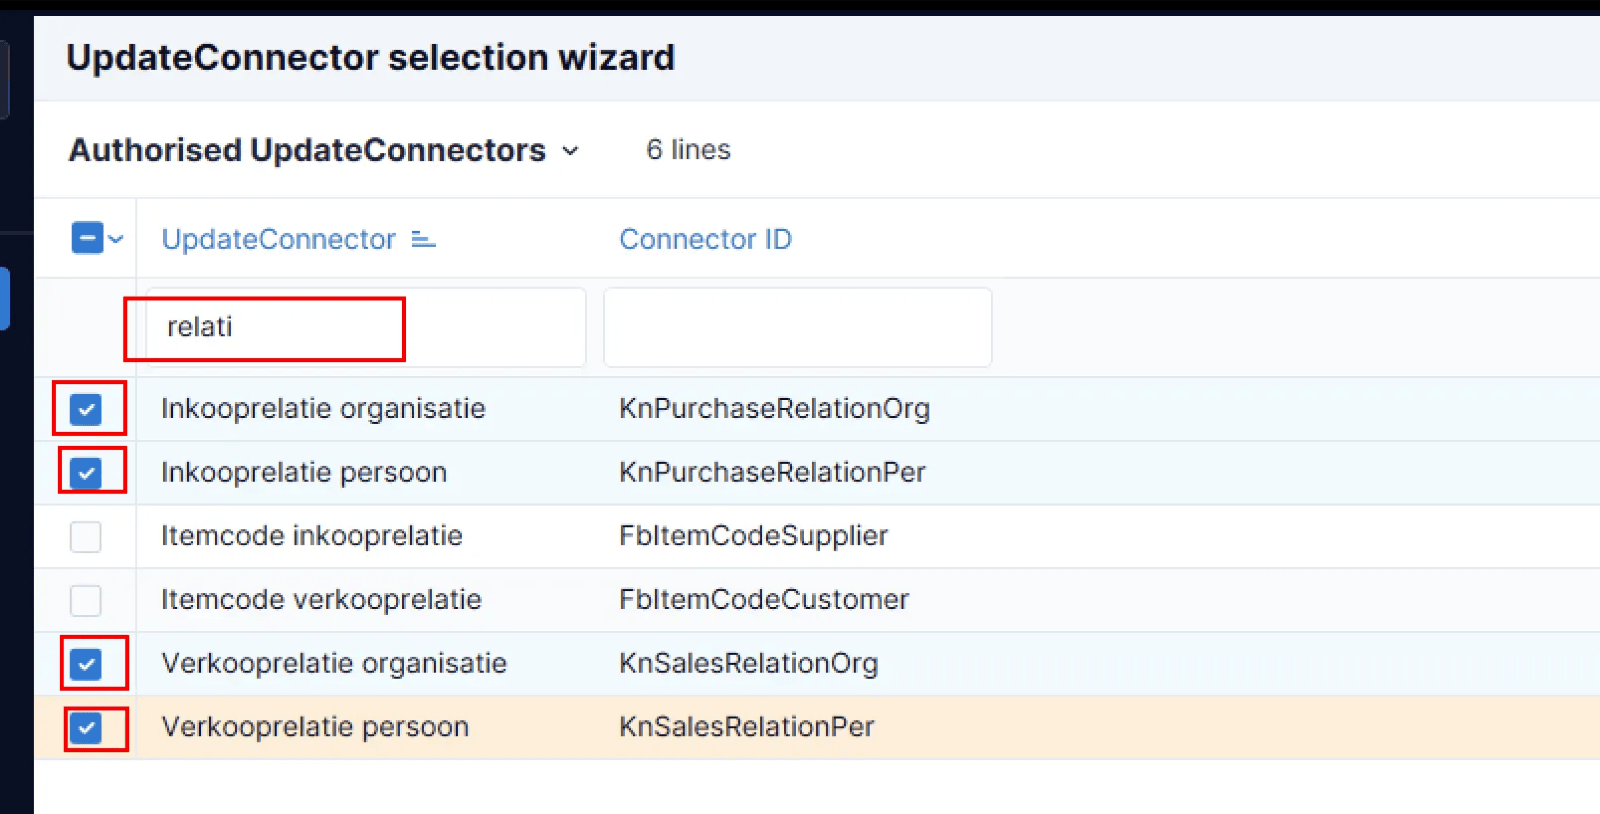 Vink de vakjes aan voor elke connector, druk op **Voltooien**, druk vervolgens op **Nieuw** om alle connectors te blijven toevoegen.
Zodra alle UpdateConnectors zijn toegevoegd, druk op **Volgende**.
Vink de vakjes aan voor elke connector, druk op **Voltooien**, druk vervolgens op **Nieuw** om alle connectors te blijven toevoegen.
Zodra alle UpdateConnectors zijn toegevoegd, druk op **Volgende**.
 Druk op “Voltooien”
⚠️ **Belangrijk:** Zorg ervoor dat je alle GetConnectors en UpdateConnectors selecteert die in de documentatie zijn gespecificeerd. Zelfs als een connector irrelevant lijkt voor jouw gebruiksgeval, zal de integratie niet werken tenzij alle connectors zijn geactiveerd. ⚠️
### Stap 4: Sla je API-token op
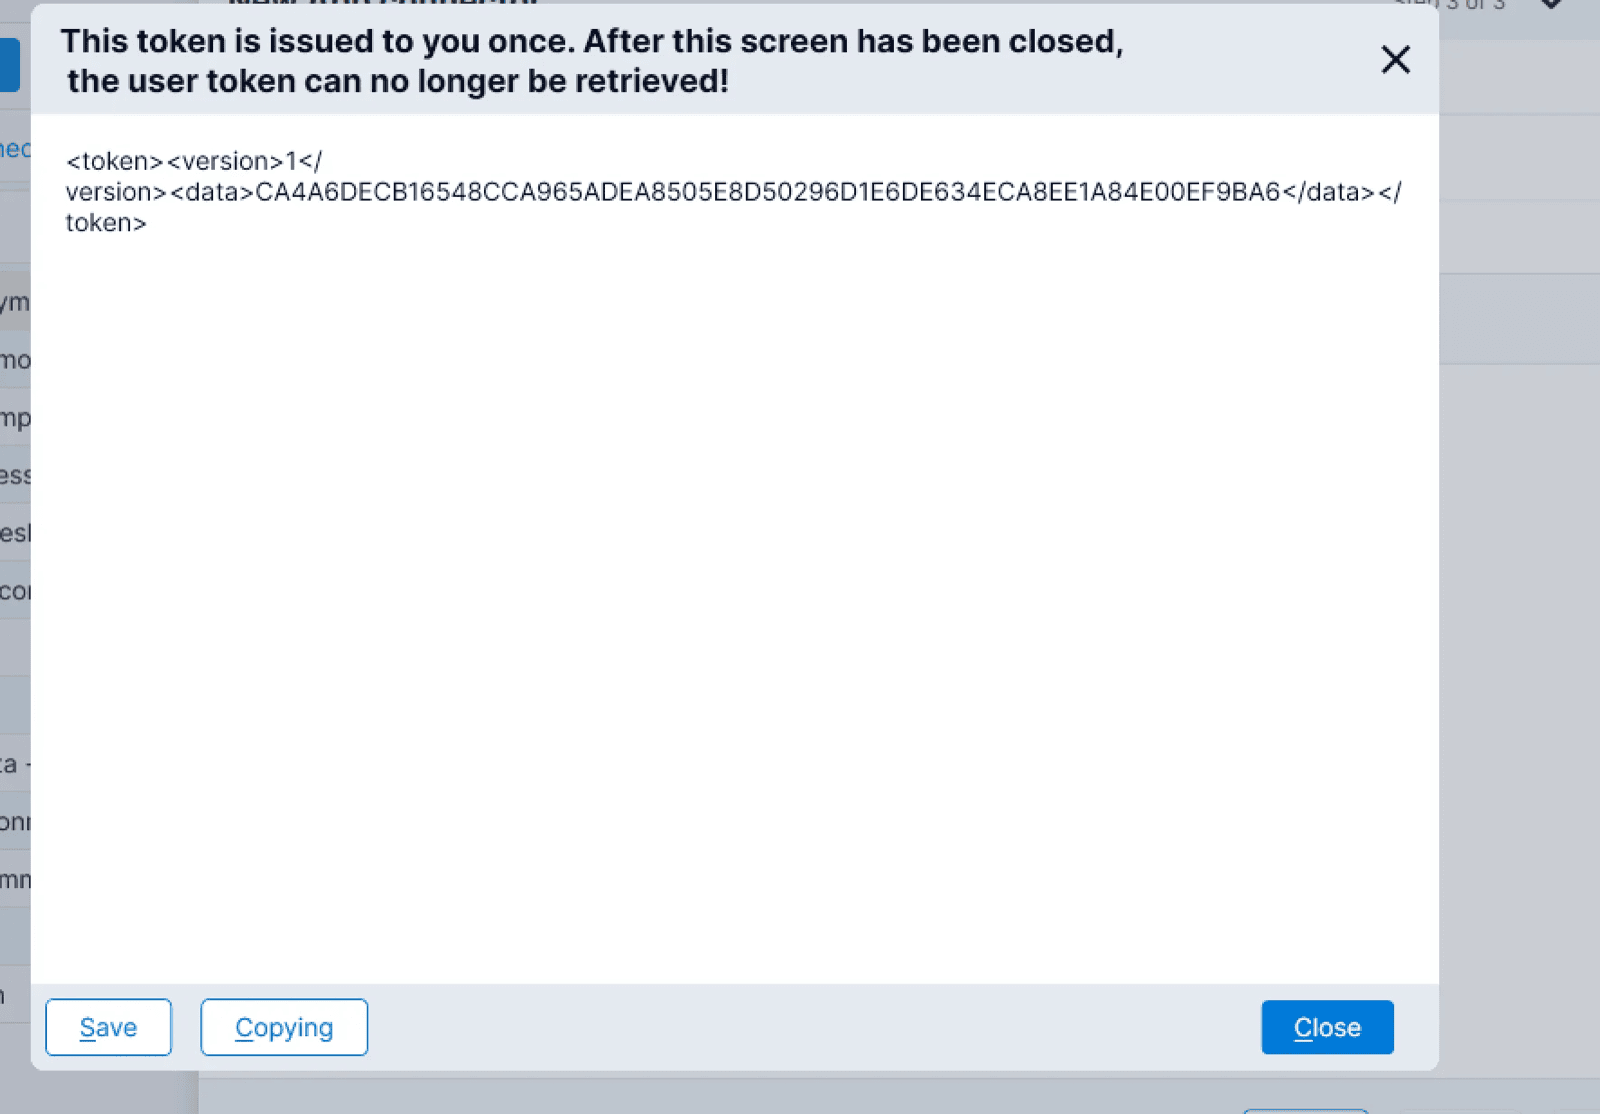
**AFAS zal de API-token weergeven nadat de connectorinstelling is voltooid.**
Bewaar deze veilig, aangezien deze nodig zal zijn om in te vullen tijdens de activering van de verbinding die in de volgende sectie wordt beschreven.
Druk op “Voltooien”
⚠️ **Belangrijk:** Zorg ervoor dat je alle GetConnectors en UpdateConnectors selecteert die in de documentatie zijn gespecificeerd. Zelfs als een connector irrelevant lijkt voor jouw gebruiksgeval, zal de integratie niet werken tenzij alle connectors zijn geactiveerd. ⚠️
### Stap 4: Sla je API-token op
**AFAS zal de API-token weergeven nadat de connectorinstelling is voltooid.**
Bewaar deze veilig, aangezien deze nodig zal zijn om in te vullen tijdens de activering van de verbinding die in de volgende sectie wordt beschreven.
 # :high\_voltage:️ VERBINDING
## ❶ VERBINDEN
# :high\_voltage:️ VERBINDING
## ❶ VERBINDEN
 ### 1) Bedrijfs-ID :
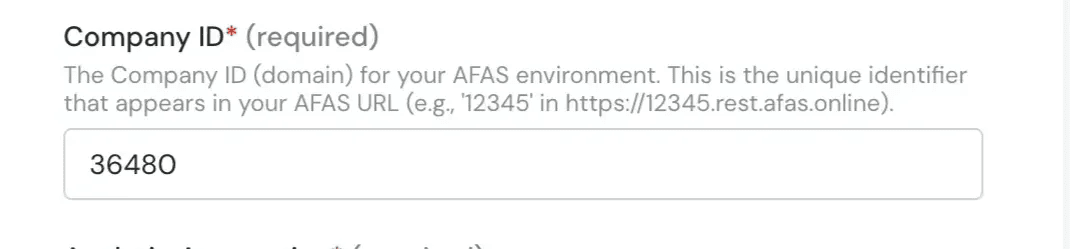 ***a) In de url :***
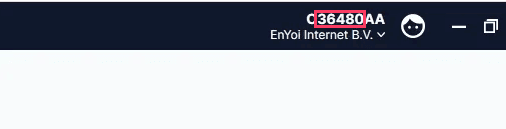
 **b) In de rechterbovenhoek** van je scherm.
⚠️ **Opmerking:** Het organisatienummer bestaat uit **alleen cijfers**. Bijvoorbeeld, in dit geval is het `36480`, **niet** `O36480AA`.
**b) In de rechterbovenhoek** van je scherm.
⚠️ **Opmerking:** Het organisatienummer bestaat uit **alleen cijfers**. Bijvoorbeeld, in dit geval is het `36480`, **niet** `O36480AA`.
 ### 2) API-token :
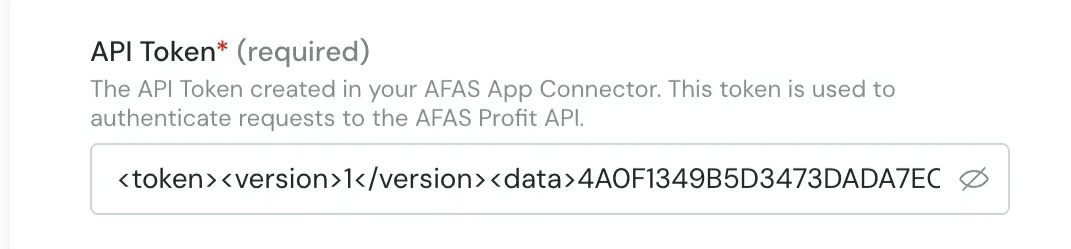 Plak de API-token die je tijdens de voorbereidingsfase hebt opgeslagen (**Stap 4: Sla je API-token op**).
⚠️ **Belangrijk:** Zorg ervoor dat je het token precies zoals opgeslagen plakt.
## ❷ Configureren
Plak de API-token die je tijdens de voorbereidingsfase hebt opgeslagen (**Stap 4: Sla je API-token op**).
⚠️ **Belangrijk:** Zorg ervoor dat je het token precies zoals opgeslagen plakt.
## ❷ Configureren
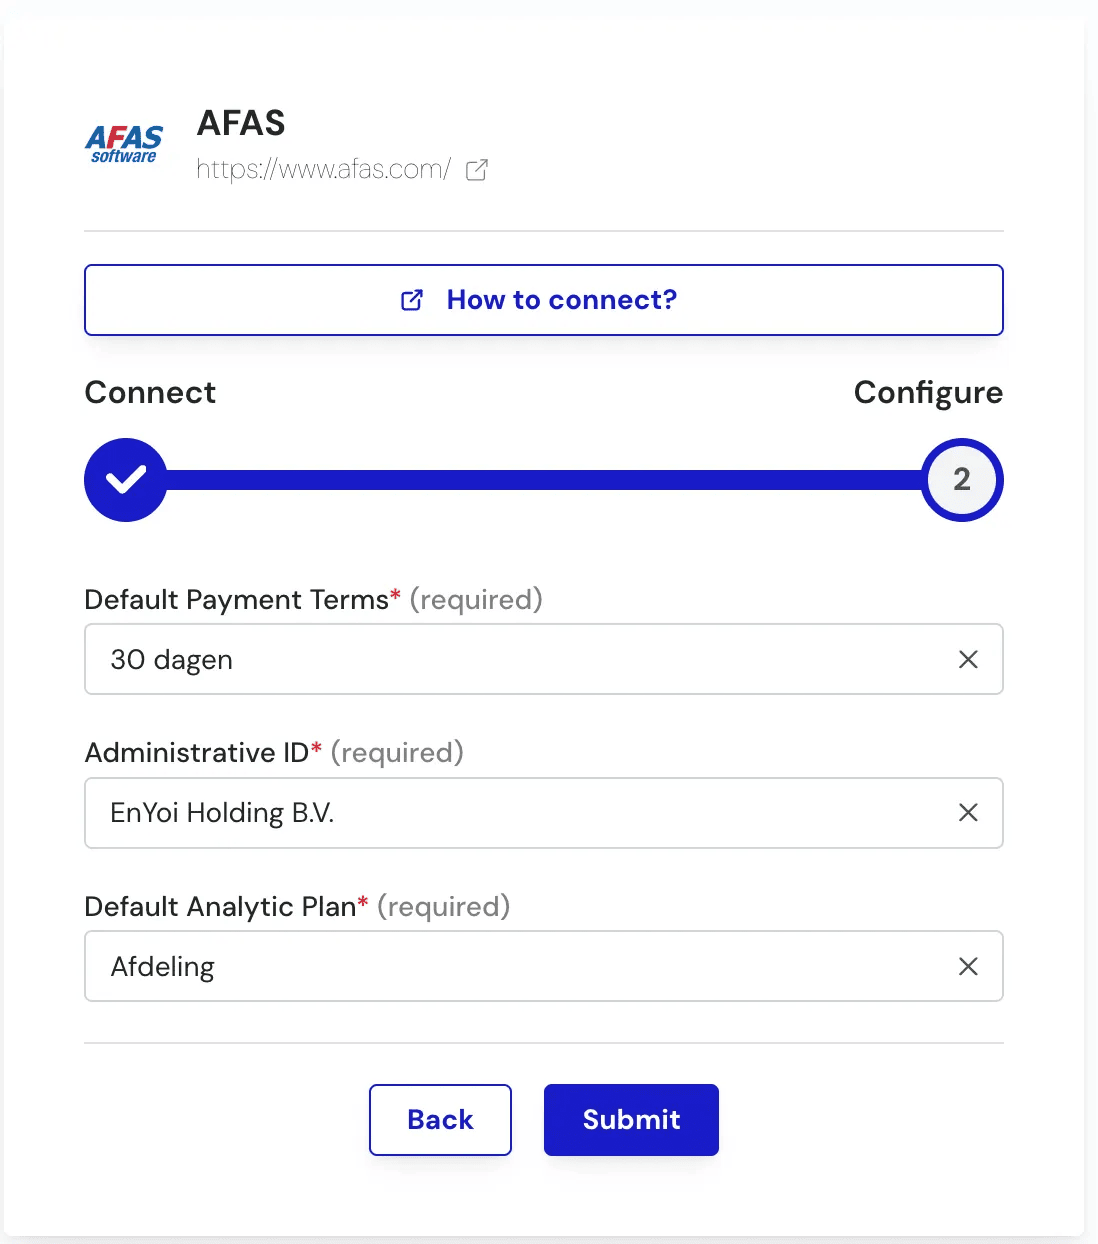 **Standaard betalingsvoorwaarden**
Selecteer de standaard betalingsvoorwaarden voor het aanmaken van **klanten** en **leveranciers**.
**Administratief ID**
:info:*Als dit veld aan de andere kant niet wordt weergegeven, kun je het negeren.*
Selecteer de **administratieve ID** die je wilt verbinden.
Deze optie wordt gebruikt wanneer je moet verbinden met een **specifieke administratieve ID** (bijvoorbeeld een specifieke boekhoudmap).
**Standaard Analytisch Plan**
:info:*Als dit veld aan de andere kant niet wordt weergegeven, kun je het negeren.*
Selecteer de**Toewijzingsas** gebruikt standaard.
Verzenden! Gefeliciteerd! :party:
**Standaard betalingsvoorwaarden**
Selecteer de standaard betalingsvoorwaarden voor het aanmaken van **klanten** en **leveranciers**.
**Administratief ID**
:info:*Als dit veld aan de andere kant niet wordt weergegeven, kun je het negeren.*
Selecteer de **administratieve ID** die je wilt verbinden.
Deze optie wordt gebruikt wanneer je moet verbinden met een **specifieke administratieve ID** (bijvoorbeeld een specifieke boekhoudmap).
**Standaard Analytisch Plan**
:info:*Als dit veld aan de andere kant niet wordt weergegeven, kun je het negeren.*
Selecteer de**Toewijzingsas** gebruikt standaard.
Verzenden! Gefeliciteerd! :party: