> ## Documentation Index
> Fetch the complete documentation index at: https://docs.chift.eu/llms.txt
> Use this file to discover all available pages before exploring further.

# Odoo Invoicing

PREREQUISITES

* The integration is enabled for Odoo versions 13 and above for Odoo.sh and Odoo SaaS.
* A "custom" pricing plan is necessary for the activation of the integration with Odoo. (Odoo's Plans & Pricing)
* Must have admin permissions to enable the connection

Constraints added in customisations in Odoo may impact the performances of the connector.

# **PREPARATION**

Watch this video:

[https://chift-connector-videos.s3.eu-west-3.amazonaws.com/1000/1000-config.mp4](https://chift-connector-videos.s3.eu-west-3.amazonaws.com/1000/1000-config.mp4)

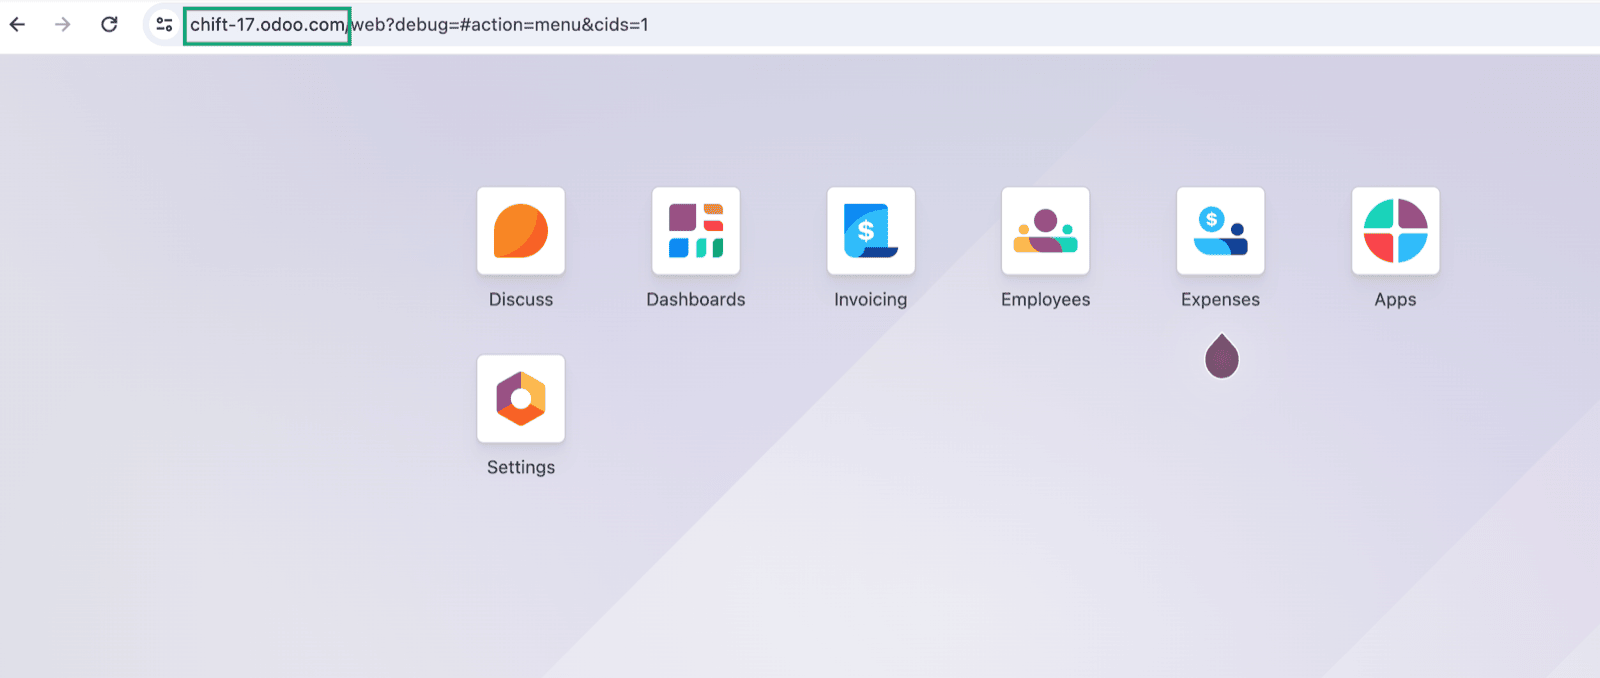
1. Find your Odoo URL.
<img src="https://mintcdn.com/chift/U14_hTCN2xNLrbV6/images/help/odoo-invoicing/odoo-invoicing-1.png?fit=max&auto=format&n=U14_hTCN2xNLrbV6&q=85&s=6abcf30a1e1a08c3041acd4156a9122c" alt="" width="1600" height="678" data-path="images/help/odoo-invoicing/odoo-invoicing-1.png" />

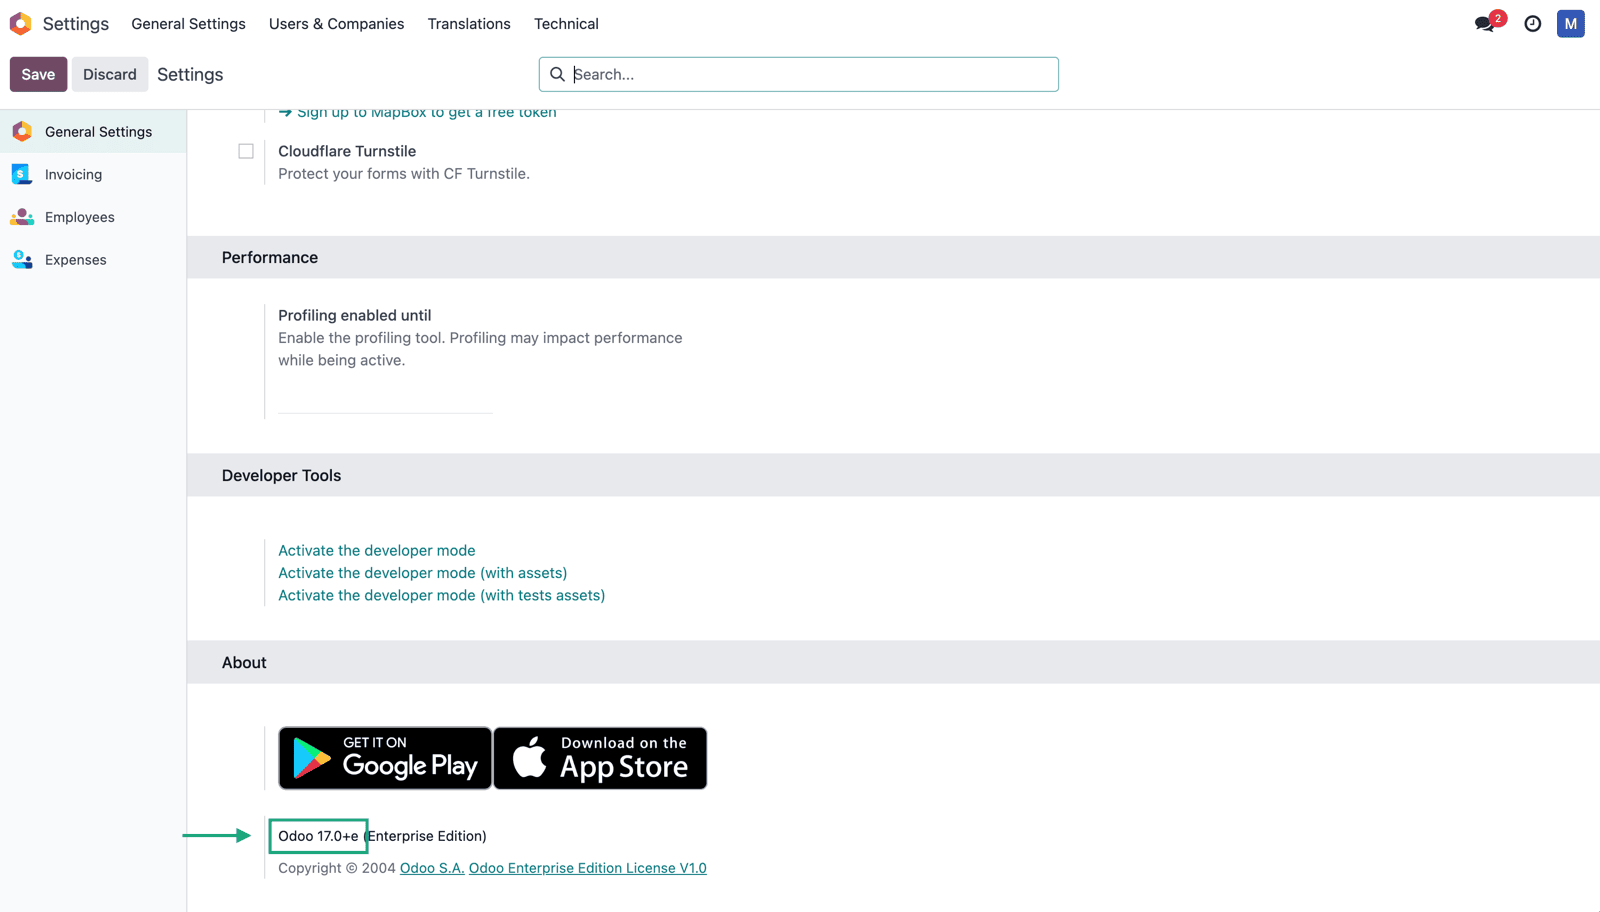
2. Find the version of your Odoo account

* Go to Odoo → Parameters
<img src="https://mintcdn.com/chift/U14_hTCN2xNLrbV6/images/help/odoo-invoicing/odoo-invoicing-2.png?fit=max&auto=format&n=U14_hTCN2xNLrbV6&q=85&s=210286a055c826ccac4756bfd71af5ee" alt="" width="1600" height="912" data-path="images/help/odoo-invoicing/odoo-invoicing-2.png" />

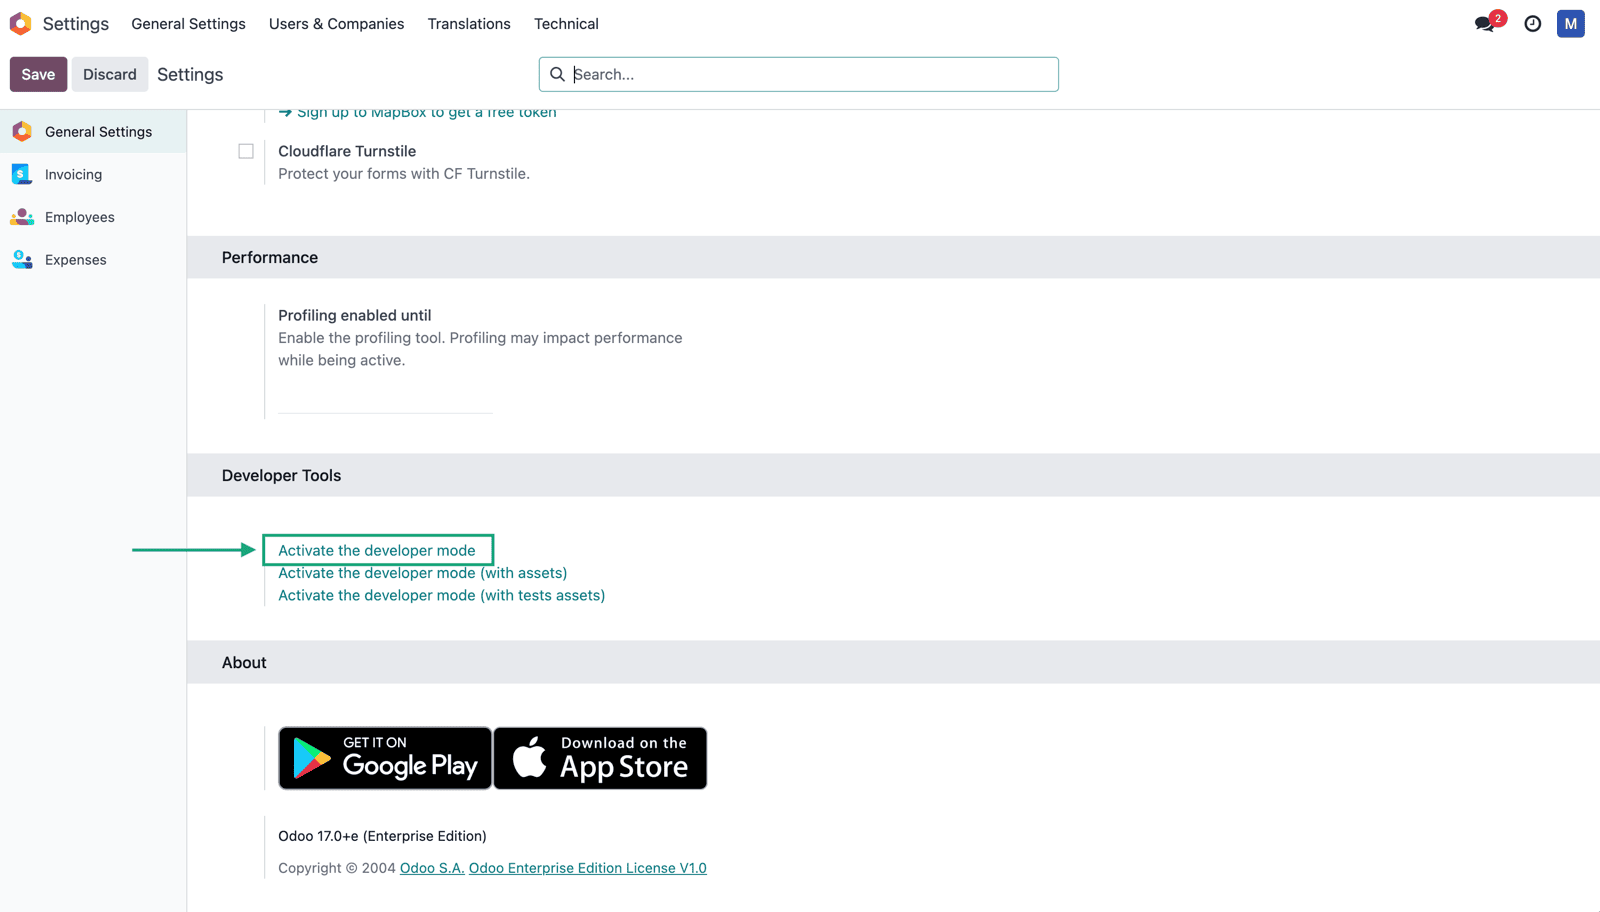
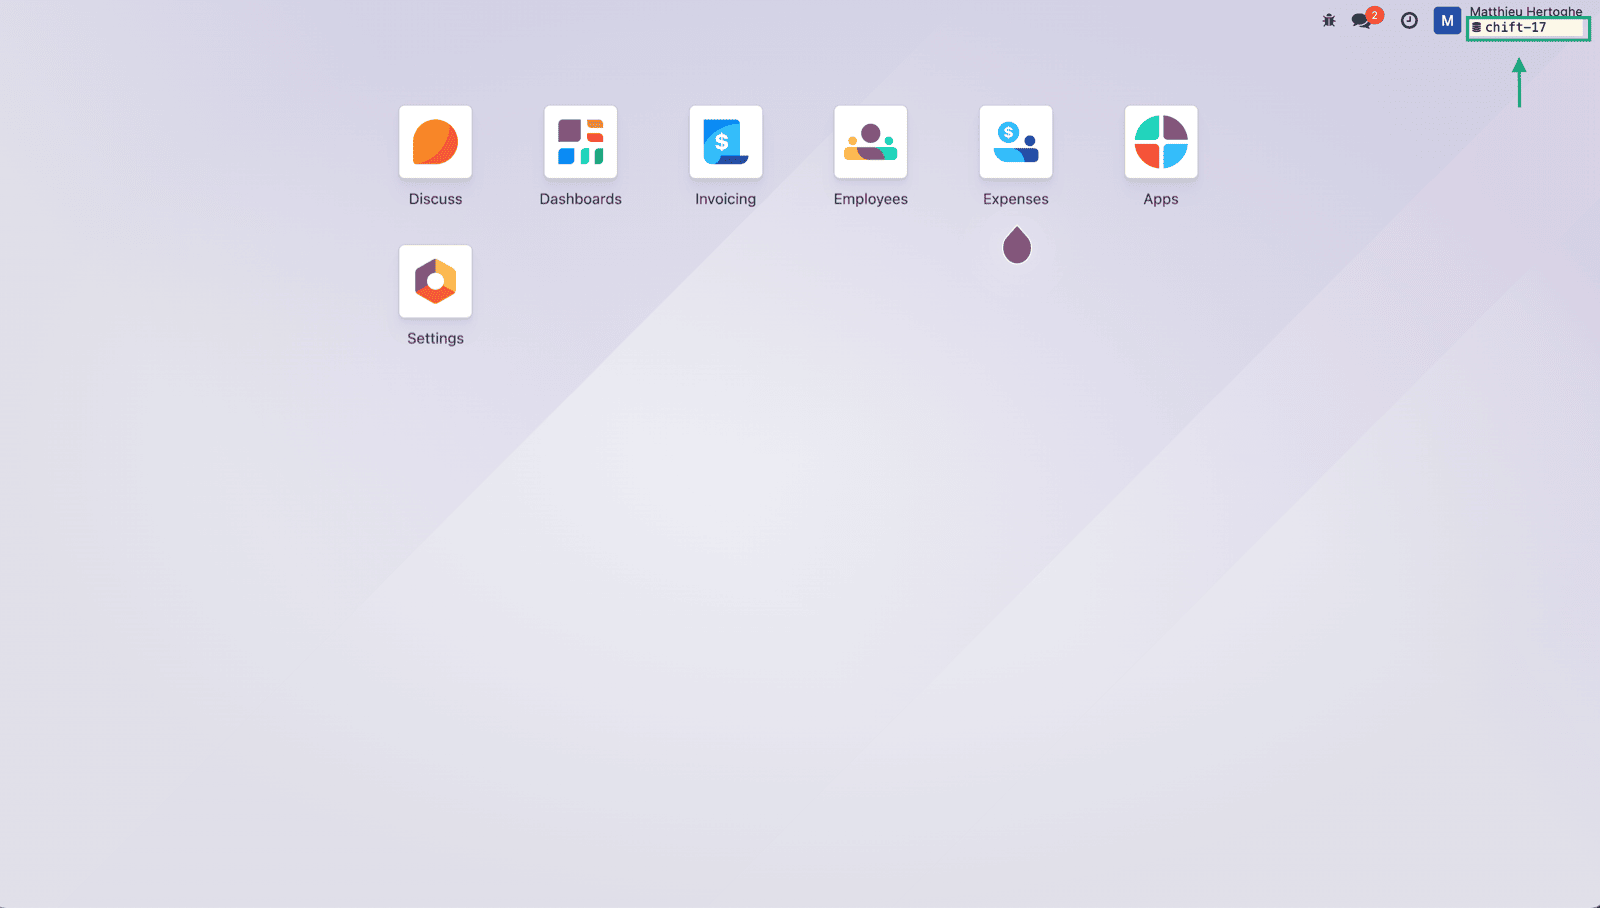
3. Find your account's database name by activating the developer mode and looking up the data on your home page.
<img src="https://mintcdn.com/chift/U14_hTCN2xNLrbV6/images/help/odoo-invoicing/odoo-invoicing-3.png?fit=max&auto=format&n=U14_hTCN2xNLrbV6&q=85&s=7daf87c4eec4d18b8a8e78bdec435ea1" alt="" width="1600" height="912" data-path="images/help/odoo-invoicing/odoo-invoicing-3.png" />

<img src="https://mintcdn.com/chift/U14_hTCN2xNLrbV6/images/help/odoo-invoicing/odoo-invoicing-4.png?fit=max&auto=format&n=U14_hTCN2xNLrbV6&q=85&s=60c98068f3d2d9f4d170980772772344" alt="" width="1600" height="908" data-path="images/help/odoo-invoicing/odoo-invoicing-4.png" />

# CONNEXION

**Step 1:** Choose a name for your connection.

<img src="https://mintcdn.com/chift/U14_hTCN2xNLrbV6/images/help/odoo-invoicing/odoo-invoicing-5.png?fit=max&auto=format&n=U14_hTCN2xNLrbV6&q=85&s=26acd2758591a192413210d0fed55025" alt="" width="523" height="99" data-path="images/help/odoo-invoicing/odoo-invoicing-5.png" />

**Step 2:** Enter the url of your Odoo instance.
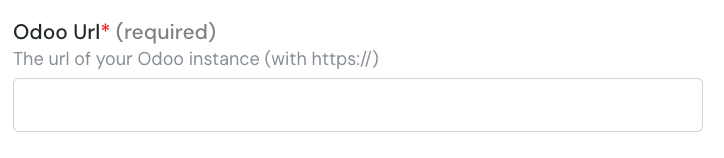
<img src="https://mintcdn.com/chift/U14_hTCN2xNLrbV6/images/help/odoo-invoicing/odoo-invoicing-6.png?fit=max&auto=format&n=U14_hTCN2xNLrbV6&q=85&s=92357d2da0e34683323e715832b7a3ad" alt="" width="724" height="158" data-path="images/help/odoo-invoicing/odoo-invoicing-6.png" />

**Step 3:** Enter the version of your odoo account.
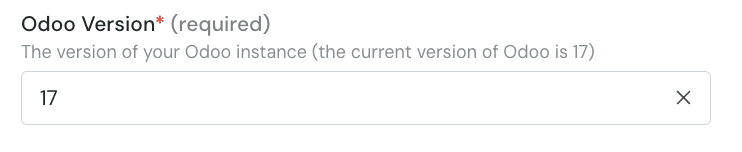
<img src="https://mintcdn.com/chift/U14_hTCN2xNLrbV6/images/help/odoo-invoicing/odoo-invoicing-7.png?fit=max&auto=format&n=U14_hTCN2xNLrbV6&q=85&s=b241383a1b3b0b511570da48a829b0eb" alt="" width="742" height="152" data-path="images/help/odoo-invoicing/odoo-invoicing-7.png" />

**Step 4:** Enter the database name

<img src="https://mintcdn.com/chift/U14_hTCN2xNLrbV6/images/help/odoo-invoicing/odoo-invoicing-8.png?fit=max&auto=format&n=U14_hTCN2xNLrbV6&q=85&s=40845cd1117109e88507a95c2dcd4715" alt="" width="752" height="126" data-path="images/help/odoo-invoicing/odoo-invoicing-8.png" />

**Step 5:** Enter your Odoo account username.

<img src="https://mintcdn.com/chift/U14_hTCN2xNLrbV6/images/help/odoo-invoicing/odoo-invoicing-9.png?fit=max&auto=format&n=U14_hTCN2xNLrbV6&q=85&s=abfc332ab0a4b4ad6db9c4b190fbcadd" alt="" width="738" height="152" data-path="images/help/odoo-invoicing/odoo-invoicing-9.png" />

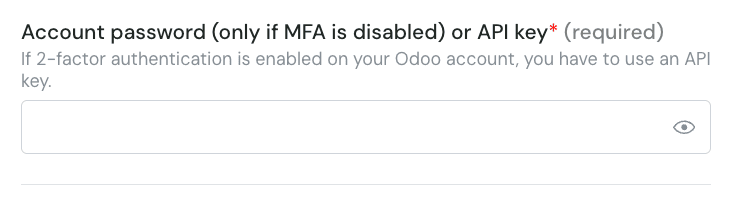
**Step 6:** Enter your Odoo account password.
<img src="https://mintcdn.com/chift/U14_hTCN2xNLrbV6/images/help/odoo-invoicing/odoo-invoicing-10.png?fit=max&auto=format&n=U14_hTCN2xNLrbV6&q=85&s=a6f48a08778cda72d333b033b9061e47" alt="" width="742" height="200" data-path="images/help/odoo-invoicing/odoo-invoicing-10.png" />

⚠ Please note that if you activated the MFA on your Odoo account, you will need to setup an API Key and use it instead of your password.

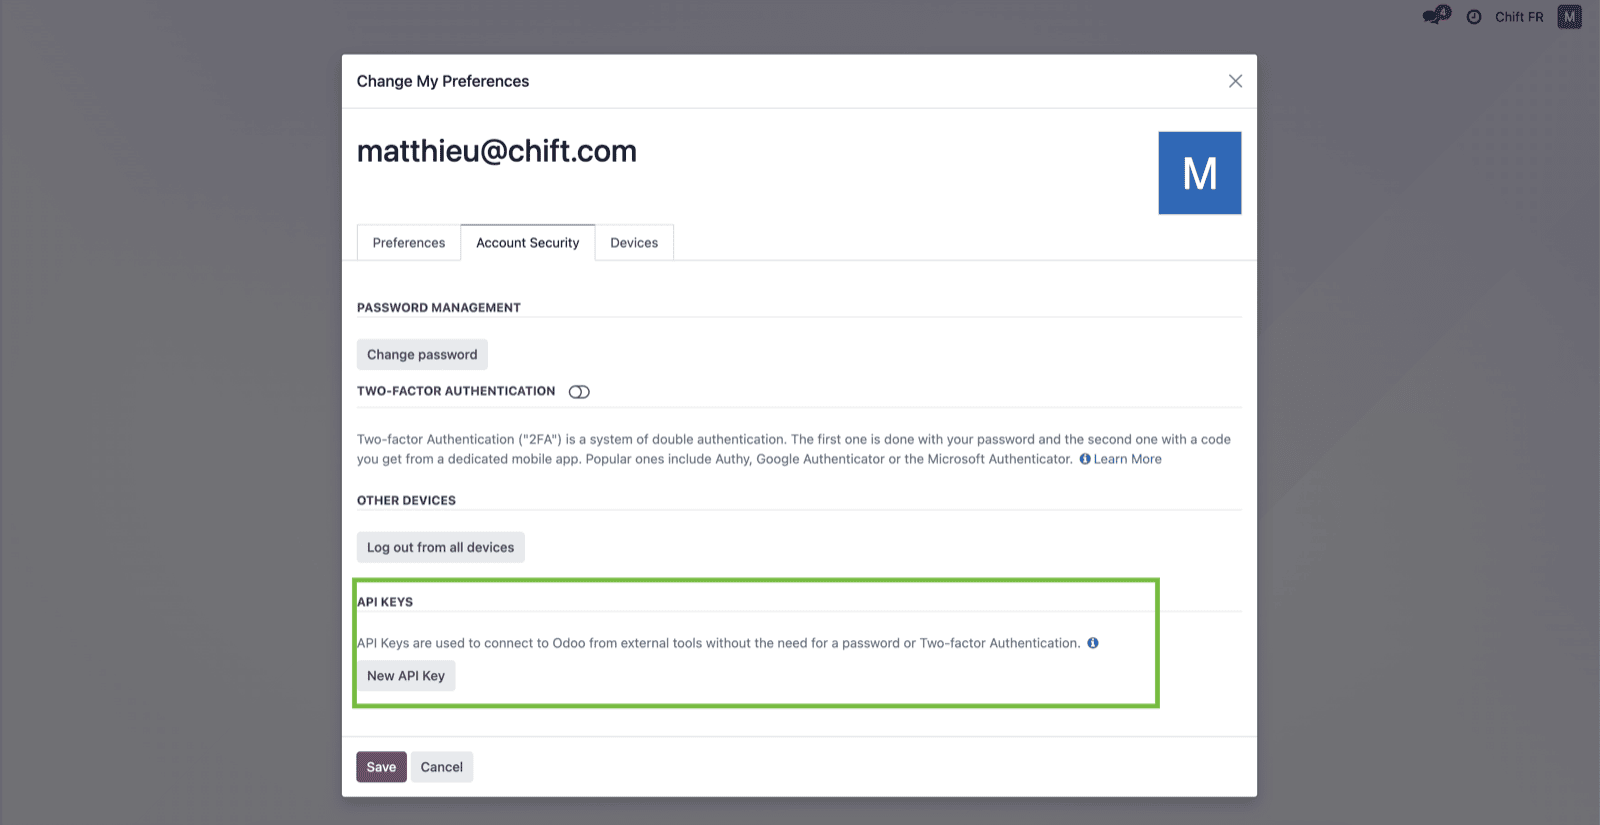
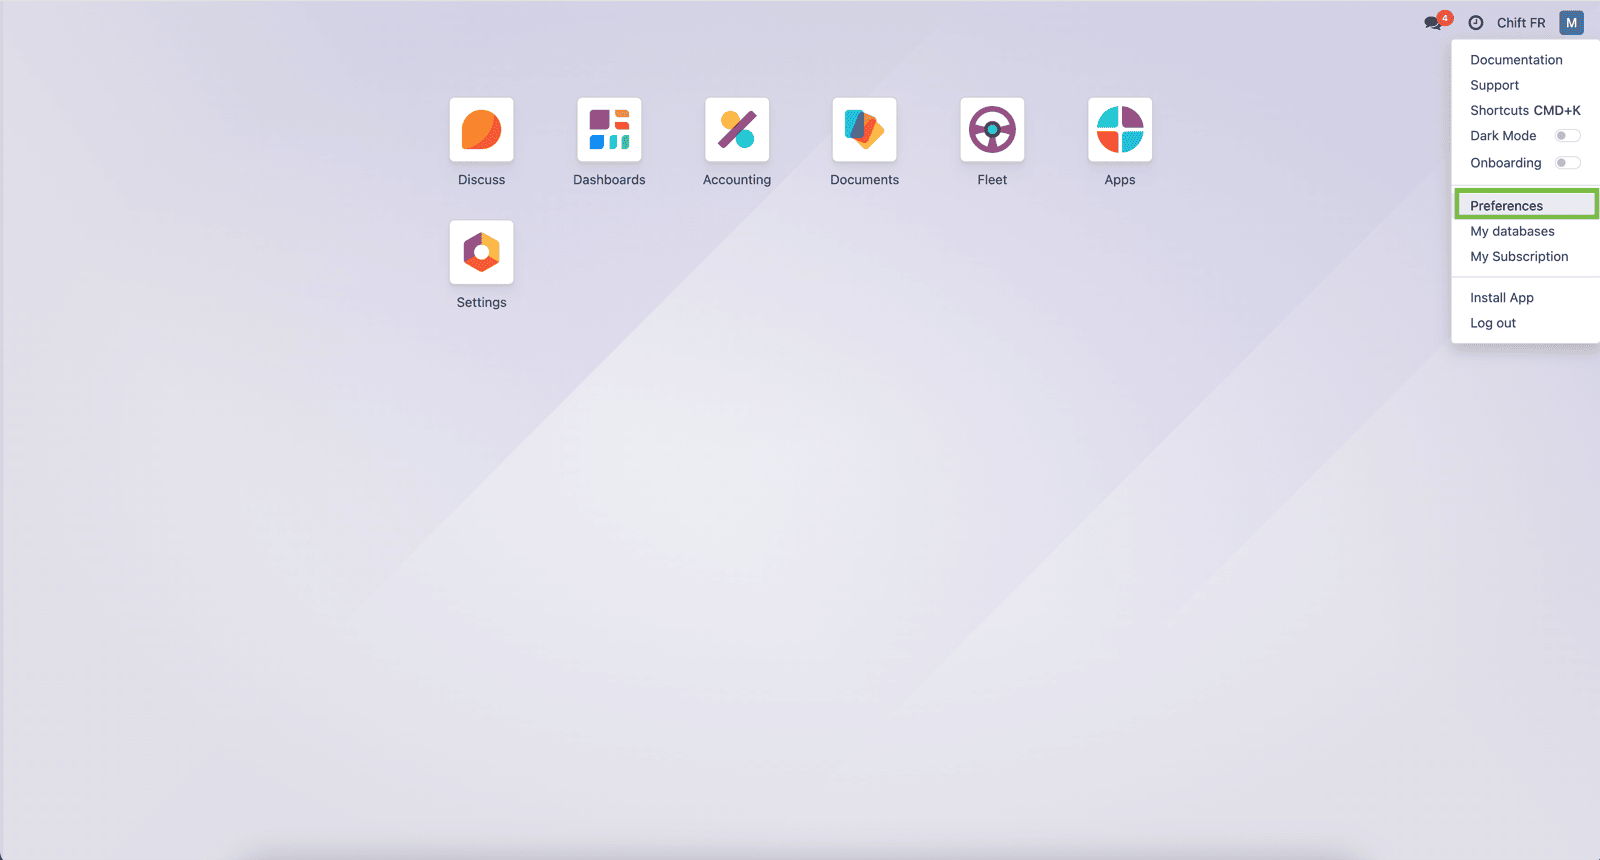
**Step 6-1:** If you need to generate an API Key, log into Odoo and click on the right top corner button and on "preferences".
<img src="https://mintcdn.com/chift/U14_hTCN2xNLrbV6/images/help/odoo-invoicing/odoo-invoicing-11.png?fit=max&auto=format&n=U14_hTCN2xNLrbV6&q=85&s=9c891c6deb65b581dba7973fffce5c56" alt="" width="1600" height="860" data-path="images/help/odoo-invoicing/odoo-invoicing-11.png" />

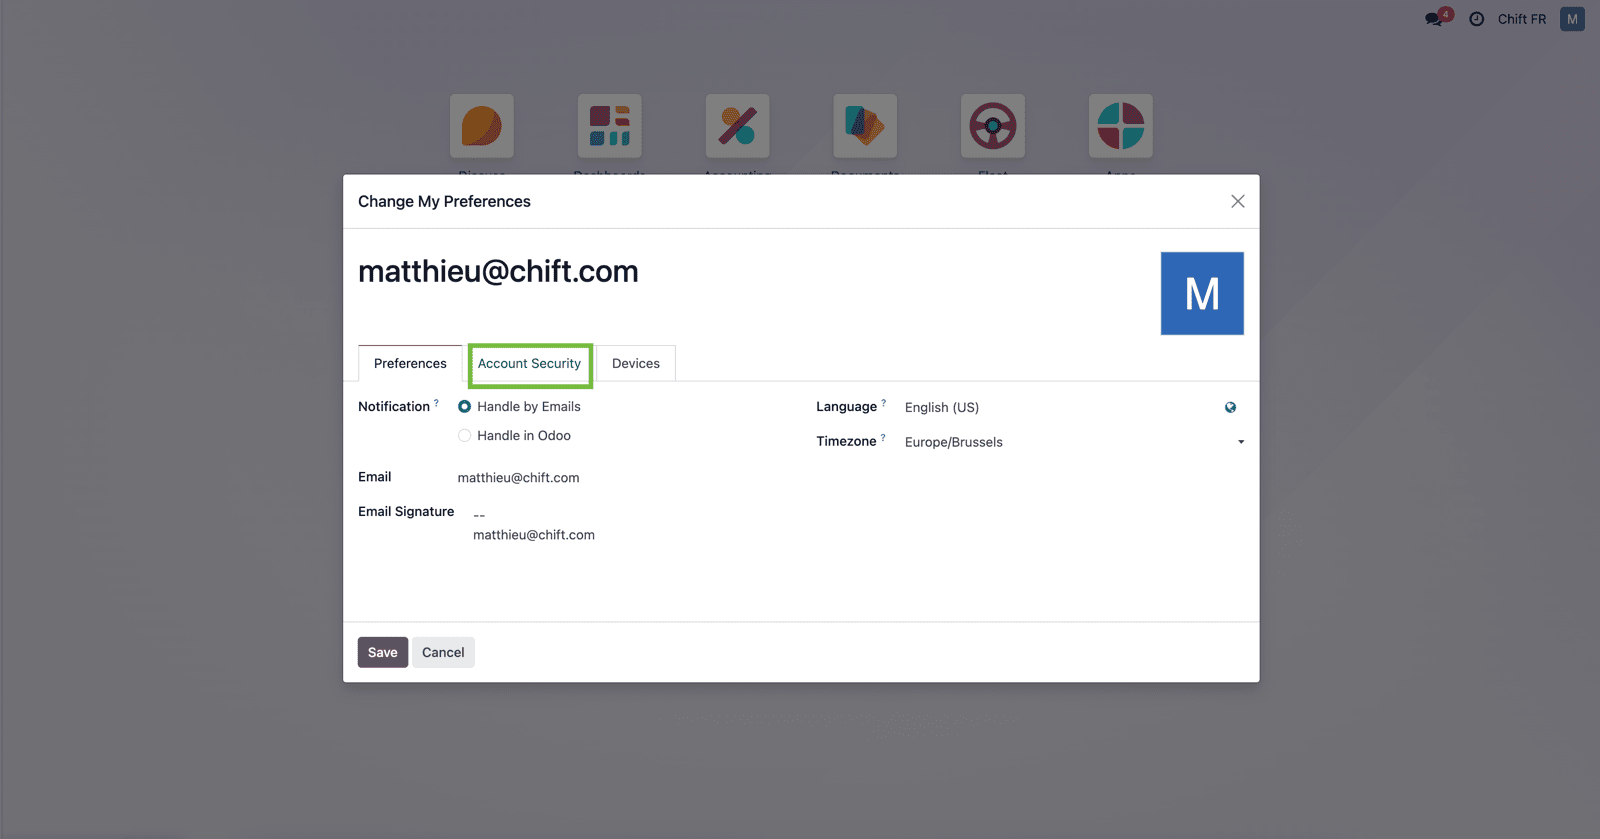
**Step 6-2:** Select "Account security"
<img src="https://mintcdn.com/chift/U14_hTCN2xNLrbV6/images/help/odoo-invoicing/odoo-invoicing-12.png?fit=max&auto=format&n=U14_hTCN2xNLrbV6&q=85&s=65ec18affc8e48139191a3ba2ccda018" alt="" width="1600" height="839" data-path="images/help/odoo-invoicing/odoo-invoicing-12.png" />

**Step 6-3:** Select "New API key"

<img src="https://mintcdn.com/chift/U14_hTCN2xNLrbV6/images/help/odoo-invoicing/odoo-invoicing-13.png?fit=max&auto=format&n=U14_hTCN2xNLrbV6&q=85&s=efb5f0670a0d64a06e394bcd52966a39" alt="" width="1600" height="825" data-path="images/help/odoo-invoicing/odoo-invoicing-13.png" />

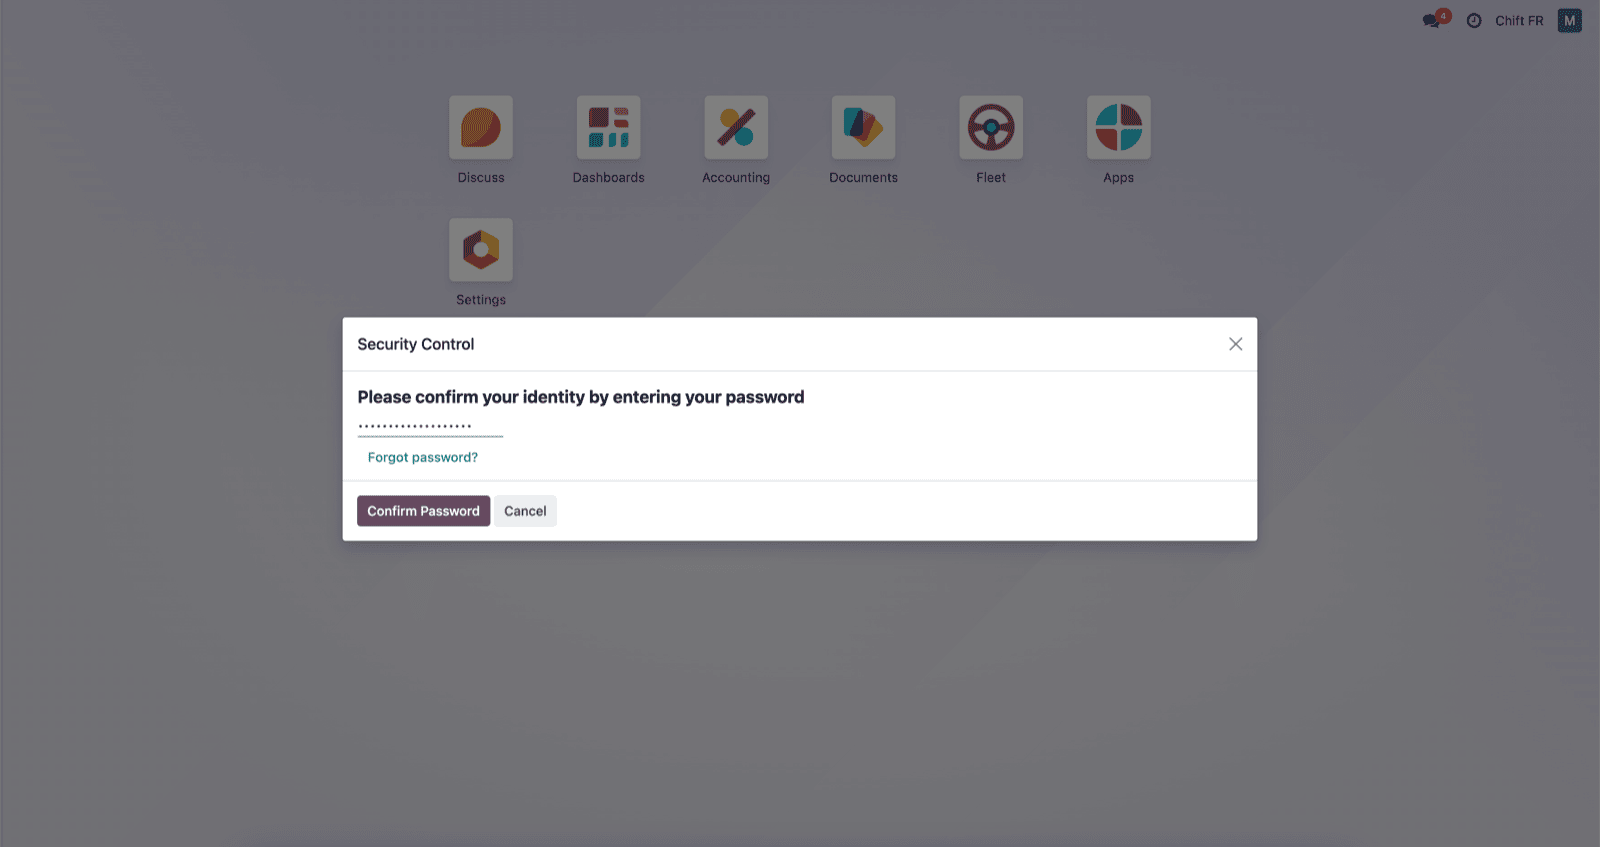
**Step 6-4:** Fill your password

<img src="https://mintcdn.com/chift/U14_hTCN2xNLrbV6/images/help/odoo-invoicing/odoo-invoicing-14.png?fit=max&auto=format&n=U14_hTCN2xNLrbV6&q=85&s=258d055eeb2f179827a6a39189db1930" alt="" width="1600" height="847" data-path="images/help/odoo-invoicing/odoo-invoicing-14.png" />

**Step 6-5:** Give a name to your api key and give "persistant key" as duration.

<img src="https://mintcdn.com/chift/U14_hTCN2xNLrbV6/images/help/odoo-invoicing/odoo-invoicing-15.png?fit=max&auto=format&n=U14_hTCN2xNLrbV6&q=85&s=b04eabcdcb1ba2003790b69d429efce4" alt="" width="1600" height="853" data-path="images/help/odoo-invoicing/odoo-invoicing-15.png" />

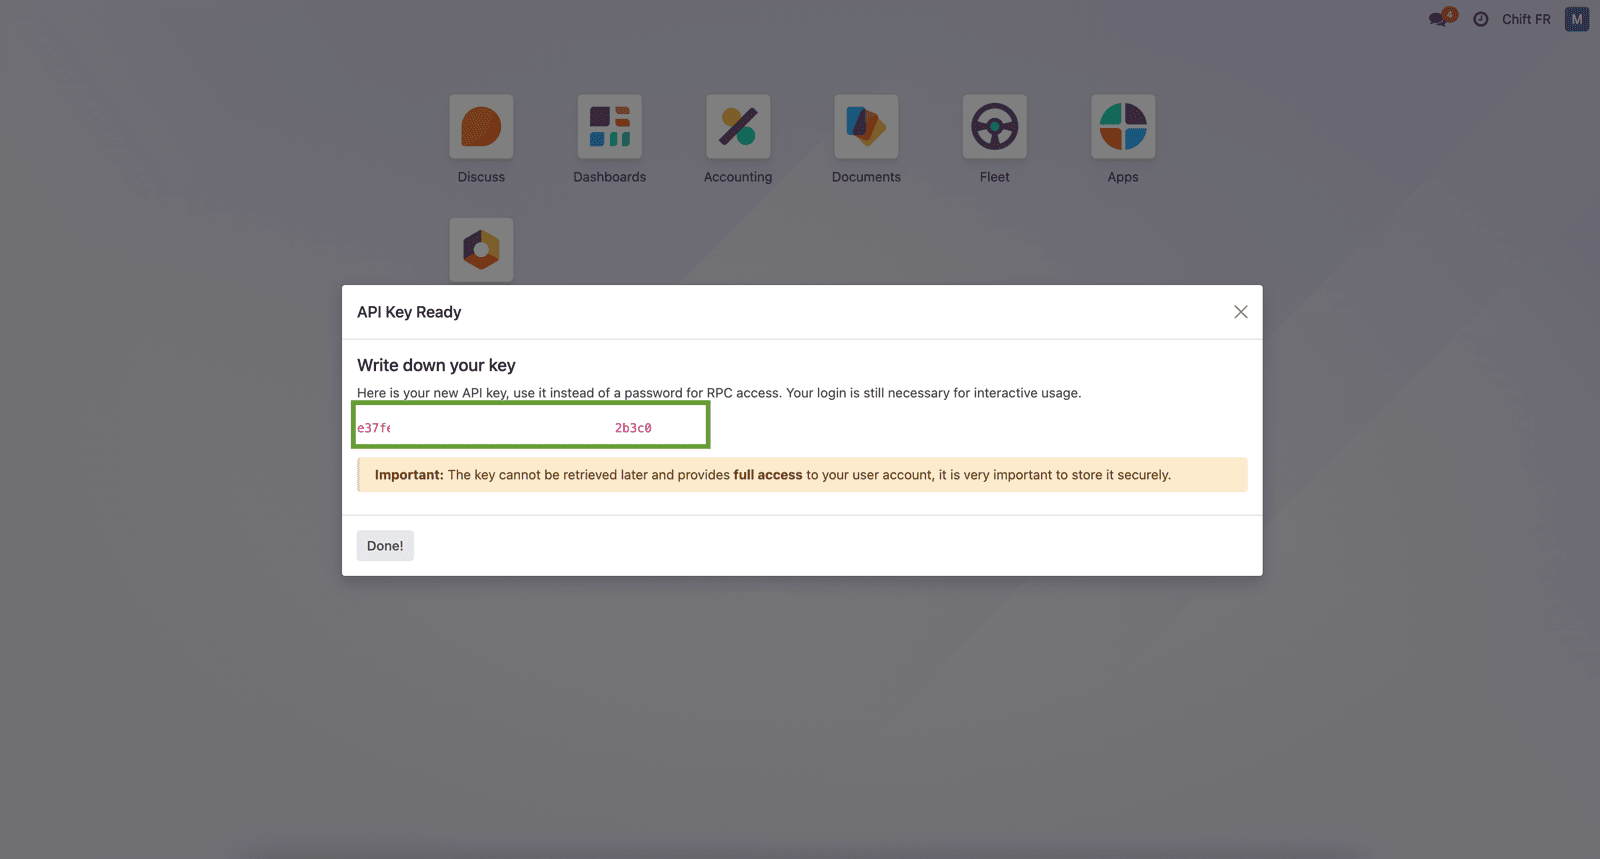
**Step 6-6:** Here is your API key that you can use in Chift funnel to connect Odoo.
<img src="https://mintcdn.com/chift/U14_hTCN2xNLrbV6/images/help/odoo-invoicing/odoo-invoicing-16.png?fit=max&auto=format&n=U14_hTCN2xNLrbV6&q=85&s=f0af48bb7610c56161d53fbebaa91150" alt="" width="1600" height="859" data-path="images/help/odoo-invoicing/odoo-invoicing-16.png" />

**Step 7:** Click "Connect" to finalise the connection.
<img src="https://mintcdn.com/chift/U14_hTCN2xNLrbV6/images/help/odoo-invoicing/odoo-invoicing-17.png?fit=max&auto=format&n=U14_hTCN2xNLrbV6&q=85&s=b7c82245cd1919cd9a0da8d2cb964ea8" alt="" width="184" height="79" data-path="images/help/odoo-invoicing/odoo-invoicing-17.png" />

# CONFIGURATION

**Step 1:** Select the company to connect to on Odoo.

<img src="https://mintcdn.com/chift/U14_hTCN2xNLrbV6/images/help/odoo-invoicing/odoo-invoicing-18.png?fit=max&auto=format&n=U14_hTCN2xNLrbV6&q=85&s=74a18703de120bc4c96e81ea21d47028" alt="" width="521" height="79" data-path="images/help/odoo-invoicing/odoo-invoicing-18.png" />

**Step 2:** Click "Submit" to finalise the configuration
<img src="https://mintcdn.com/chift/U14_hTCN2xNLrbV6/images/help/odoo-invoicing/odoo-invoicing-19.png?fit=max&auto=format&n=U14_hTCN2xNLrbV6&q=85&s=b051de1e4e4723c4f3a6bfc6d0686f72" alt="" width="167" height="78" data-path="images/help/odoo-invoicing/odoo-invoicing-19.png" />