> ## Documentation Index
> Fetch the complete documentation index at: https://docs.chift.eu/llms.txt
> Use this file to discover all available pages before exploring further.
# AFAS
# 🚨 PRÉREQUIS
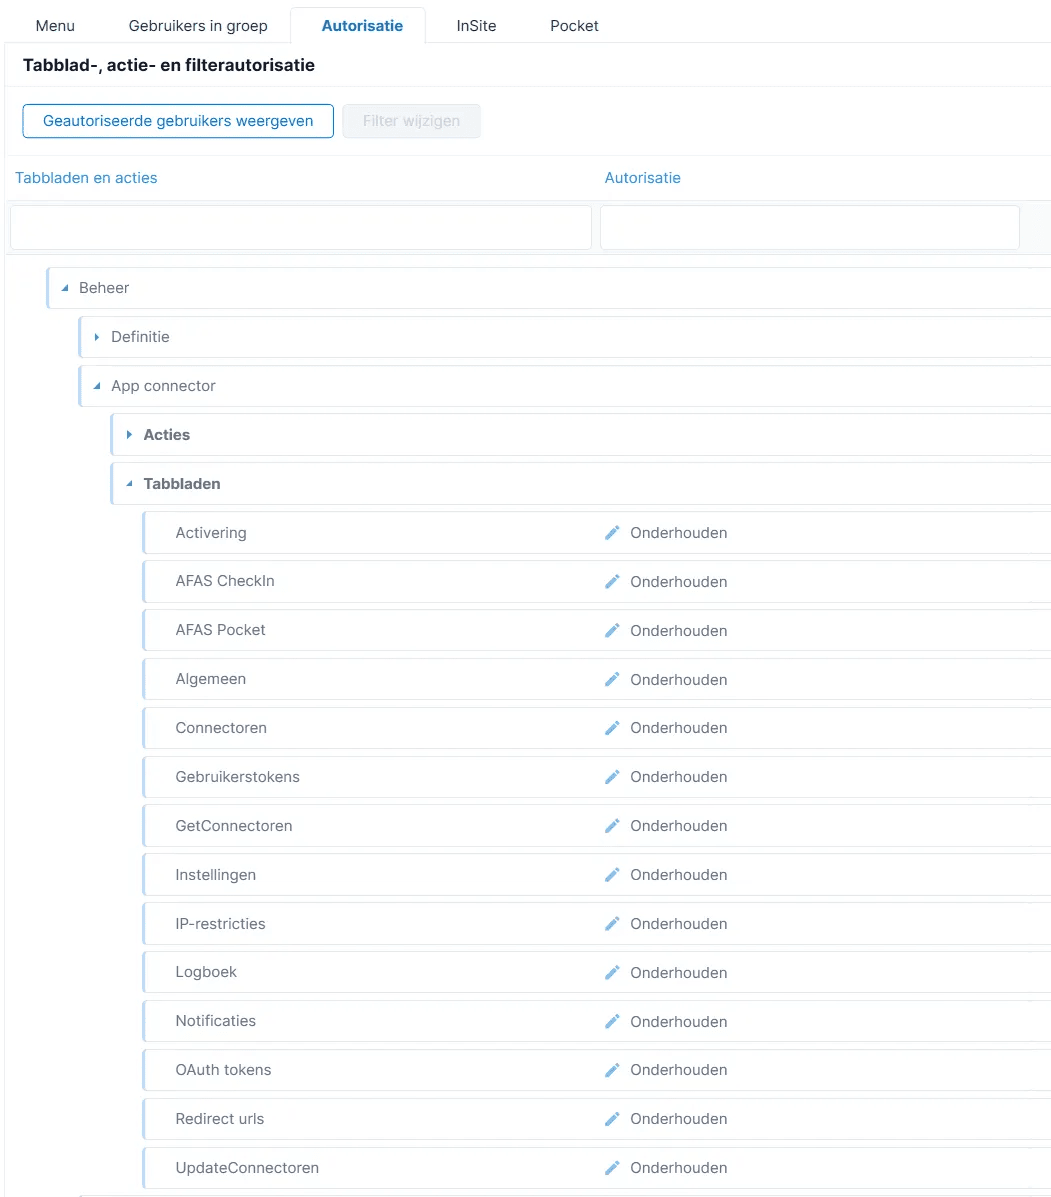
* Disposer d'un identifiant AFAS avec tous les droits d'administration listés dans la capture d'écran ci-dessus.
 * Avoir téléchargé le fichier zip sur votre ordinateur et l'avoir décompressé.
[AFAS\_GetConnectors\_15122025.zip](/images/help/afas/1765813797282-AFAS_GetConnectors_15122025.zip)
* Paramètres AFAS :
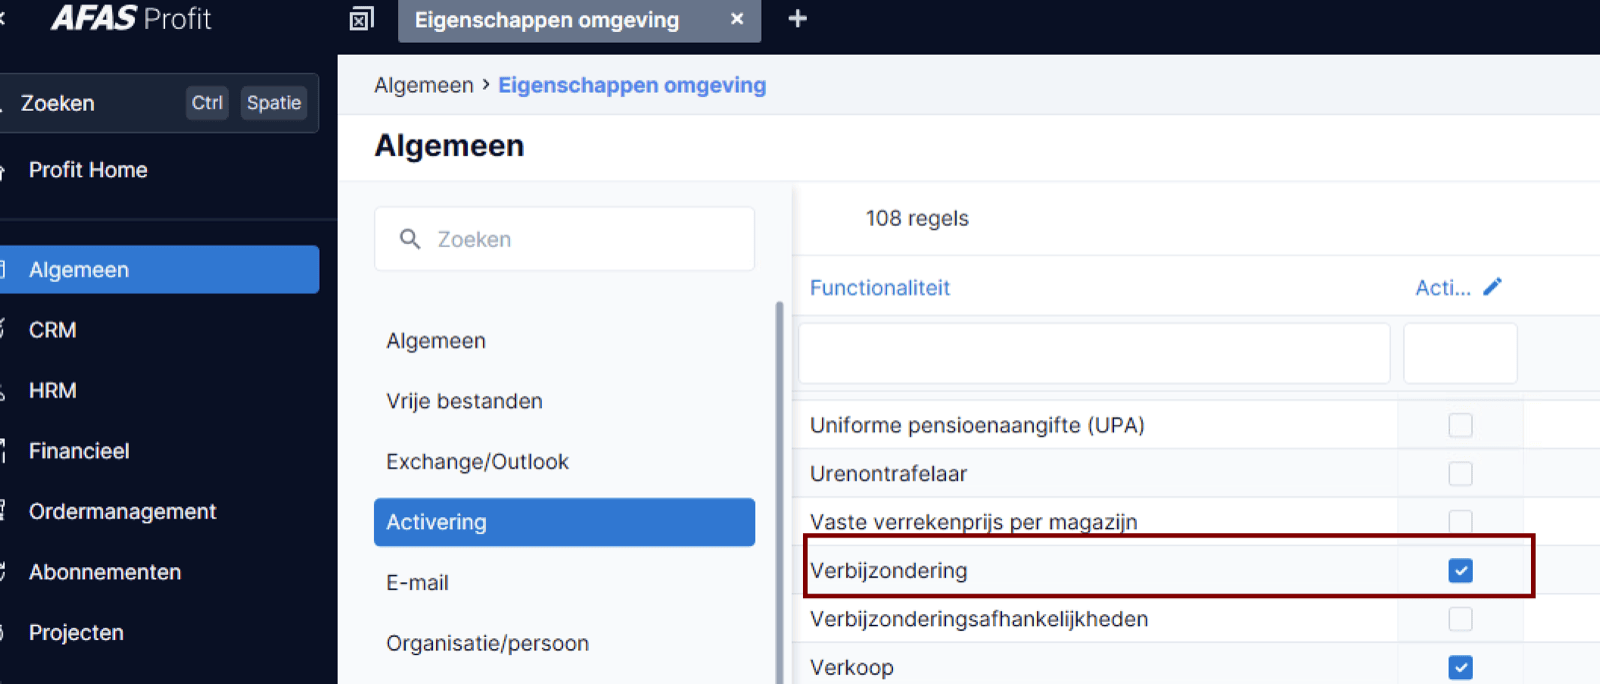
Assurez-vous que l'option « Verbijzonderingen » est activée :
* Avoir téléchargé le fichier zip sur votre ordinateur et l'avoir décompressé.
[AFAS\_GetConnectors\_15122025.zip](/images/help/afas/1765813797282-AFAS_GetConnectors_15122025.zip)
* Paramètres AFAS :
Assurez-vous que l'option « Verbijzonderingen » est activée :
 Pour utiliser la logique d'autoNumber d'AFAS :
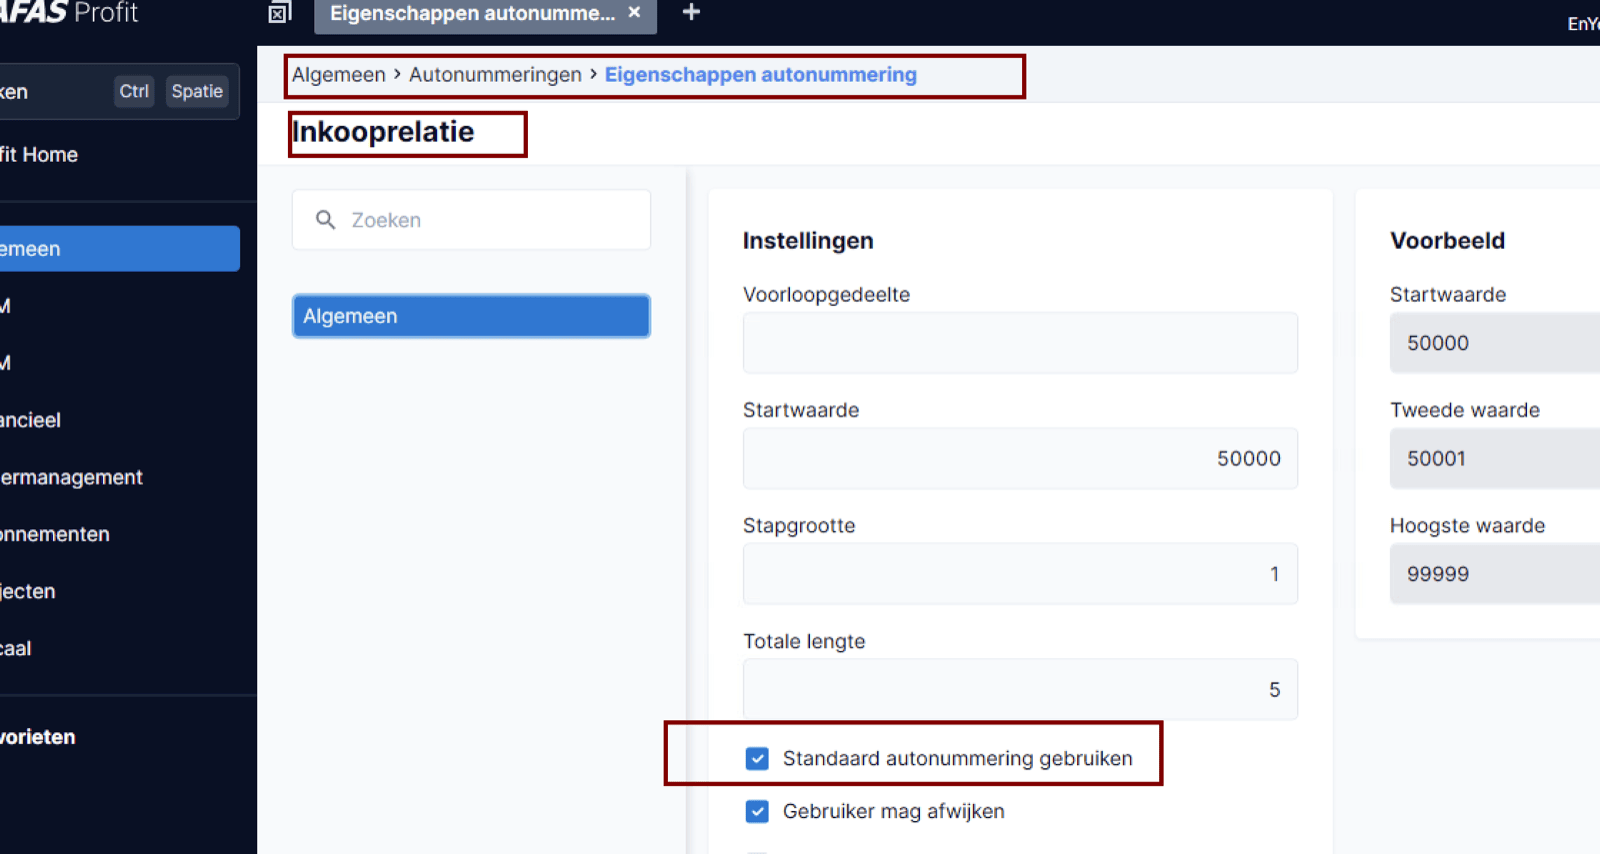
Assurez-vous que les cases suivantes sont remplies :
Pour utiliser la logique d'autoNumber d'AFAS :
Assurez-vous que les cases suivantes sont remplies :
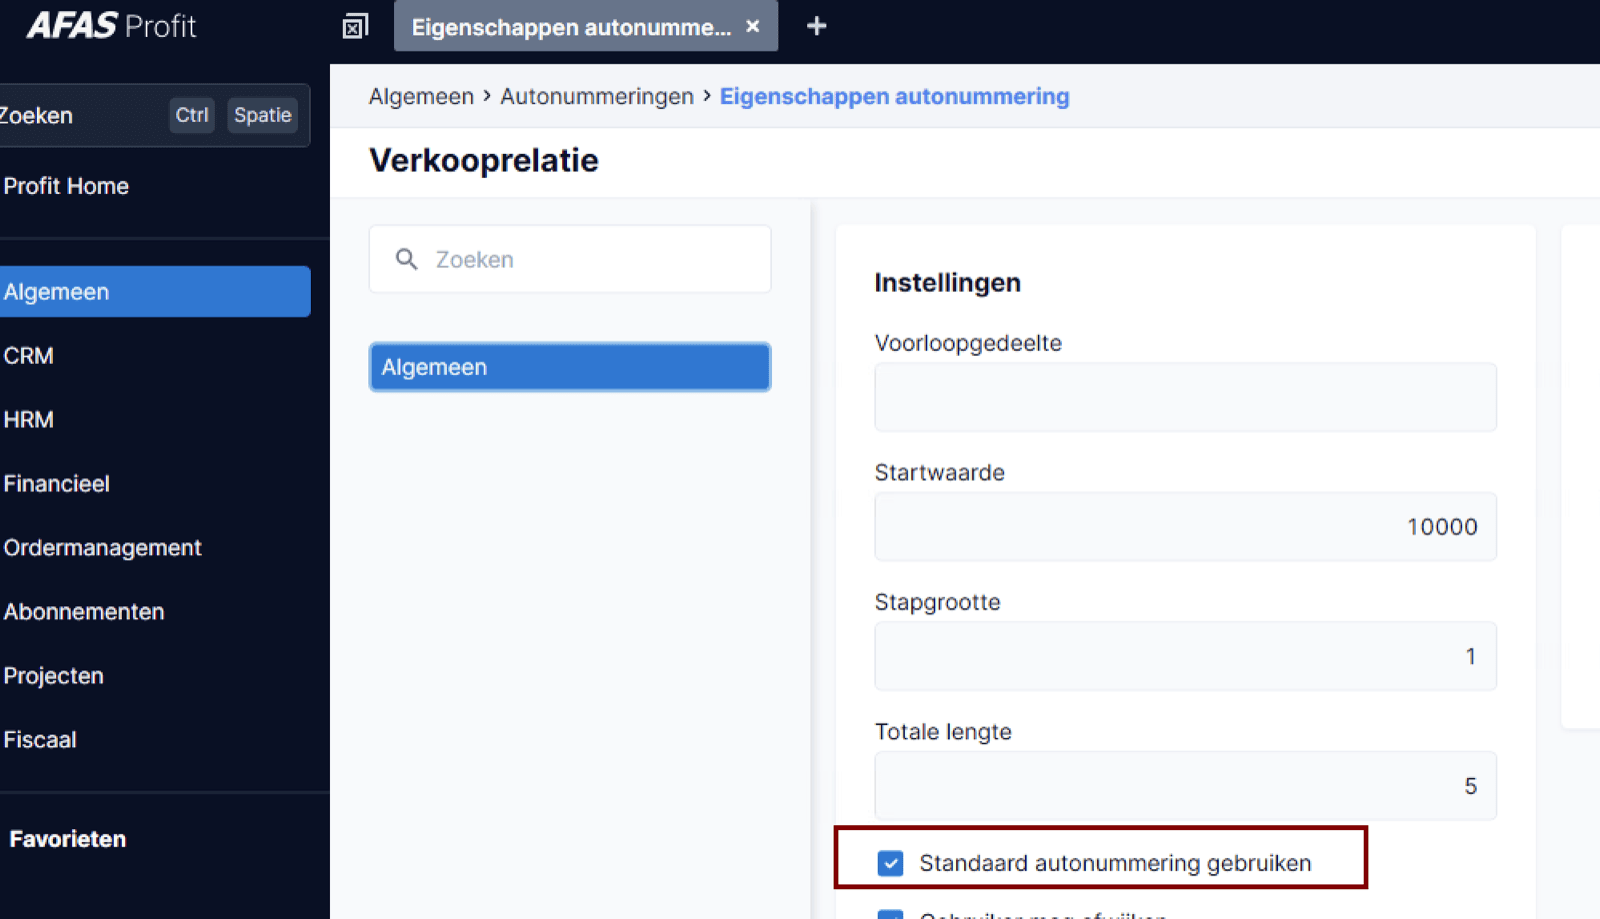
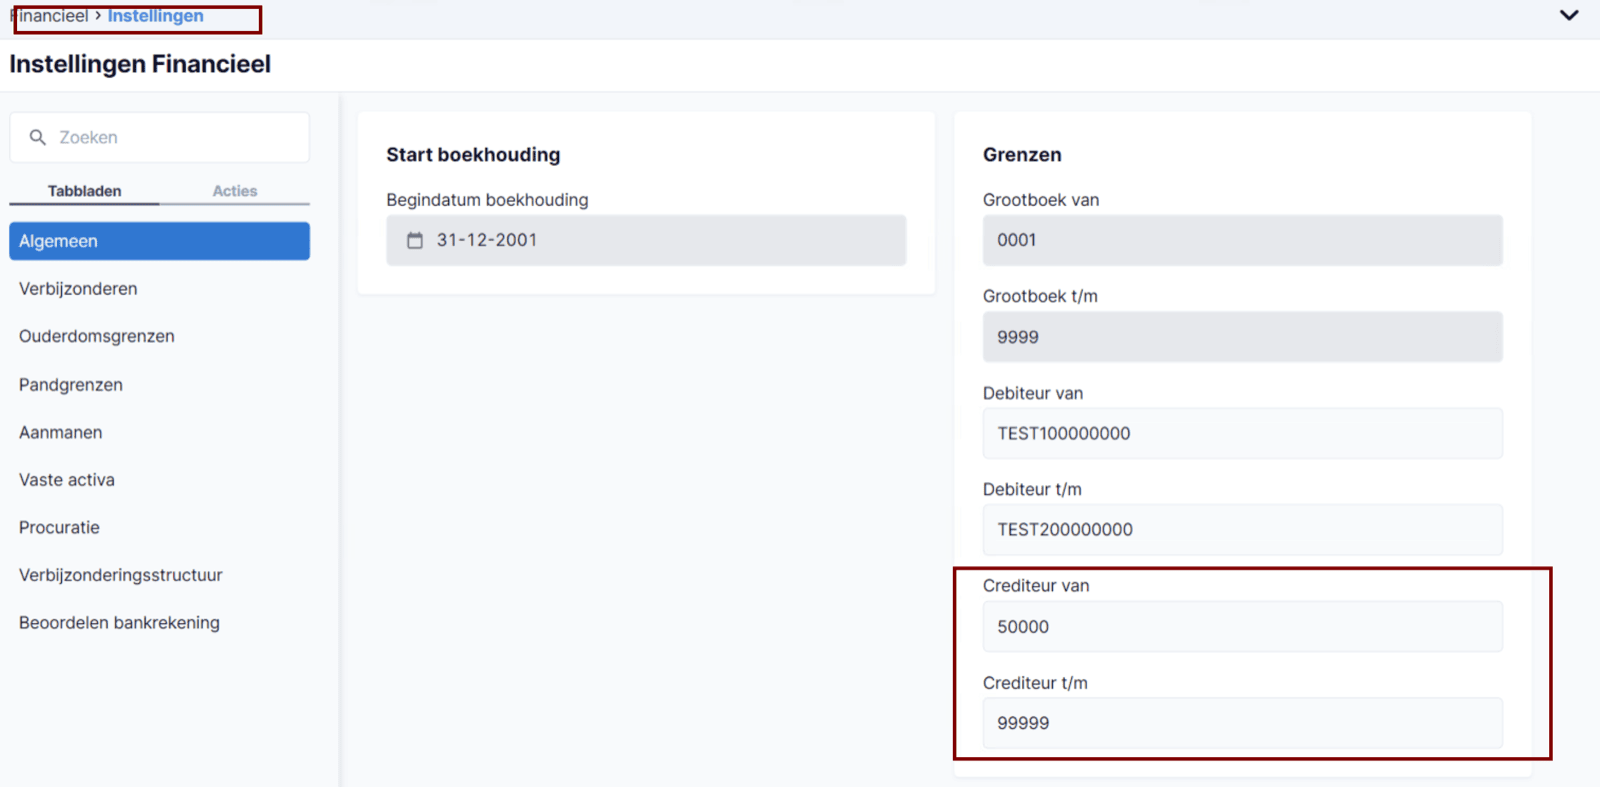 Précisez que la numérotation automatique est activée pour les débiteurs et les créditeurs :
 &
&
 # 💪 PRÉPARATION
### Étape 1 : Création d'une App Chift :
Rendez-vous sur [AFAS Online Login](https://idp.afasonline.com/Account/Login?) et connectez-vous avec vos identifiants AFAS.
⚠ **Important :** Utilisez une session Citrix (pas Citrix dans le navigateur). Vous ne pourrez pas copier les identifiants ultérieurement. ⚠
# 💪 PRÉPARATION
### Étape 1 : Création d'une App Chift :
Rendez-vous sur [AFAS Online Login](https://idp.afasonline.com/Account/Login?) et connectez-vous avec vos identifiants AFAS.
⚠ **Important :** Utilisez une session Citrix (pas Citrix dans le navigateur). Vous ne pourrez pas copier les identifiants ultérieurement. ⚠
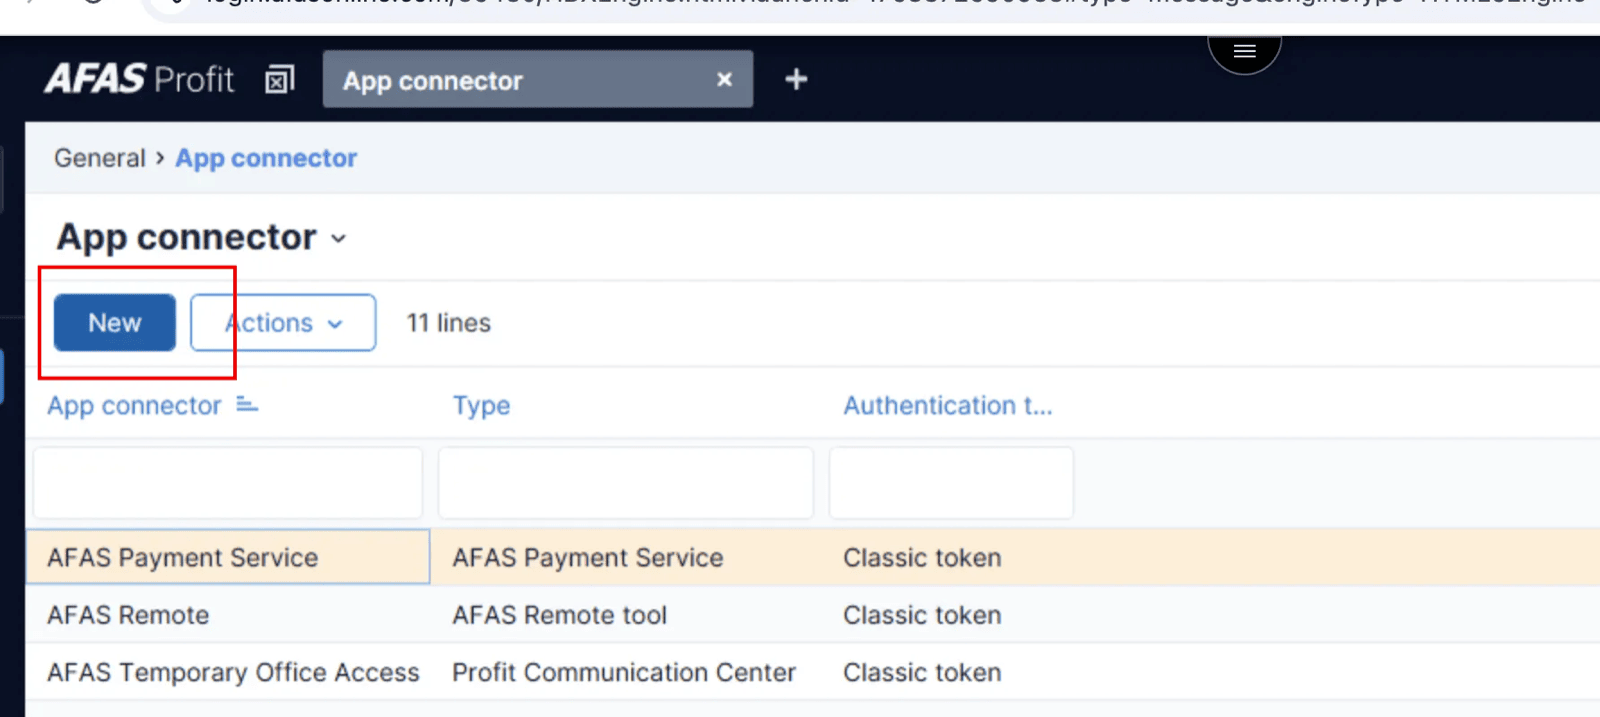
 Accédez à la page **General** et ouvrez **App connector**.
Créez un nouveau App connector.
Accédez à la page **General** et ouvrez **App connector**.
Créez un nouveau App connector.
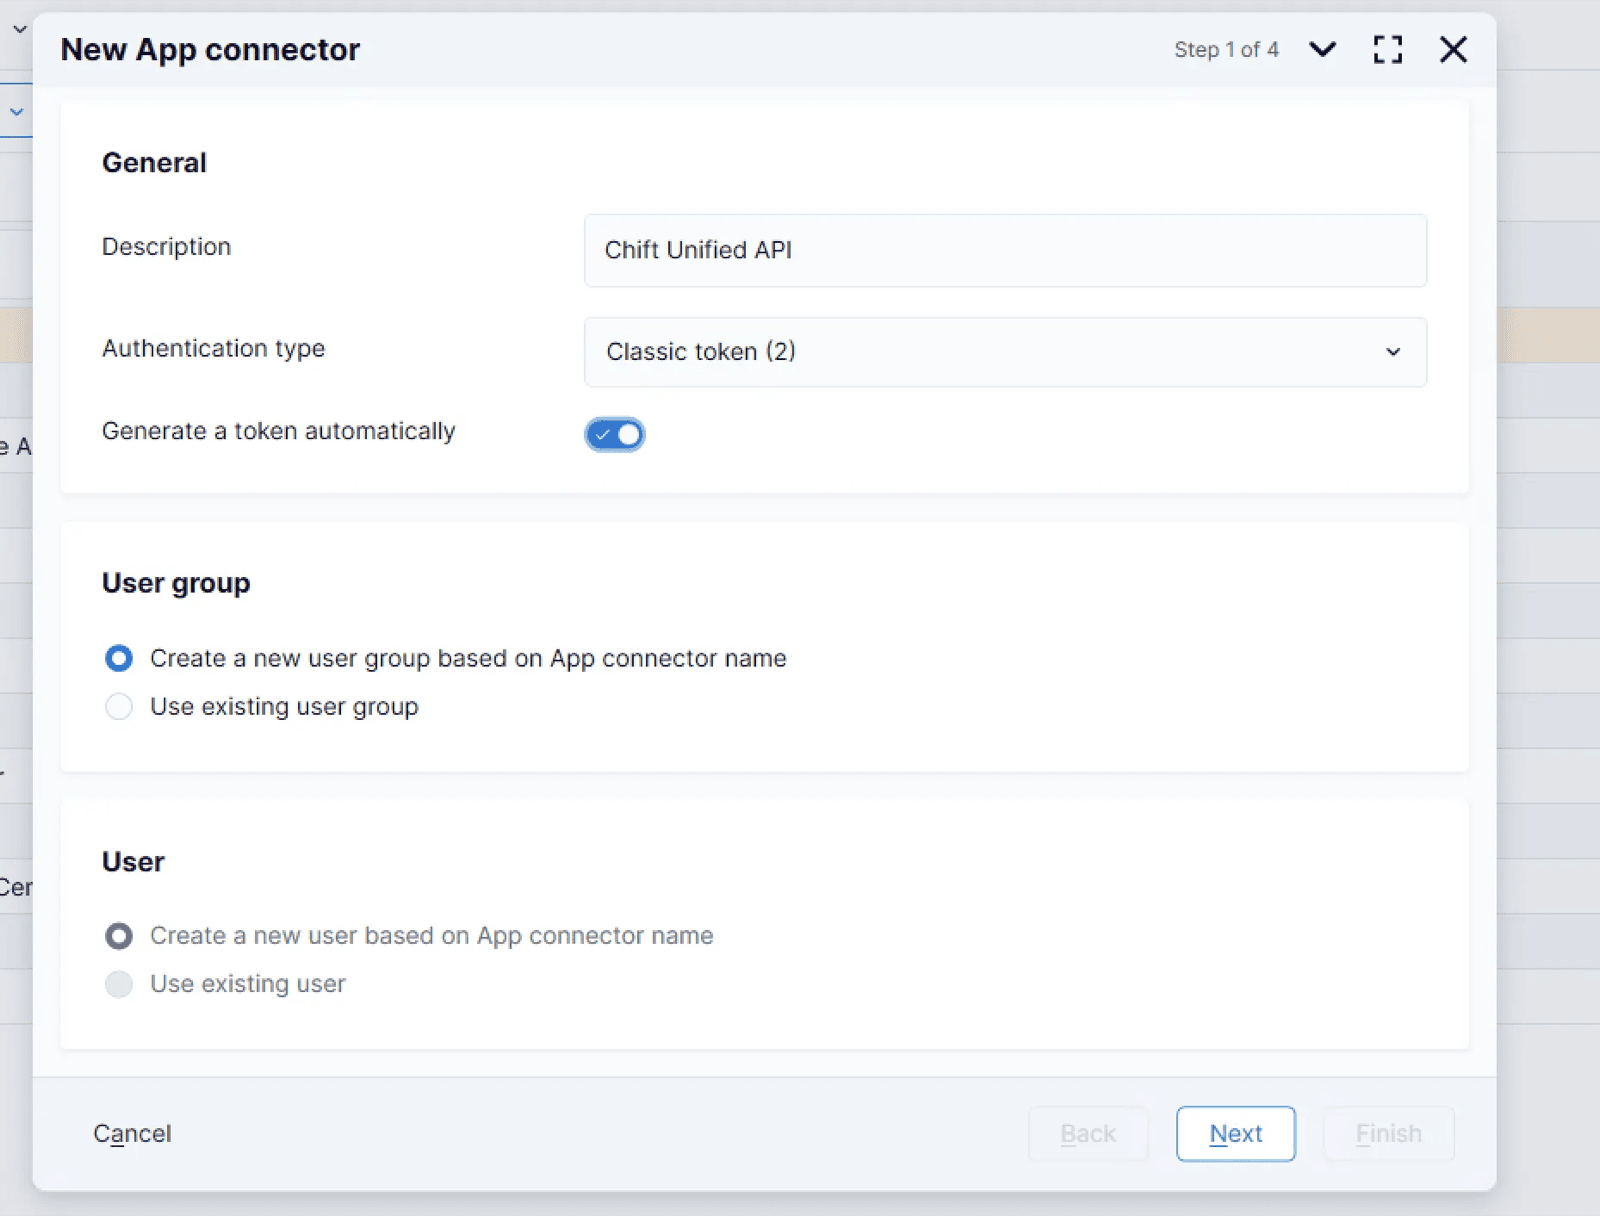
 Configurez l'App connector comme indiqué dans la capture d'écran suivante :
 ### Étape 2 : Ajoutez les GetConnectors de Chift à votre App
Utilisez la fonctionnalité d'import pour ajouter le fichier ci-dessous :
[AFAS\_GetConnectors\_15122025.zip](/images/help/afas/1765813857584-AFAS_GetConnectors_15122025.zip)
(téléchargez-le et importez-le comme illustré dans la capture d'écran ci-dessous)
### Étape 2 : Ajoutez les GetConnectors de Chift à votre App
Utilisez la fonctionnalité d'import pour ajouter le fichier ci-dessous :
[AFAS\_GetConnectors\_15122025.zip](/images/help/afas/1765813857584-AFAS_GetConnectors_15122025.zip)
(téléchargez-le et importez-le comme illustré dans la capture d'écran ci-dessous)
 1 - Enregistrez le fichier zip en local et extrayez-le dans un dossier.
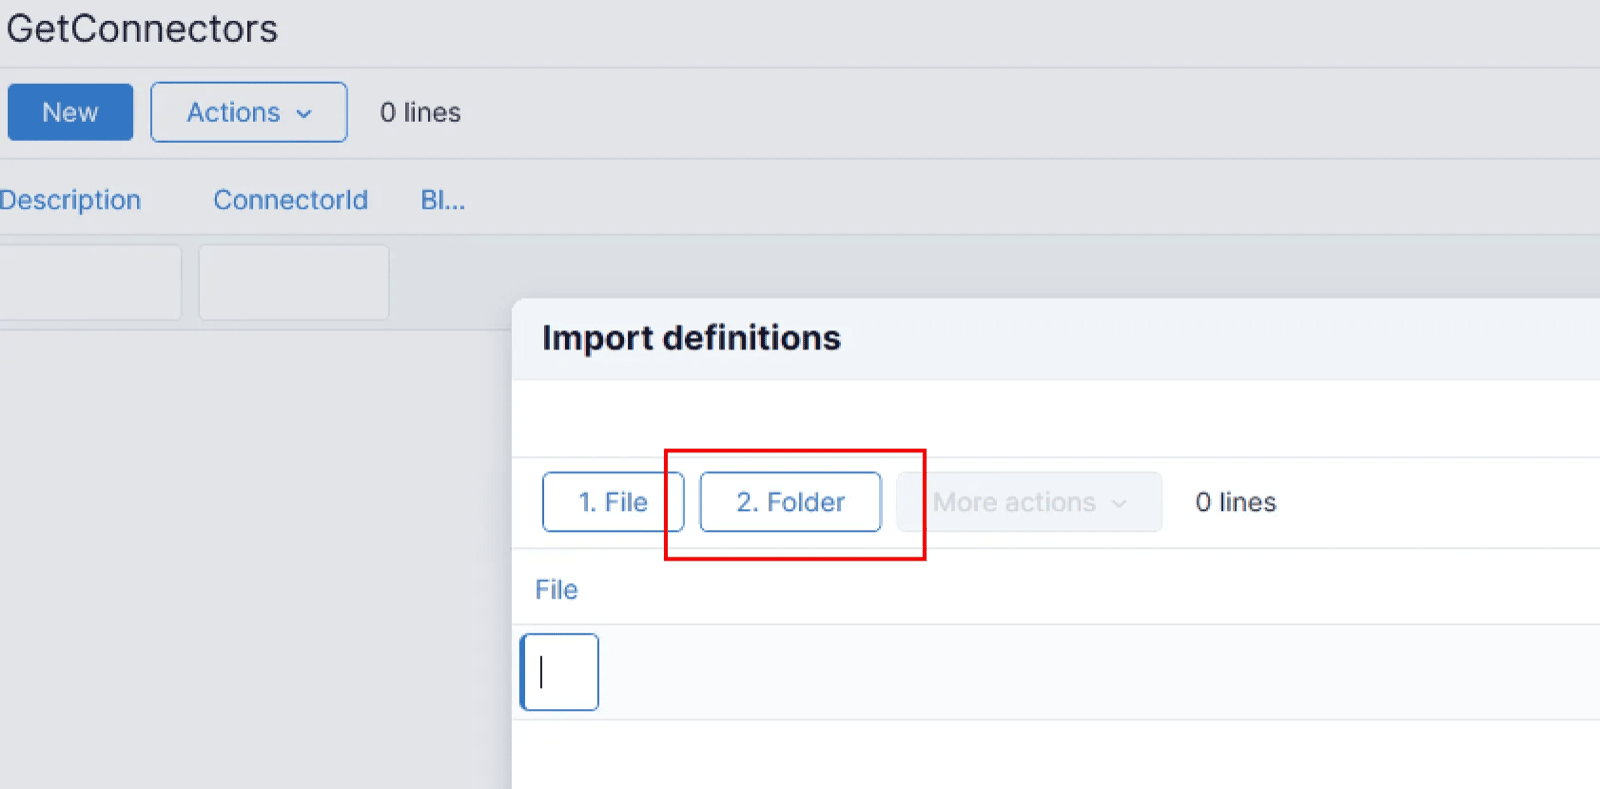 2- Sélectionnez ce dossier depuis votre machine et cliquez sur **Finish**.
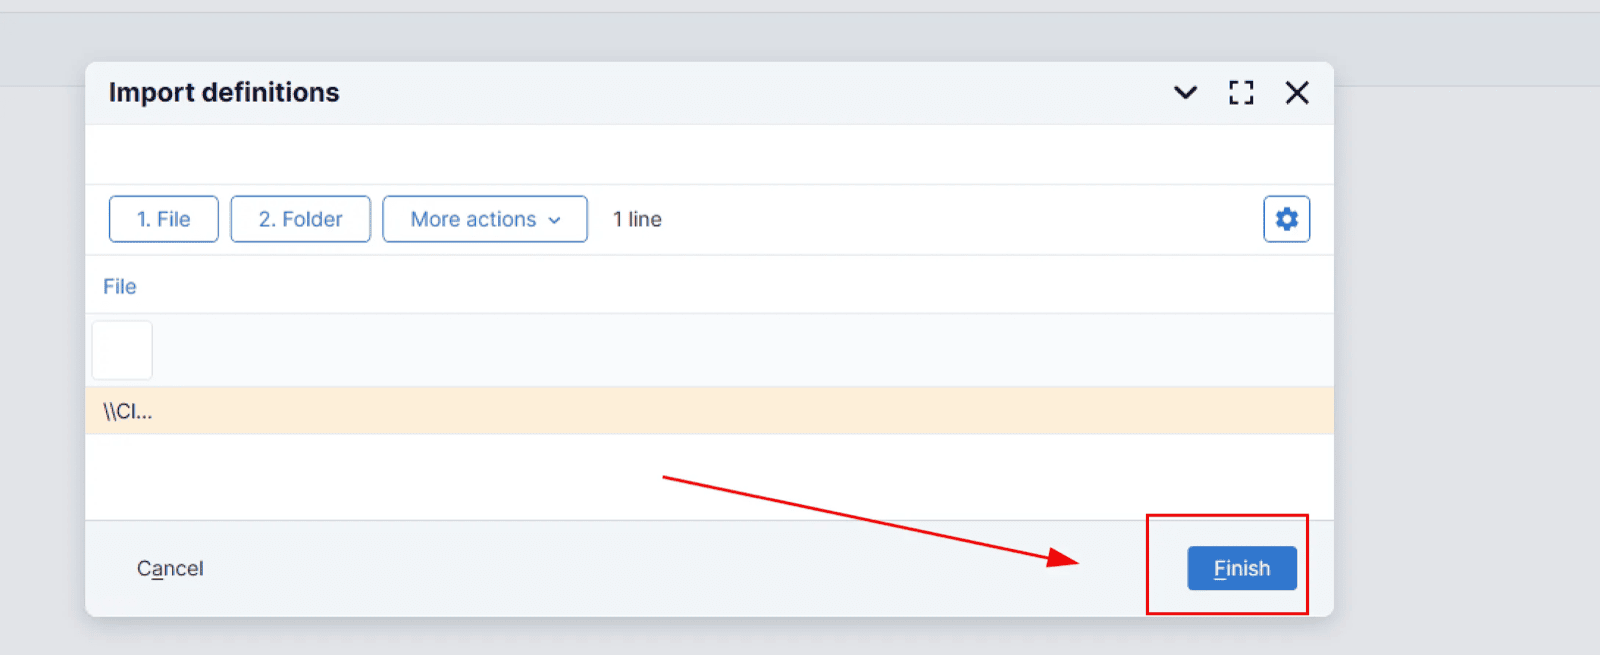 Après avoir accepté le message d'avertissement, AFAS importera les GetConnectors. Une fois terminé, sélectionnez **Next** :
 ### Étape 3 : Ajoutez les UpdateConnectors
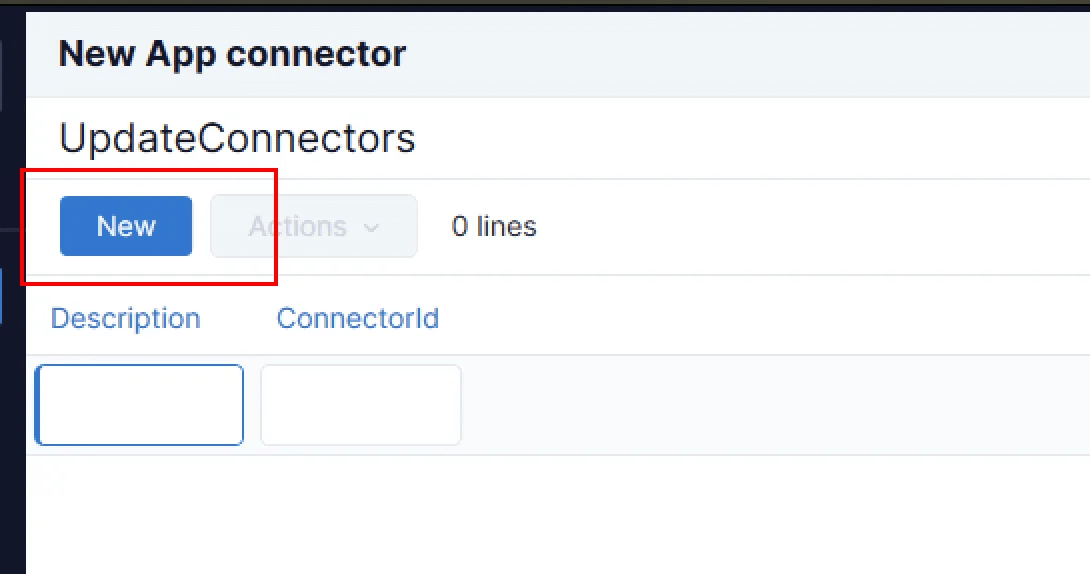 Utilisez la barre de recherche pour trouver et ajouter les UpdateConnectors suivants :
* Inkooprelatie organisatie - KnPurchaseRelationOrg
* Inkooprelatie persoon - KnPurchaseRealationPer
* Verkoopsrelatie organisatie - KnSalesRelationOrg
* Verkoopsrelatie persoon - KnSalesRelationPer
* Financiële mutaties - FiEntries
* Code verbijzondering - KnDimCode
Utilisez la barre de recherche pour trouver et ajouter les UpdateConnectors suivants :
* Inkooprelatie organisatie - KnPurchaseRelationOrg
* Inkooprelatie persoon - KnPurchaseRealationPer
* Verkoopsrelatie organisatie - KnSalesRelationOrg
* Verkoopsrelatie persoon - KnSalesRelationPer
* Financiële mutaties - FiEntries
* Code verbijzondering - KnDimCode
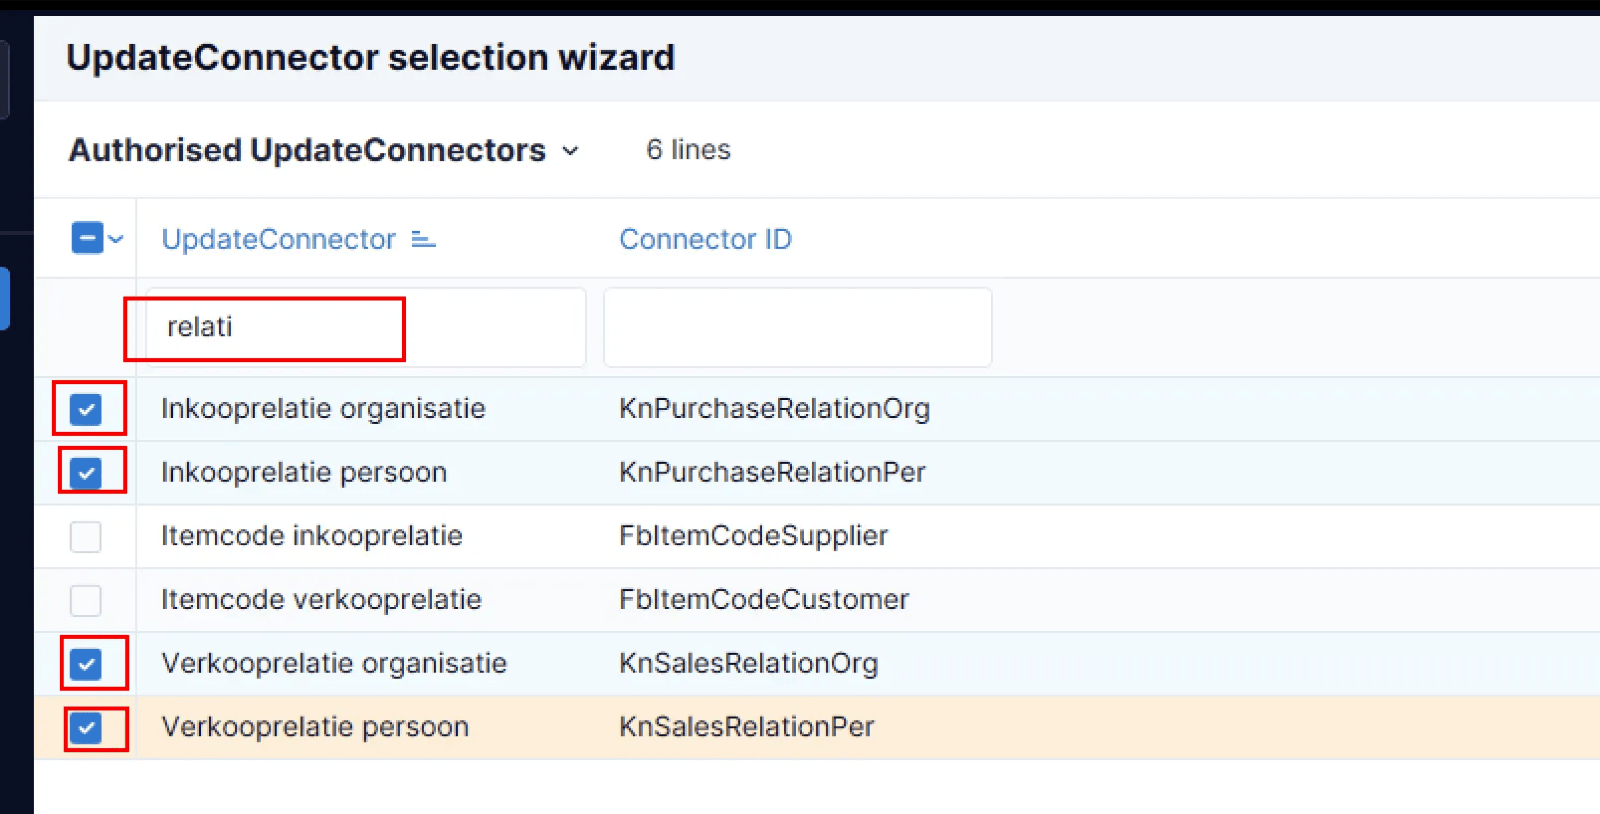 Cochez les cases pour chaque connecteur, cliquez sur **Finish**, puis cliquez sur **New** pour continuer à ajouter tous les connecteurs.
Une fois tous les UpdateConnectors ajoutés, cliquez sur **Next**.
Cochez les cases pour chaque connecteur, cliquez sur **Finish**, puis cliquez sur **New** pour continuer à ajouter tous les connecteurs.
Une fois tous les UpdateConnectors ajoutés, cliquez sur **Next**.
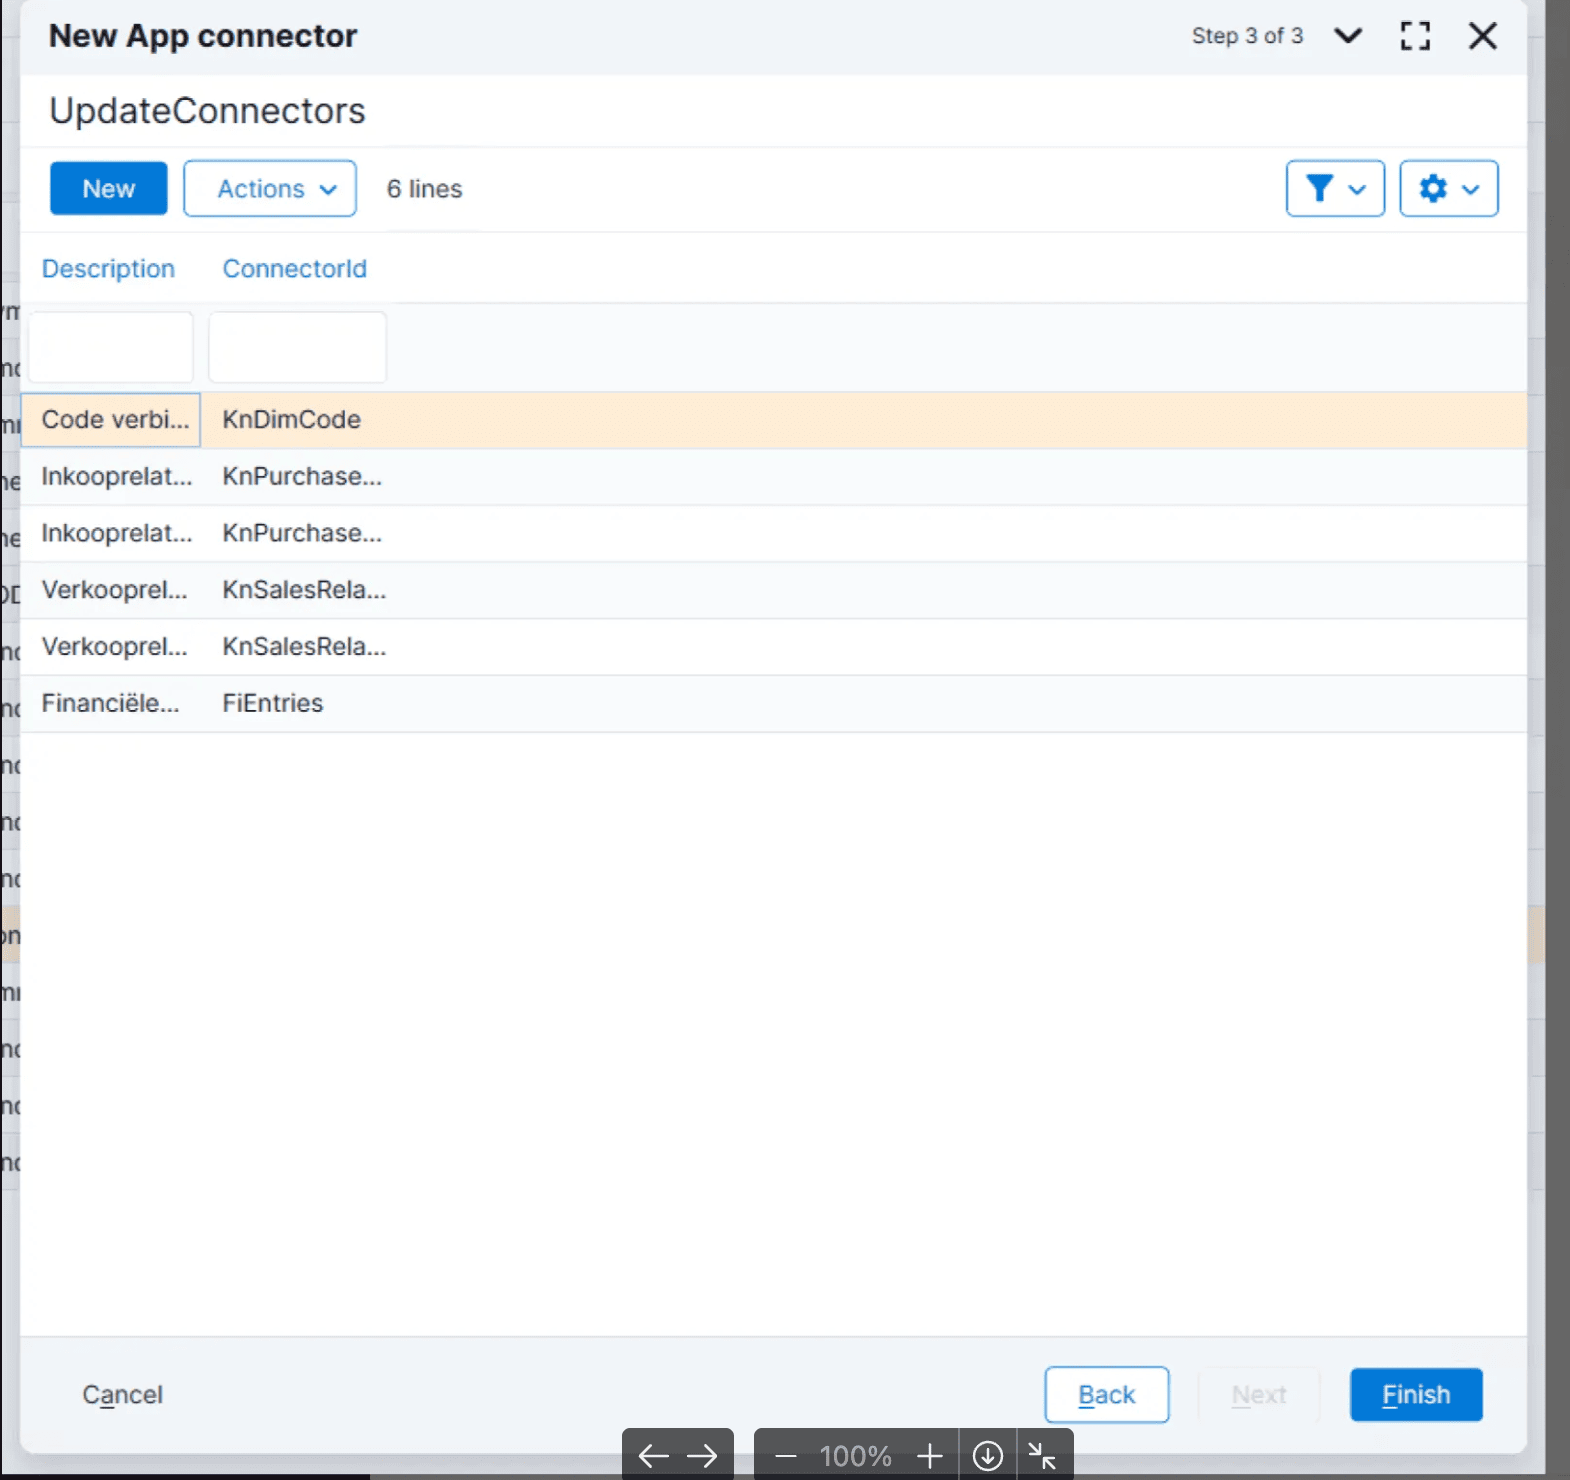 Cliquez sur « Finish »
⚠ **Important :** Veillez à sélectionner tous les GetConnectors et UpdateConnectors indiqués dans la documentation. Même si un connecteur semble sans rapport avec votre cas d'usage, l'intégration ne fonctionnera pas si tous les connecteurs ne sont pas activés. ⚠
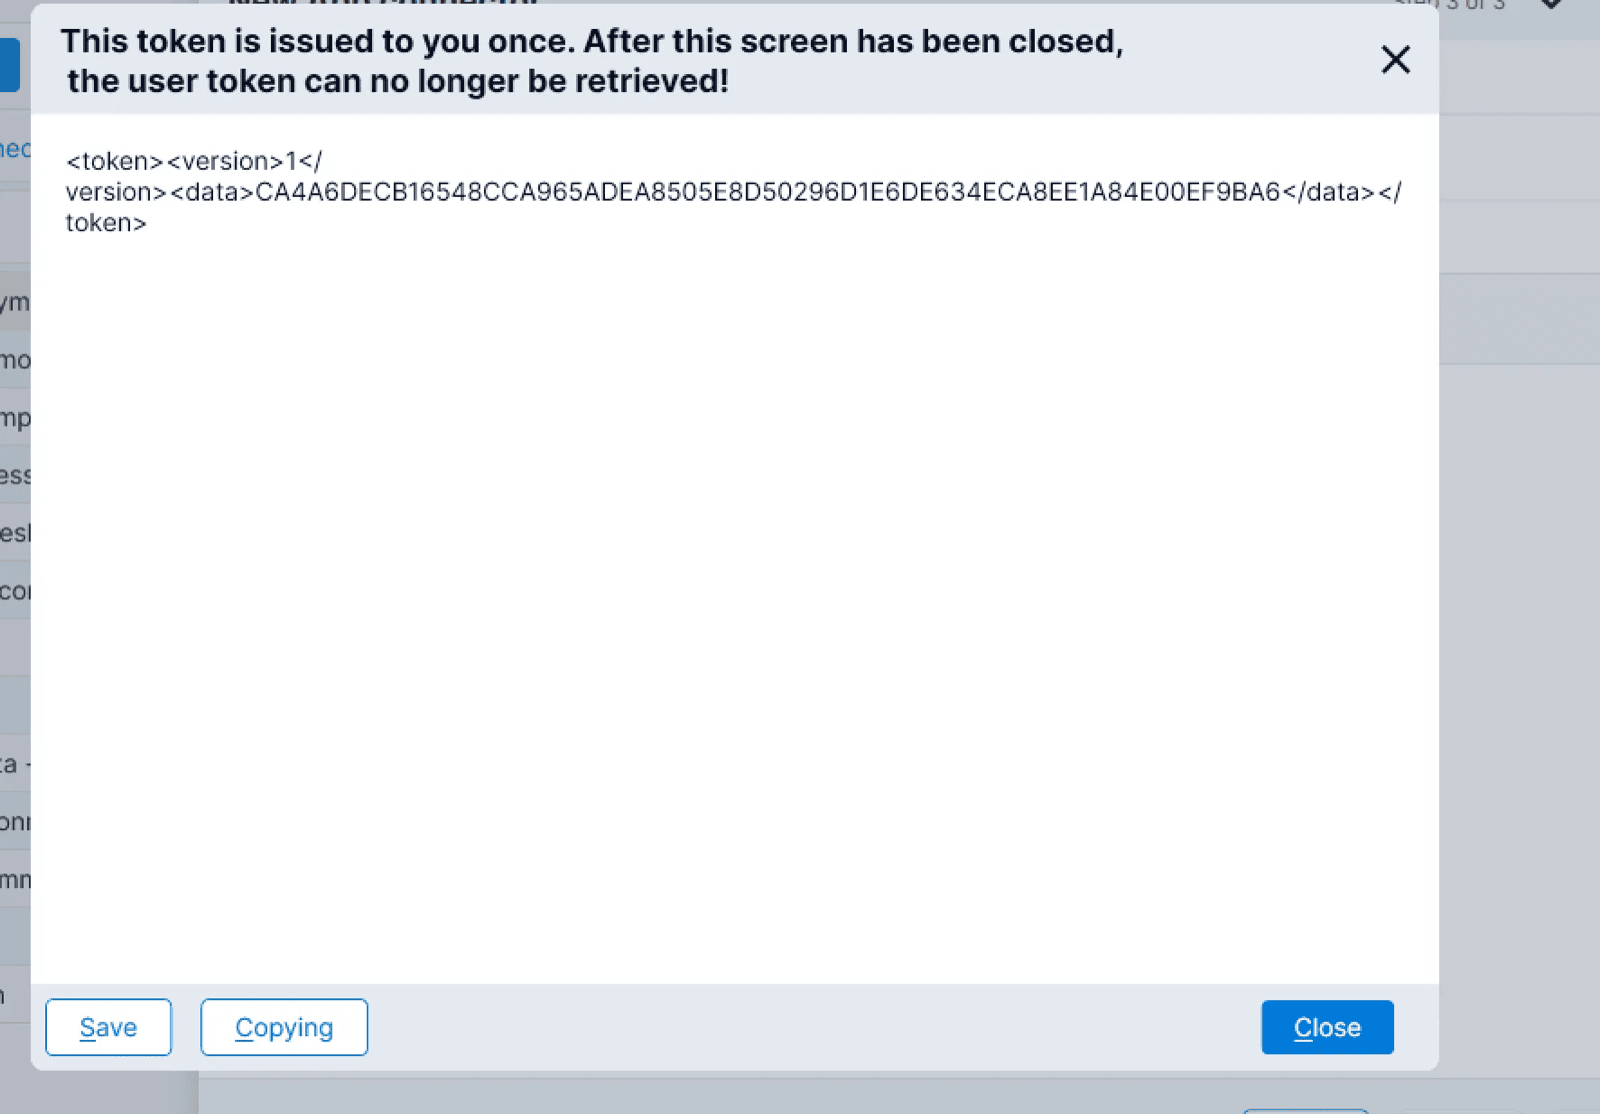
### Étape 4 : Enregistrez votre token API
**AFAS affichera le token API après la finalisation de la configuration des connecteurs.**\
Conservez-le en sécurité, car vous devrez le renseigner lors de l'activation de la connexion décrite dans la section suivante.
Cliquez sur « Finish »
⚠ **Important :** Veillez à sélectionner tous les GetConnectors et UpdateConnectors indiqués dans la documentation. Même si un connecteur semble sans rapport avec votre cas d'usage, l'intégration ne fonctionnera pas si tous les connecteurs ne sont pas activés. ⚠
### Étape 4 : Enregistrez votre token API
**AFAS affichera le token API après la finalisation de la configuration des connecteurs.**\
Conservez-le en sécurité, car vous devrez le renseigner lors de l'activation de la connexion décrite dans la section suivante.
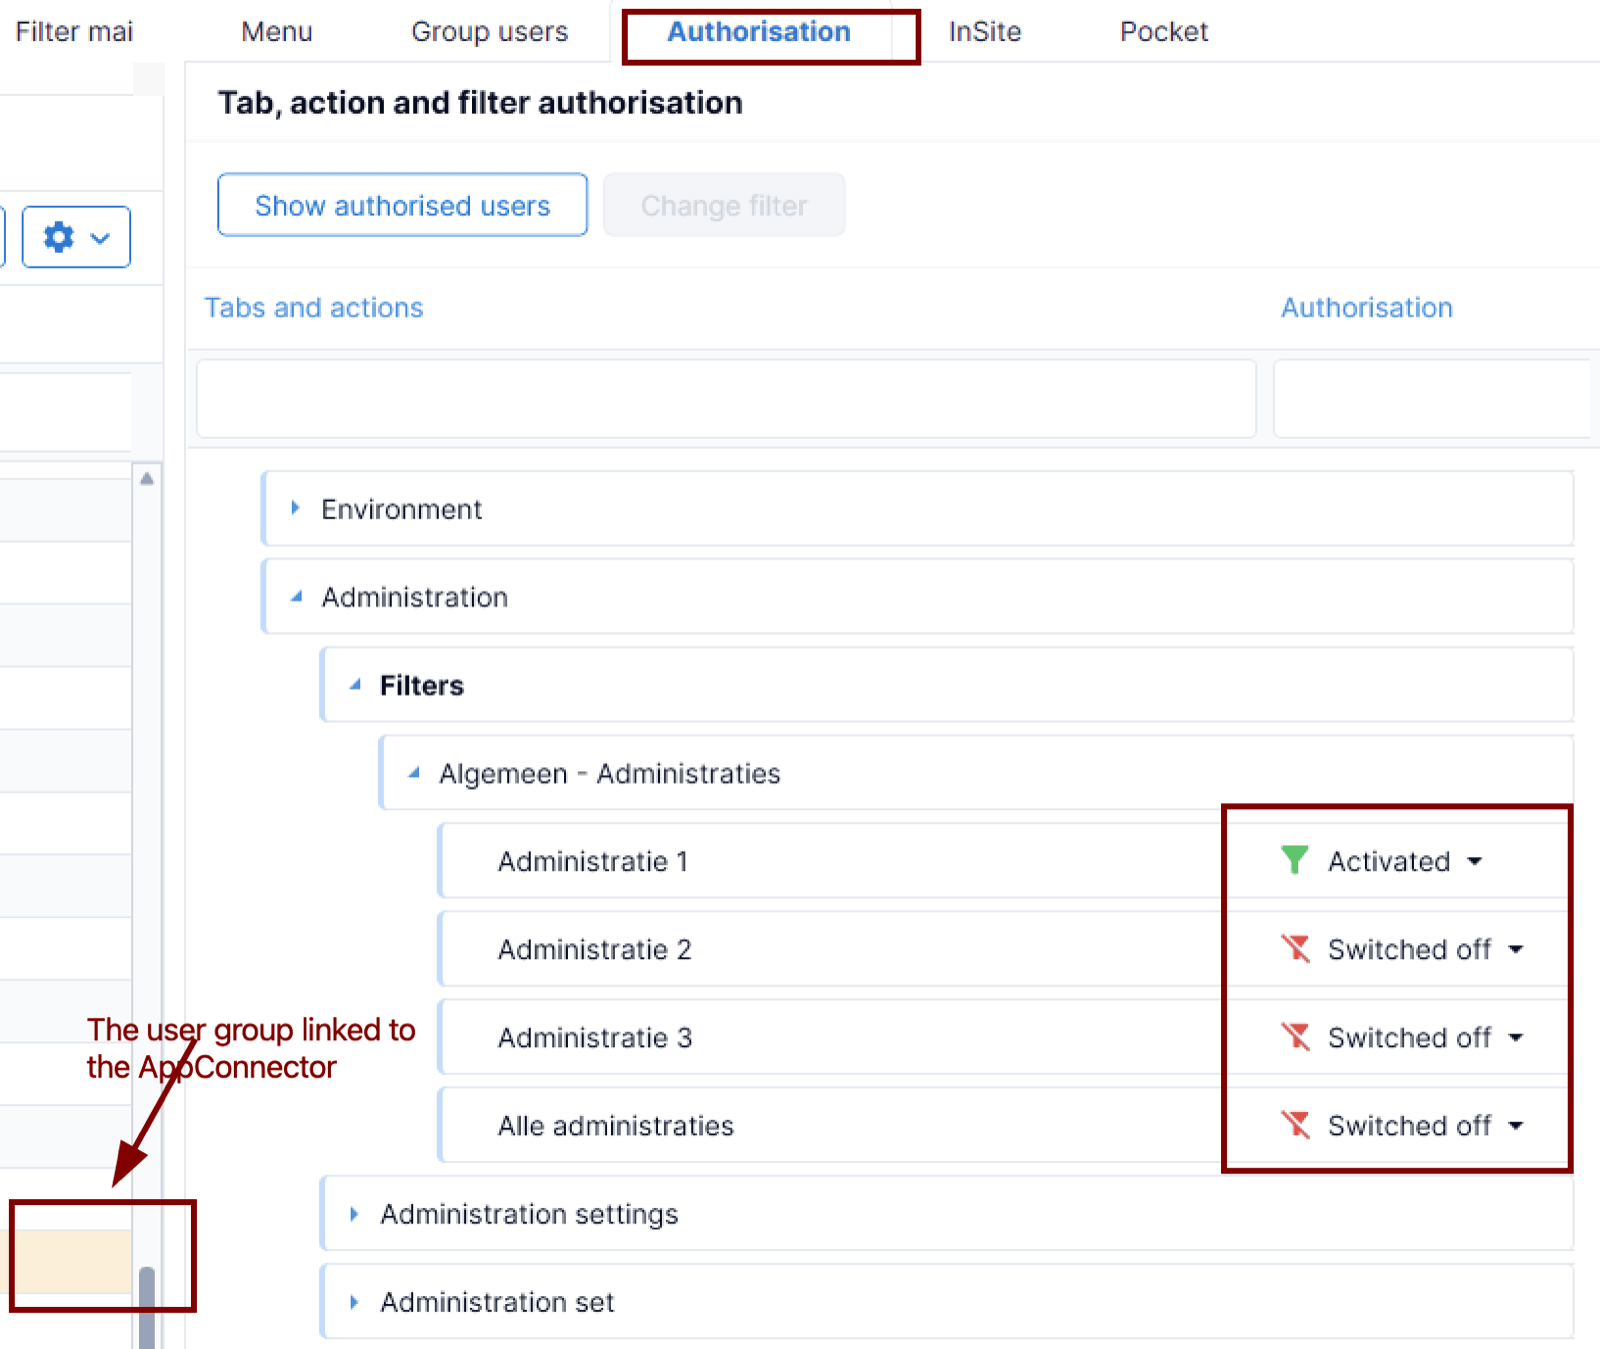
 Cette App Chift nécessite le filtre d'autorisation « Algemeen - Adminstraties ». Vous pouvez le vérifier en accédant à l'outil d'autorisation et en retrouvant le groupe d'autorisation qui a été automatiquement créé lors du processus de l'App Connector, dans la partie gauche de l'écran. Une fois sélectionné, retrouvez les filtres d'autorisation dans l'onglet « Authorisiation » et activez les Administraties (dossiers) pertinents que vous souhaitez utiliser dans le cadre de l'intégration. Dans l'image d'exemple, seule l'Administratie 1 fera partie du périmètre.
 # ⚡️ CONNEXION
## ❶ CONNECTER
# ⚡️ CONNEXION
## ❶ CONNECTER
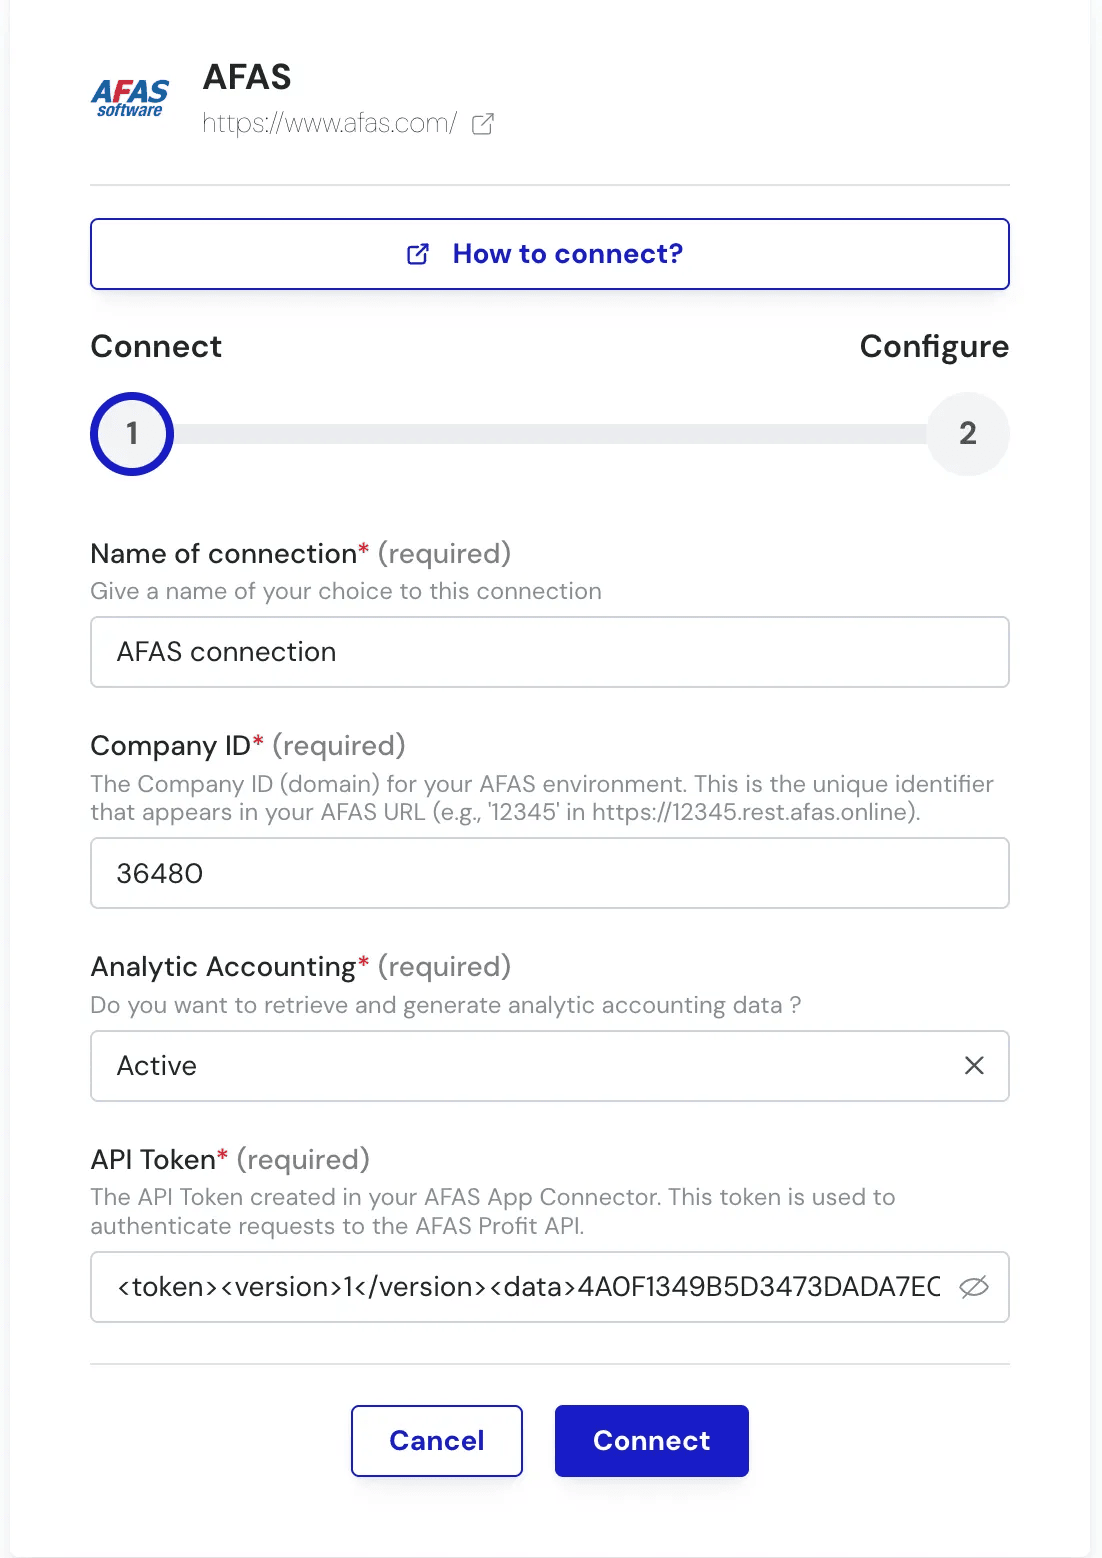 ### 1) Company ID :
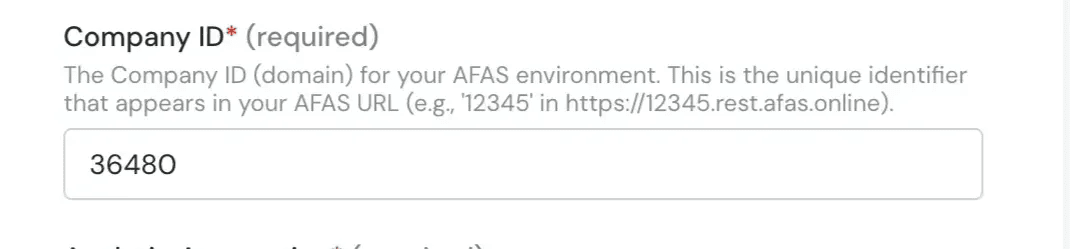 ***a) Dans l'url :***
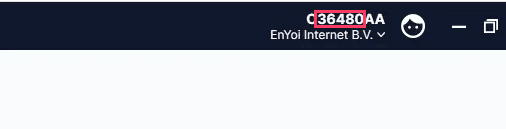
 **b) Dans le coin supérieur droit** de votre écran.
⚠ **Remarque :** Le numéro d'organisation est composé **uniquement de chiffres**. Par exemple, dans ce cas il s'agit de `36480`, et **non** de `O36480AA`.
**b) Dans le coin supérieur droit** de votre écran.
⚠ **Remarque :** Le numéro d'organisation est composé **uniquement de chiffres**. Par exemple, dans ce cas il s'agit de `36480`, et **non** de `O36480AA`.
 ### 2) Token API :
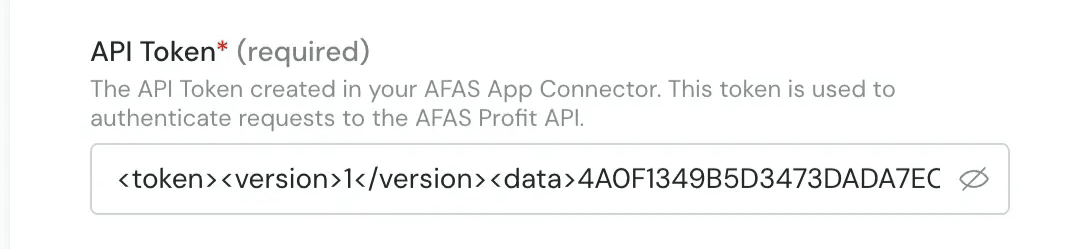 Collez le token API que vous avez enregistré lors de la phase de préparation (**Étape 4 : Enregistrez votre token API**).
⚠ **Important :** Assurez-vous de coller le token exactement tel qu'il a été enregistré.
## ❷ Configurer
Collez le token API que vous avez enregistré lors de la phase de préparation (**Étape 4 : Enregistrez votre token API**).
⚠ **Important :** Assurez-vous de coller le token exactement tel qu'il a été enregistré.
## ❷ Configurer
 **Conditions de paiement par défaut**
Sélectionnez les conditions de paiement par défaut pour la création des **clients** et des **fournisseurs**.
**Administrative ID**
ℹ *Si ce champ n'est pas affiché de l'autre côté, vous pouvez l'ignorer.*
Sélectionnez l'**administrative ID** auquel vous souhaitez vous connecter.\
Cette option est utilisée lorsque vous devez vous connecter à un **administrative ID spécifique** (par exemple, un dossier comptable particulier).
**Plan analytique par défaut**
ℹ *Si ce champ n'est pas affiché de l'autre côté, vous pouvez l'ignorer.*
Sélectionnez l'**axe d'affectation** utilisé par défaut.
Validez ! Félicitations ! 🎉
**Conditions de paiement par défaut**
Sélectionnez les conditions de paiement par défaut pour la création des **clients** et des **fournisseurs**.
**Administrative ID**
ℹ *Si ce champ n'est pas affiché de l'autre côté, vous pouvez l'ignorer.*
Sélectionnez l'**administrative ID** auquel vous souhaitez vous connecter.\
Cette option est utilisée lorsque vous devez vous connecter à un **administrative ID spécifique** (par exemple, un dossier comptable particulier).
**Plan analytique par défaut**
ℹ *Si ce champ n'est pas affiché de l'autre côté, vous pouvez l'ignorer.*
Sélectionnez l'**axe d'affectation** utilisé par défaut.
Validez ! Félicitations ! 🎉