> ## Documentation Index
> Fetch the complete documentation index at: https://docs.chift.eu/llms.txt
> Use this file to discover all available pages before exploring further.
# Connection flow through Chift's API
This guide introduces the **connection flow** in Chift and explains how to connect your end-users (called **consumers**) to a connector through the API.
A **connection** represents the link between a consumer (your end-customer) and a software integration or connector (e.g., Odoo, Sage, QuickBooks).
**Each consumer typically has one connection.** For advanced scenarios with multiple connections per consumer, see [Multiple connections on same consumer for same API](https://docs.chift.eu/developer-guides/implementation/connections#multiple-connections-on-same-consumer-for-same-api).
Connections store the credentials and configuration required to access the software and interact with Chift’s Unified API.
For more details on connections, see [Connections ↗️](https://docs.chift.eu/developer-guides/implementation/connections).
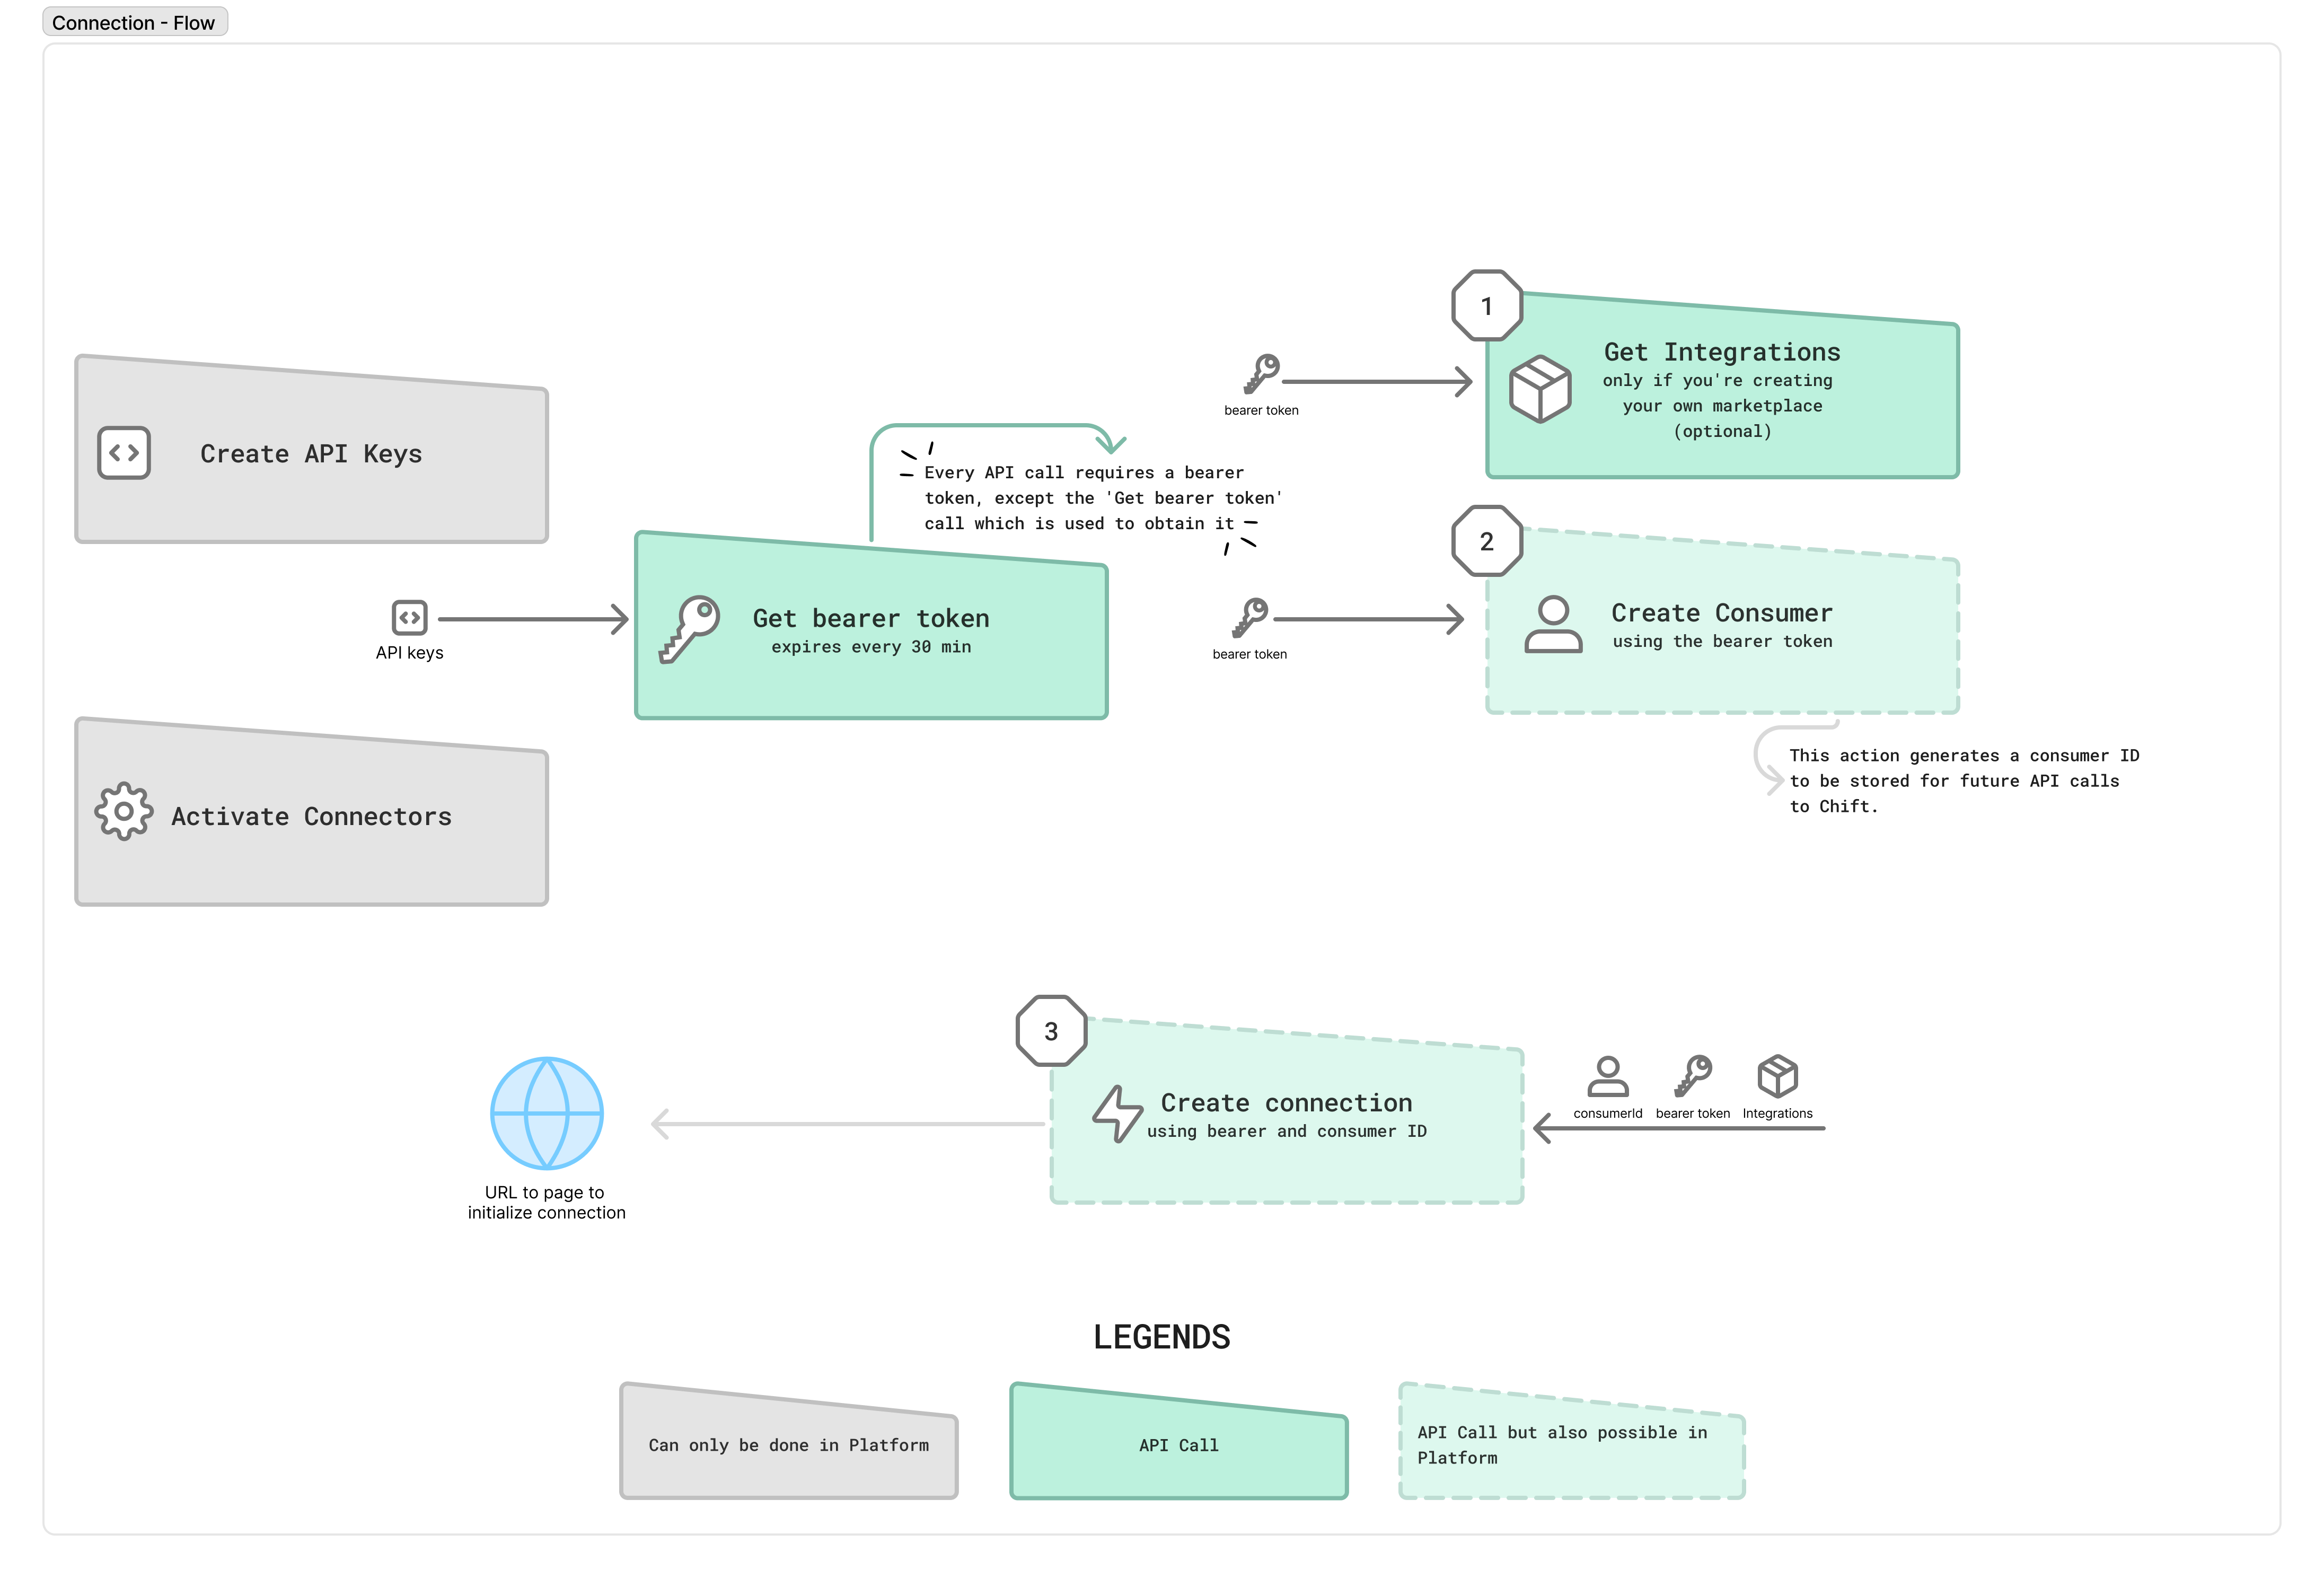 ***
## 1. Retrieve active integrations (connectors)
This step is only required if you want to build your own marketplace inside your product.\
It lets you retrieve all **active integrations** (connectors) from your Chift platform, including their technical `integration_id` and logos.
* If you build your own marketplace → use this endpoint.
* If you use Chift’s hosted marketplace → you can skip this step.
**Endpoint:** Get list of integrations\
[API Reference ↗️](https://docs.chift.eu/api-reference/endpoints/integrations/get-list-of-integrations)
**Notes:**
* Use the query parameter `status=active` to get the list of available connectors.
* Logos can be retrieved as base64 for display in your interface:\
[Returns a logo/icon (as base64) ↗️](https://docs.chift.eu/api-reference/endpoints/integrations/returns-a-logoicon-of-an-integration-as-base64)
***
## 2. Create the consumer
A **consumer** represents your end-customer within Chift.
**Endpoint:** Create new consumer\
[API Reference ↗️](https://docs.chift.eu/api-reference/endpoints/consumers/create-new-consumer)
**Fields:**
* `name`: **Required** — Consumer name.
* `redirect_url`: URL to redirect the user after activation.
* Can be customized per consumer.
* Or defined as a static default for your account and connectors (see [Configure account ↗️](https://docs.chift.eu/back-office/getting-started/configure-account#default-redirection-url)).
* A detailed explanation of how redirection works is provided in the [Annex on Redirect URL](#appendix).
* `internal_reference`: Your internal ID/reference for this consumer, used to reconcile with your internal systems.
* `email`: Used for [automated reminders](https://docs.chift.eu/back-office/user-onboarding/email-reminders) and [local agent](https://docs.chift.eu/back-office/advanced/local-agent) deployment (if applicable).
***
## 3. Generate the activation link
Once the consumer exists, generate an activation link so they can connect their software.
**Endpoint:** Add new connection\
[API Reference ↗️](https://docs.chift.eu/api-reference/endpoints/connections/add-new-connection)
**Fields:**
***A - Using your marketplace:***
* `name`: **Required** — Display name of the connection.
* `consumerId`: **Required** — From Step 2.
* `integrationId`: From Step 1.
***B - Using Chift's marketplace:***
* `name`: **Required** — Display name of the connection.
* `consumerId`: **Required** — From Step 2.
* `redirect`: Optional (`true` / `false`, default = `false`). See [Redirect URL](#appendix).
The activation link must then be shared with the consumer.\
It is secured by a token and valid for **30 minutes**.
After this step, your consumer must authorize and sometimes provide additional information to complete the connection activation.\
👉 Connection status and updates are covered in the following article [Monitoring & Updating Connections](/developer-guides/monitor-connections).
***
# **Appendix**
## 🔄 Redirect URL
The redirect behavior in Chift refers to the process of sending the consumer back to a specific URL (typically within your software) once the connection flow has been completed.\
It is controlled by two parameters:
* **`redirect`** — a boolean that determines *whether* Chift should redirect the user after completing or failing the connection flow.
* **`redirect_url`** — the destination URL where the user is redirected after the connection process.\
This can be defined **per consumer** or **globally** in your account settings.\
See [Configure account ↗️](https://docs.chift.eu/back-office/getting-started/configure-account#default-redirection-url)
### 1. During connection creation
| Scenario | Behavior |
| -------------------------------------------------- | ------------------------------------------------------------------------------------------------------------ |
| **`integration_id provided`** | Automatically redirects the user to their `redirect_url` after the connection is successfully activated. |
| **`redirect = true and integration_id = null`** | Redirects the user to the `redirect_url` after completing the connection flow through the Chift Marketplace. |
| **`redirect = false and integration_id provided`** | Same as the first case — redirects directly to the user’s `redirect_url` after activation. |
***
### 2. During connection update
| Scenario | Behavior |
| ----------------------------------------------- | ---------------------------------------------------------------------------------------------------------------------------------------------------- |
| **`redirect = true and success`** | Redirects the user directly to the defined `redirect_url`. |
| **`redirect = true and error or user cancel`** | Remains on the current page to allow retry. If the user clicks **Cancel** or **Back to \[account name]**, they are redirected to the `redirect_url`. |
| **`redirect = false and success`** | Redirects the user to the Chift Marketplace page. |
| **`redirect = false and error or user cancel`** | Remains on the current page to allow retry. If the user clicks **Cancel** or **Back to \[account name]**, they are redirected to the `redirect_url`. |
***
### Note
* When defined at both levels, the consumer-level `redirect_url` takes precedence.
***
### URL parameters
When redirection occurs, Chift automatically appends query parameters to provide context on the connection result (e.g., `connectionStatus`, `error`).\
See [Configure account ↗️](https://docs.chift.eu/back-office/getting-started/configure-account#redirect-url-parameters) for details and to ensure it is activated.
***
### ✅ Summary
* Default behavior: `redirect = false`
* `redirect_url` can be defined per consumer or globally in account settings.
* Redirection behavior is consistent for both new and updated connections.
***
## 1. Retrieve active integrations (connectors)
This step is only required if you want to build your own marketplace inside your product.\
It lets you retrieve all **active integrations** (connectors) from your Chift platform, including their technical `integration_id` and logos.
* If you build your own marketplace → use this endpoint.
* If you use Chift’s hosted marketplace → you can skip this step.
**Endpoint:** Get list of integrations\
[API Reference ↗️](https://docs.chift.eu/api-reference/endpoints/integrations/get-list-of-integrations)
**Notes:**
* Use the query parameter `status=active` to get the list of available connectors.
* Logos can be retrieved as base64 for display in your interface:\
[Returns a logo/icon (as base64) ↗️](https://docs.chift.eu/api-reference/endpoints/integrations/returns-a-logoicon-of-an-integration-as-base64)
***
## 2. Create the consumer
A **consumer** represents your end-customer within Chift.
**Endpoint:** Create new consumer\
[API Reference ↗️](https://docs.chift.eu/api-reference/endpoints/consumers/create-new-consumer)
**Fields:**
* `name`: **Required** — Consumer name.
* `redirect_url`: URL to redirect the user after activation.
* Can be customized per consumer.
* Or defined as a static default for your account and connectors (see [Configure account ↗️](https://docs.chift.eu/back-office/getting-started/configure-account#default-redirection-url)).
* A detailed explanation of how redirection works is provided in the [Annex on Redirect URL](#appendix).
* `internal_reference`: Your internal ID/reference for this consumer, used to reconcile with your internal systems.
* `email`: Used for [automated reminders](https://docs.chift.eu/back-office/user-onboarding/email-reminders) and [local agent](https://docs.chift.eu/back-office/advanced/local-agent) deployment (if applicable).
***
## 3. Generate the activation link
Once the consumer exists, generate an activation link so they can connect their software.
**Endpoint:** Add new connection\
[API Reference ↗️](https://docs.chift.eu/api-reference/endpoints/connections/add-new-connection)
**Fields:**
***A - Using your marketplace:***
* `name`: **Required** — Display name of the connection.
* `consumerId`: **Required** — From Step 2.
* `integrationId`: From Step 1.
***B - Using Chift's marketplace:***
* `name`: **Required** — Display name of the connection.
* `consumerId`: **Required** — From Step 2.
* `redirect`: Optional (`true` / `false`, default = `false`). See [Redirect URL](#appendix).
The activation link must then be shared with the consumer.\
It is secured by a token and valid for **30 minutes**.
After this step, your consumer must authorize and sometimes provide additional information to complete the connection activation.\
👉 Connection status and updates are covered in the following article [Monitoring & Updating Connections](/developer-guides/monitor-connections).
***
# **Appendix**
## 🔄 Redirect URL
The redirect behavior in Chift refers to the process of sending the consumer back to a specific URL (typically within your software) once the connection flow has been completed.\
It is controlled by two parameters:
* **`redirect`** — a boolean that determines *whether* Chift should redirect the user after completing or failing the connection flow.
* **`redirect_url`** — the destination URL where the user is redirected after the connection process.\
This can be defined **per consumer** or **globally** in your account settings.\
See [Configure account ↗️](https://docs.chift.eu/back-office/getting-started/configure-account#default-redirection-url)
### 1. During connection creation
| Scenario | Behavior |
| -------------------------------------------------- | ------------------------------------------------------------------------------------------------------------ |
| **`integration_id provided`** | Automatically redirects the user to their `redirect_url` after the connection is successfully activated. |
| **`redirect = true and integration_id = null`** | Redirects the user to the `redirect_url` after completing the connection flow through the Chift Marketplace. |
| **`redirect = false and integration_id provided`** | Same as the first case — redirects directly to the user’s `redirect_url` after activation. |
***
### 2. During connection update
| Scenario | Behavior |
| ----------------------------------------------- | ---------------------------------------------------------------------------------------------------------------------------------------------------- |
| **`redirect = true and success`** | Redirects the user directly to the defined `redirect_url`. |
| **`redirect = true and error or user cancel`** | Remains on the current page to allow retry. If the user clicks **Cancel** or **Back to \[account name]**, they are redirected to the `redirect_url`. |
| **`redirect = false and success`** | Redirects the user to the Chift Marketplace page. |
| **`redirect = false and error or user cancel`** | Remains on the current page to allow retry. If the user clicks **Cancel** or **Back to \[account name]**, they are redirected to the `redirect_url`. |
***
### Note
* When defined at both levels, the consumer-level `redirect_url` takes precedence.
***
### URL parameters
When redirection occurs, Chift automatically appends query parameters to provide context on the connection result (e.g., `connectionStatus`, `error`).\
See [Configure account ↗️](https://docs.chift.eu/back-office/getting-started/configure-account#redirect-url-parameters) for details and to ensure it is activated.
***
### ✅ Summary
* Default behavior: `redirect = false`
* `redirect_url` can be defined per consumer or globally in account settings.
* Redirection behavior is consistent for both new and updated connections.