> ## Documentation Index
> Fetch the complete documentation index at: https://docs.chift.eu/llms.txt
> Use this file to discover all available pages before exploring further.

# e-conomic

export const OverviewLegend = ({showTitle = true}) => <blockquote>
    {showTitle && <p>
        <strong>Overview legend 🧭</strong>
      </p>}
    <table>
      <thead>
        <tr>
          <th>Column</th>
          <th>Value</th>
          <th>Meaning</th>
        </tr>
      </thead>
      <tbody>
        <tr>
          <td>Geography</td>
          <td>🇫🇷 FR · 🇧🇪 BE · …</td>
          <td>Countries where the connector is officially supported.</td>
        </tr>
        <tr>
          <td rowSpan={3}>Software type</td>
          <td>SaaS</td>
          <td>Through API.</td>
        </tr>
        <tr>
          <td>On-premise (local agent)</td>
          <td>
            Software running locally — installation of a local agent is
            required.
          </td>
        </tr>
        <tr>
          <td>On-premise (API)</td>
          <td>Software running locally — API available.</td>
        </tr>
        <tr>
          <td rowSpan={2}>Status</td>
          <td>🔵 Live</td>
          <td>Connector is generally available and production-ready.</td>
        </tr>
        <tr>
          <td>🟣 Beta</td>
          <td>
            Connector is in beta — usable in production but may still evolve.
          </td>
        </tr>
        <tr>
          <td>Multi folder</td>
          <td>✅ Yes / ❌ No</td>
          <td>
            Connection to multiple accounting folders at the same time (see{' '}
            <a href="/developer-guides/api-guides/accounting/folders">
              accounting folders guide
            </a>
            ).
          </td>
        </tr>
        <tr>
          <td>Rate limits</td>
          <td>✅ No / ❌ Yes</td>
          <td>Whether the target software sets rate limits on API calls.</td>
        </tr>
        <tr>
          <td rowSpan={3}>API keys</td>
          <td>❎ No</td>
          <td>
            No API keys required (OAuth2 client secret and client ID). No
            requirements to activate the connector — you can create a
            connection.
          </td>
        </tr>
        <tr>
          <td>🔑</td>
          <td>
            Keys are required to activate the connector. Chift cannot act as
            intermediary to obtain them; we can still assist with steps to get
            keys directly from the software provider.
          </td>
        </tr>
        <tr>
          <td>🔑 ☑️ via Chift</td>
          <td>
            Keys are required to activate the connector. You can go through
            Chift to get the keys (intermediary or partnership keys). An
            approval process may still apply, but you do not need to request
            keys from the vendor on your own.
          </td>
        </tr>
        <tr>
          <td rowSpan={3}>Approval / certification process</td>
          <td>⚡ Instant</td>
          <td>
            No keys required, or Chift can encode their keys for you when
            requested. Activation is instantaneous.
          </td>
        </tr>
        <tr>
          <td>🟢 Approval — [Duration]</td>
          <td>
            Approval will be granted. The vendor may require information or app
            configuration in a developer portal before issuing keys.
          </td>
        </tr>
        <tr>
          <td>🟠 Approval — [Duration]</td>
          <td>
            Approval is not guaranteed — often due to integration strategy; the
            vendor may do a deeper assessment (competitors, partnership
            requirements, and similar).
          </td>
        </tr>
        <tr>
          <td rowSpan={2}>Activation time</td>
          <td>⚡ Instant</td>
          <td>
            If no keys are required, or Chift has keys ready to share with you.
          </td>
        </tr>
        <tr>
          <td>Time</td>
          <td>
            Estimated time to get the connector activated in production as a
            result of the approval or certification process (e.g. ⏱️ 2 days, 1
            week).
          </td>
        </tr>
        <tr>
          <td rowSpan={3}>Extra fees — software editor</td>
          <td>❎ No</td>
          <td>No fees charged by the software editor.</td>
        </tr>
        <tr>
          <td>💰 🕹️</td>
          <td>Fees associated with obtaining a testing account.</td>
        </tr>
        <tr>
          <td>💰 🔑</td>
          <td>Fees charged to get API keys.</td>
        </tr>
        <tr>
          <td rowSpan={2}>Extra fees — end user</td>
          <td>❎ No</td>
          <td>The end user does not pay extra to get integrated.</td>
        </tr>
        <tr>
          <td>💰 Yes</td>
          <td>The end user must pay extra to get integrated.</td>
        </tr>
        <tr>
          <td>Comments on costs</td>
          <td>—</td>
          <td>Additional notes on fees or pricing when relevant.</td>
        </tr>
        <tr>
          <td rowSpan={4}>Sandbox account</td>
          <td>✅ via Chift</td>
          <td>Chift can provide you with a sandbox.</td>
        </tr>
        <tr>
          <td>🟠 Only through integrator</td>
          <td>Only the software's integrator can provide a sandbox.</td>
        </tr>
        <tr>
          <td>✅ Self-service</td>
          <td>You can create your own sandbox.</td>
        </tr>
        <tr>
          <td>✅ Trial account</td>
          <td>It is possible to create a trial account.</td>
        </tr>
      </tbody>
    </table>
  </blockquote>;

export const ConnectorCardIframe = ({api = 'accounting', connectors}) => {
  const [theme, setTheme] = React.useState('light');
  React.useEffect(() => {
    const checkTheme = () => {
      const isDark = document.documentElement.classList.contains('dark');
      setTheme(isDark ? 'dark' : 'light');
    };
    checkTheme();
    const observer = new MutationObserver(checkTheme);
    observer.observe(document.documentElement, {
      attributes: true,
      attributeFilter: ['class']
    });
    return () => observer.disconnect();
  }, []);
  const queryParams = new URLSearchParams({
    api,
    theme,
    ...connectors ? {
      connectors
    } : {}
  });
  const iframeUrl = `https://chift-coverage-matrix.s3.eu-west-3.amazonaws.com/connector-card.html?${queryParams.toString()}`;
  return <iframe src={iframeUrl} title={`Chift connector information - ${api}`} style={{
    display: 'block',
    width: '100%',
    height: '480px',
    margin: 0,
    padding: 0,
    border: 'none'
  }} />;
};

export const CoverageIframe = ({api = 'accounting', connectors}) => {
  const [theme, setTheme] = React.useState('light');
  const [isFullscreen, setIsFullscreen] = React.useState(false);
  const [currentIframeUrl, setCurrentIframeUrl] = React.useState(null);
  const iframeRef = React.useRef(null);
  React.useEffect(() => {
    const checkTheme = () => {
      const isDark = document.documentElement.classList.contains('dark');
      setTheme(isDark ? 'dark' : 'light');
    };
    checkTheme();
    const observer = new MutationObserver(checkTheme);
    observer.observe(document.documentElement, {
      attributes: true,
      attributeFilter: ['class']
    });
    return () => observer.disconnect();
  }, []);
  React.useEffect(() => {
    const handleFullscreenChange = () => {
      setIsFullscreen(!!document.fullscreenElement);
    };
    document.addEventListener('fullscreenchange', handleFullscreenChange);
    return () => document.removeEventListener('fullscreenchange', handleFullscreenChange);
  }, []);
  React.useEffect(() => {
    const handleMessage = event => {
      if (!event.origin.includes('chift-coverage-matrix.s3.eu-west-3.amazonaws.com')) return;
      if (event.data?.type === 'urlChange' && event.data?.url) {
        setCurrentIframeUrl(event.data.url);
      }
    };
    window.addEventListener('message', handleMessage);
    return () => window.removeEventListener('message', handleMessage);
  }, []);
  const queryParams = new URLSearchParams({
    api,
    theme,
    ...connectors ? {
      connectors
    } : {}
  });
  const iframeUrl = `https://chift-coverage-matrix.s3.eu-west-3.amazonaws.com/coverage.html?${queryParams.toString()}`;
  const openUrl = currentIframeUrl || iframeUrl;
  const toggleFullscreen = () => {
    if (!document.fullscreenElement) {
      iframeRef.current?.requestFullscreen();
    } else {
      document.exitFullscreen();
    }
  };
  const isDark = theme === 'dark';
  const buttonStyle = {
    display: 'inline-flex',
    alignItems: 'center',
    gap: '8px',
    padding: '4px 12px',
    fontSize: '14px',
    fontWeight: '500',
    color: isDark ? '#d4d4d4' : '#374151',
    backgroundColor: 'transparent',
    border: `1px solid ${isDark ? '#404040' : '#e5e7eb'}`,
    borderRadius: '12px',
    cursor: 'pointer',
    textDecoration: 'none',
    transition: 'all 0.15s ease'
  };
  const hoverBg = isDark ? 'rgba(255,255,255,0.05)' : 'rgba(0,0,0,0.03)';
  const hoverBorder = isDark ? '#525252' : '#d1d5db';
  const defaultBg = 'transparent';
  const defaultBorder = isDark ? '#404040' : '#e5e7eb';
  return <>
  <div style={{
    display: 'flex',
    justifyContent: 'flex-end',
    gap: '12px',
    marginBottom: '8px'
  }}>
    <button onClick={toggleFullscreen} style={buttonStyle} onMouseEnter={e => {
    e.target.style.backgroundColor = hoverBg;
    e.target.style.borderColor = hoverBorder;
  }} onMouseLeave={e => {
    e.target.style.backgroundColor = defaultBg;
    e.target.style.borderColor = defaultBorder;
  }}>
      <svg width="16" height="16" viewBox="0 0 24 24" fill="none" stroke="currentColor" strokeWidth="2" strokeLinecap="round" strokeLinejoin="round">
        {isFullscreen ? <>
            <polyline points="4 14 10 14 10 20"></polyline>
            <polyline points="20 10 14 10 14 4"></polyline>
            <line x1="14" y1="10" x2="21" y2="3"></line>
            <line x1="3" y1="21" x2="10" y2="14"></line>
          </> : <>
            <polyline points="15 3 21 3 21 9"></polyline>
            <polyline points="9 21 3 21 3 15"></polyline>
            <line x1="21" y1="3" x2="14" y2="10"></line>
            <line x1="3" y1="21" x2="10" y2="14"></line>
          </>}
      </svg>
      {isFullscreen ? 'Exit Fullscreen' : 'Fullscreen'}
    </button>
    <a href={iframeUrl} target="_blank" rel="noopener noreferrer" style={buttonStyle} onMouseEnter={e => {
    e.target.style.backgroundColor = hoverBg;
    e.target.style.borderColor = hoverBorder;
  }} onMouseLeave={e => {
    e.target.style.backgroundColor = defaultBg;
    e.target.style.borderColor = defaultBorder;
  }}>
      <svg width="16" height="16" viewBox="0 0 24 24" fill="none" stroke="currentColor" strokeWidth="2" strokeLinecap="round" strokeLinejoin="round">
        <path d="M18 13v6a2 2 0 0 1-2 2H5a2 2 0 0 1-2-2V8a2 2 0 0 1 2-2h6"></path>
        <polyline points="15 3 21 3 21 9"></polyline>
        <line x1="10" y1="14" x2="21" y2="3"></line>
      </svg>
      Open in new tab
    </a>
  </div>
  <iframe ref={iframeRef} src={iframeUrl} title={`Chift Coverage Matrix - ${api}`} style={{
    height: 'max(500px, 80vh)'
  }} className="w-full" allowFullScreen />
  <blockquote>
    <p>
      <strong>Matrix Legend 🧭</strong>
    </p>
    <table>
      <thead>
        <tr>
          <th>Status</th>
          <th>Meaning</th>
        </tr>
      </thead>
      <tbody>
        <tr>
          <td>✅ Implemented</td>
          <td>Endpoint is implemented and available.</td>
        </tr>
        <tr>
          <td>❌ Not supported</td>
          <td>
            Endpoint is not supported by the target software (connector
            limitation). Cannot be implemented.
          </td>
        </tr>
        <tr>
          <td>💬 On request</td>
          <td>
            Endpoint is not implemented but feasibility is validated. Can be
            implemented on request — contact your Chift point of contact to
            discuss scope and timing.
          </td>
        </tr>
        <tr>
          <td>🔎 To be analyzed</td>
          <td>
            Endpoint is not implemented and feasibility has not yet been fully
            assessed. Analysis is pending.
          </td>
        </tr>
      </tbody>
    </table>
  </blockquote>
</>;
};

<ConnectorCardIframe api="accounting" connectors="Visma E-conomic" />

<Accordion title="Overview Legend 🧭">
  <OverviewLegend showTitle={false} />
</Accordion>

## Introduction

e-conomic is a cloud-based accounting software developed by Visma, primarily used by small and medium-sized businesses in Denmark and Scandinavia. It offers features such as invoicing, bookkeeping, VAT reporting, and financial reporting.

<Warning>
  e-conomic uses a **dual-API model**: a legacy REST API (`restapi.e-conomic.com`) and a newer OpenAPI (`apis.e-conomic.com`). Chift uses both depending on the endpoint.
</Warning>

## Configure e-conomic

### Prerequisites

The end user must have an active e-conomic subscription. Beyond that, the prerequisites depend on the authentication option you choose:

* **Option 1 — Use Chift's app:** no additional setup required.
* **Option 2 — Use your own app:** you must have an e-conomic developer agreement, create an app in your developer account, and store its `AppSecretToken`.

### Activation process

When connecting your end users to e-conomic, you can choose between two authentication approaches. In both cases the end-user experience is identical: the user clicks an installation URL and generates an `AgreementGrantToken`.

#### Option 1 — Use Chift's app

Use Chift's own e-conomic app. No setup is required — the app appears under the **Chift** name on the end user's e-conomic account. \
→ Reach out to your Chift point of contact and he will activate it for you.

#### Option 2 — Use your own app

Create your own e-conomic developer app and provide your own `AppSecretToken`. The app then appears under your own brand name on the end user's e-conomic account. This requires an e-conomic developer agreement.

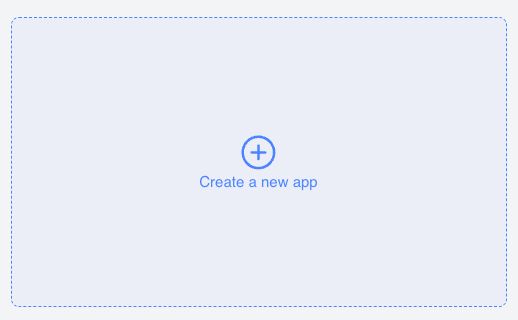
1. In your developer account, click **Create a new app**.

<Frame>
  <img src="https://mintcdn.com/chift/QOOaIx-C3EscaWw6/images/connectors/e-conomic/1-create-app.png?fit=max&auto=format&n=QOOaIx-C3EscaWw6&q=85&s=95f84a22de24a2345e5a1b6f6199a7aa" alt="Create a new app button in the e-conomic developer portal" width="518" height="320" data-path="images/connectors/e-conomic/1-create-app.png" />
</Frame>

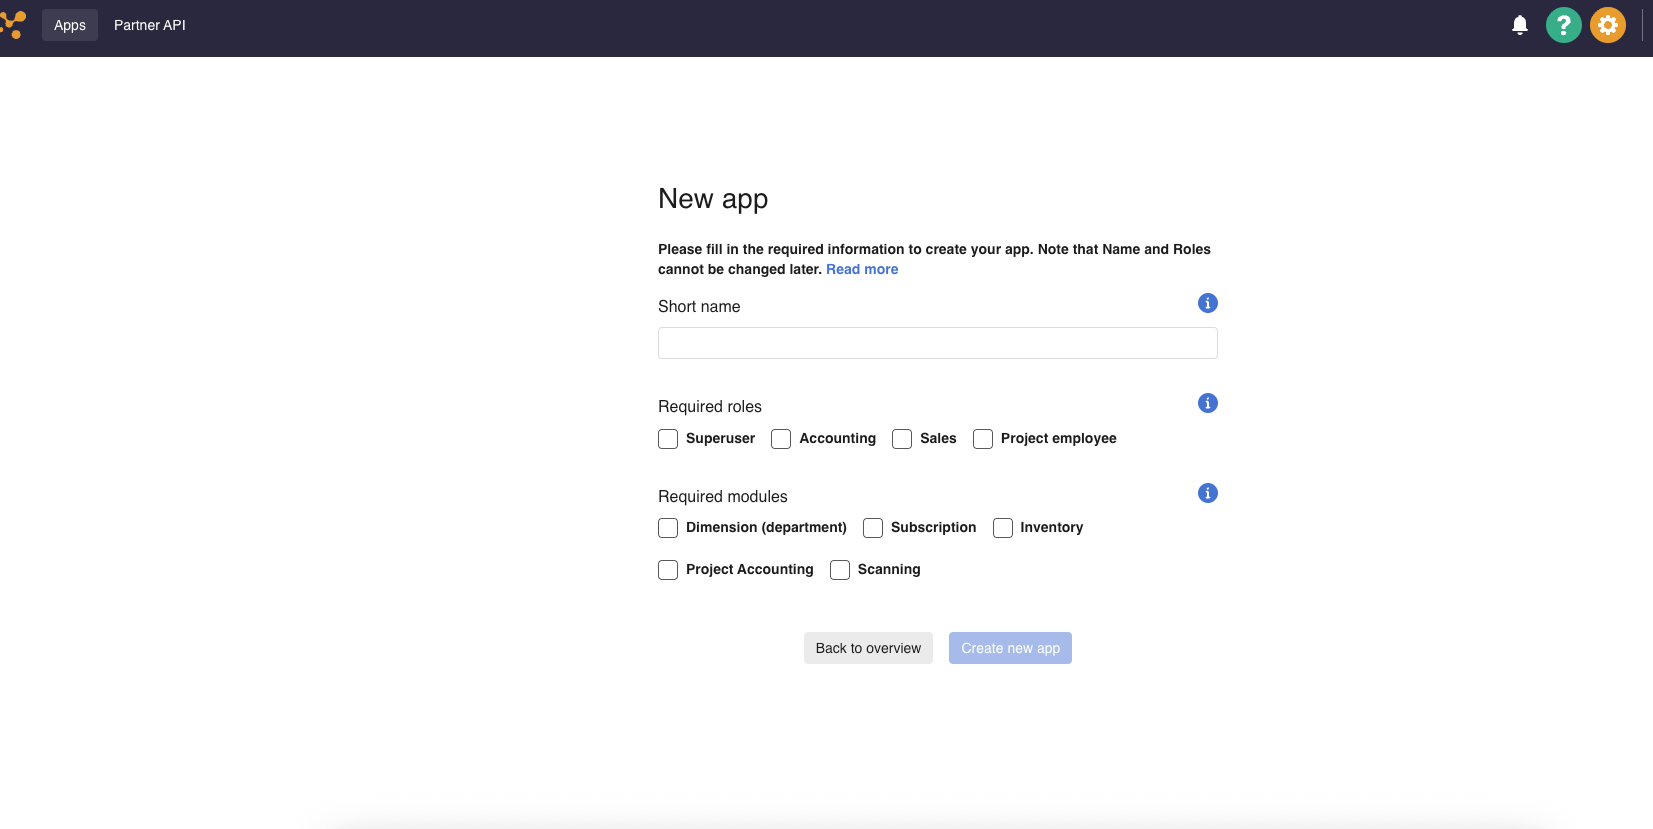
2. Fill in the **New app** form. Note that the name and roles **cannot be changed later**.
<Frame>
  <img src="https://mintcdn.com/chift/QOOaIx-C3EscaWw6/images/connectors/e-conomic/2-select-roles.png?fit=max&auto=format&n=QOOaIx-C3EscaWw6&q=85&s=b910022a7cd1f1e7b4e9808bc0c6549f" alt="New app form in the e-conomic developer portal with required roles and required modules" width="1653" height="829" data-path="images/connectors/e-conomic/2-select-roles.png" />
</Frame>

**Required roles** — select at least one role based on your use case. e-conomic validates that the end user granting access has the matching rights.

* **Superuser** — recommended for full accounting integrations (journals, customers, invoices, suppliers, attachments, company info). Note that regular users won't be able to authorize access with this setting.
* **Bookkeeping** — suitable if you only need access to journals, entries, accounts and attachments (no access to customers or company information).
* **Sales** — if you want to handle customers and invoices.
* **Project employee** — not applicable to the Chift connector.

To handle accounting data, customer data and company information at once, use one of these setups: **Superuser**, or **Bookkeeping + Sales**.

**Required modules** — modules extend e-conomic's default features. Select a module only if your app depends on it. If not all of your customers have a given module, leave it unselected — otherwise customers without it won't be able to install the app.

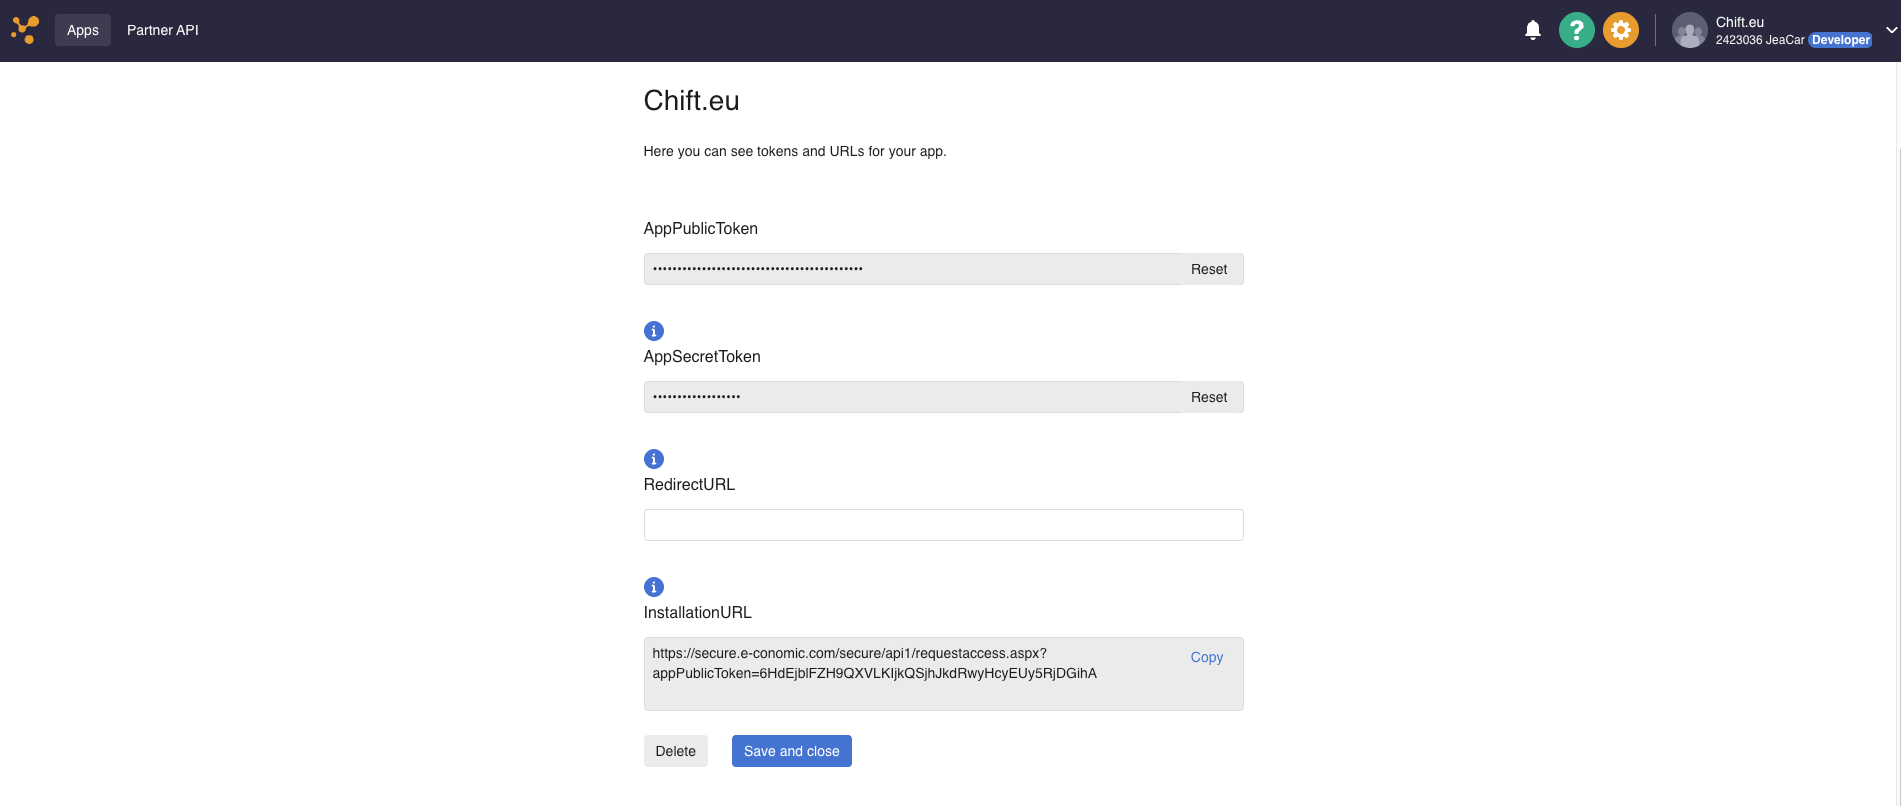
3. After creating the app, retrieve its `AppSecretToken` and `InstallationURL` from the app's credentials page.
<Frame>
  <img src="https://mintcdn.com/chift/QOOaIx-C3EscaWw6/images/connectors/e-conomic/3-app-tokens.png?fit=max&auto=format&n=QOOaIx-C3EscaWw6&q=85&s=3f1d6525bd114530d30d481ad28fa99b" alt="e-conomic app credentials page showing AppPublicToken, AppSecretToken and InstallationURL" width="1901" height="806" data-path="images/connectors/e-conomic/3-app-tokens.png" />
</Frame>

## Test e-conomic

e-conomic provides a **free trial environment** that can be used for testing integrations.

To create a test account:

1. Go to [e-conomic.dk/regnskabsprogram/demo-alle](https://e-conomic.dk/regnskabsprogram/demo-alle).
2. Sign up for a free 14-day trial with demo data.
3. If you need the trial extended beyond 14 days for testing purposes, contact [api@e-conomic.com](mailto:api@e-conomic.com) with your agreement number and the duration needed.

<Info>
  The sandbox is a real e-conomic agreement — it uses the same APIs as production. There is no separate sandbox base URL.
</Info>

## Connect e-conomic

To activate a connection with e-conomic, users will have to go through the following steps.

* English article: [Help Center - e-conomic EN](https://help.chift.app/articles/5451889171-e-conomic?lang=en)

## Rate limits

e-conomic uses a **cost-based token bucket** system (rolled out December 2025). Rather than limiting the number of requests per second, e-conomic limits the *cost* of requests, where each endpoint has a different cost based on its load on the platform.

| Parameter                        | Value                                                                                             |
| -------------------------------- | ------------------------------------------------------------------------------------------------- |
| **Bucket size** (burst capacity) | 2,000 tokens per agreement                                                                        |
| **Refill rate** (sustained rate) | 30 tokens/second (over 60s)                                                                       |
| **Cost per request**             | Varies by endpoint (e.g. `GET /accounts/{id}` = 1 token, `GET /invoices/booked/{id}` = 13 tokens) |

When a limit is exceeded, e-conomic returns an HTTP `429 Too Many Requests` error. Response headers include:

* **`X-CallCost`**: the token cost of the request just made.
* **`X-RateLimiting`**: current bucket status (e.g. `limit-2000-per-60-seconds: 1450/2000`).

Chift handles retries automatically using exponential backoff.

For more details, see the [e-conomic rate limiting documentation](https://techtalk.e-conomic.com/building-a-more-stable-api-ecosystem-together/).

## Technical limitations & specificities

### Single-folder connector

Each e-conomic connection maps to a single accounting agreement. One Chift connection = one e-conomic agreement.

### Journal restrictions

e-conomic journals have an `allowedEntryType` field that restricts which account types can be used within a journal. This affects how journal entries are created via the Chift API.

| `allowedEntryType` | Restriction             | Accepted Chift line types                                 |
| ------------------ | ----------------------- | --------------------------------------------------------- |
| 0                  | All types               | `general_account`, `customer_account`, `supplier_account` |
| 2                  | Customer Payment        | `customer_account` only                                   |
| 3                  | Supplier Invoice        | `supplier_account` only                                   |
| 4                  | Supplier Payment        | `supplier_account` only                                   |
| 5                  | Finance Voucher         | `general_account` only                                    |
| 10                 | Manual Customer Invoice | `customer_account` only                                   |

When creating a journal entry, all lines must match the journal's `allowedEntryType`. If mixed line types are sent to a restricted journal, the API returns an `ERROR_JOURNAL_NOT_GOOD_SCOPE` error.

For journals with `allowedEntryType: 2` (customer payment), the contra account (bank account) is automatically applied by e-conomic based on the journal's `customerContraAccount` setting — no need to specify it explicitly.

To retrieve the list of journals and their restrictions, use `GET /consumers/{id}/accounting/journals`.

The `force_general_account` field is not supported when creating journal entries in e-conomic. e-conomic always uses the collective account associated with the customer or supplier, so providing this field returns an error.

### VAT auto-calculation

When creating journal entries with a `vatCode`, e-conomic automatically calculates and posts the VAT amount to the corresponding VAT account at booking time. No explicit VAT line needs to be created.

## Coverage

<CoverageIframe api="accounting" connectors="Visma E-conomic" />
