> ## Documentation Index
> Fetch the complete documentation index at: https://docs.chift.eu/llms.txt
> Use this file to discover all available pages before exploring further.

# Dinero

export const CoverageIframe = ({api = 'accounting', connectors}) => {
  const [theme, setTheme] = React.useState('light');
  const [isFullscreen, setIsFullscreen] = React.useState(false);
  const [currentIframeUrl, setCurrentIframeUrl] = React.useState(null);
  const iframeRef = React.useRef(null);
  React.useEffect(() => {
    const checkTheme = () => {
      const isDark = document.documentElement.classList.contains('dark');
      setTheme(isDark ? 'dark' : 'light');
    };
    checkTheme();
    const observer = new MutationObserver(checkTheme);
    observer.observe(document.documentElement, {
      attributes: true,
      attributeFilter: ['class']
    });
    return () => observer.disconnect();
  }, []);
  React.useEffect(() => {
    const handleFullscreenChange = () => {
      setIsFullscreen(!!document.fullscreenElement);
    };
    document.addEventListener('fullscreenchange', handleFullscreenChange);
    return () => document.removeEventListener('fullscreenchange', handleFullscreenChange);
  }, []);
  React.useEffect(() => {
    const handleMessage = event => {
      if (!event.origin.includes('chift-coverage-matrix.s3.eu-west-3.amazonaws.com')) return;
      if (event.data?.type === 'urlChange' && event.data?.url) {
        setCurrentIframeUrl(event.data.url);
      }
    };
    window.addEventListener('message', handleMessage);
    return () => window.removeEventListener('message', handleMessage);
  }, []);
  const queryParams = new URLSearchParams({
    api,
    theme,
    ...connectors ? {
      connectors
    } : {}
  });
  const iframeUrl = `https://chift-coverage-matrix.s3.eu-west-3.amazonaws.com/coverage.html?${queryParams.toString()}`;
  const openUrl = currentIframeUrl || iframeUrl;
  const toggleFullscreen = () => {
    if (!document.fullscreenElement) {
      iframeRef.current?.requestFullscreen();
    } else {
      document.exitFullscreen();
    }
  };
  const isDark = theme === 'dark';
  const buttonStyle = {
    display: 'inline-flex',
    alignItems: 'center',
    gap: '8px',
    padding: '4px 12px',
    fontSize: '14px',
    fontWeight: '500',
    color: isDark ? '#d4d4d4' : '#374151',
    backgroundColor: 'transparent',
    border: `1px solid ${isDark ? '#404040' : '#e5e7eb'}`,
    borderRadius: '12px',
    cursor: 'pointer',
    textDecoration: 'none',
    transition: 'all 0.15s ease'
  };
  const hoverBg = isDark ? 'rgba(255,255,255,0.05)' : 'rgba(0,0,0,0.03)';
  const hoverBorder = isDark ? '#525252' : '#d1d5db';
  const defaultBg = 'transparent';
  const defaultBorder = isDark ? '#404040' : '#e5e7eb';
  return <>
  <div style={{
    display: 'flex',
    justifyContent: 'flex-end',
    gap: '12px',
    marginBottom: '8px'
  }}>
    <button onClick={toggleFullscreen} style={buttonStyle} onMouseEnter={e => {
    e.target.style.backgroundColor = hoverBg;
    e.target.style.borderColor = hoverBorder;
  }} onMouseLeave={e => {
    e.target.style.backgroundColor = defaultBg;
    e.target.style.borderColor = defaultBorder;
  }}>
      <svg width="16" height="16" viewBox="0 0 24 24" fill="none" stroke="currentColor" strokeWidth="2" strokeLinecap="round" strokeLinejoin="round">
        {isFullscreen ? <>
            <polyline points="4 14 10 14 10 20"></polyline>
            <polyline points="20 10 14 10 14 4"></polyline>
            <line x1="14" y1="10" x2="21" y2="3"></line>
            <line x1="3" y1="21" x2="10" y2="14"></line>
          </> : <>
            <polyline points="15 3 21 3 21 9"></polyline>
            <polyline points="9 21 3 21 3 15"></polyline>
            <line x1="21" y1="3" x2="14" y2="10"></line>
            <line x1="3" y1="21" x2="10" y2="14"></line>
          </>}
      </svg>
      {isFullscreen ? 'Exit Fullscreen' : 'Fullscreen'}
    </button>
    <a href={iframeUrl} target="_blank" rel="noopener noreferrer" style={buttonStyle} onMouseEnter={e => {
    e.target.style.backgroundColor = hoverBg;
    e.target.style.borderColor = hoverBorder;
  }} onMouseLeave={e => {
    e.target.style.backgroundColor = defaultBg;
    e.target.style.borderColor = defaultBorder;
  }}>
      <svg width="16" height="16" viewBox="0 0 24 24" fill="none" stroke="currentColor" strokeWidth="2" strokeLinecap="round" strokeLinejoin="round">
        <path d="M18 13v6a2 2 0 0 1-2 2H5a2 2 0 0 1-2-2V8a2 2 0 0 1 2-2h6"></path>
        <polyline points="15 3 21 3 21 9"></polyline>
        <line x1="10" y1="14" x2="21" y2="3"></line>
      </svg>
      Open in new tab
    </a>
  </div>
  <iframe ref={iframeRef} src={iframeUrl} title={`Chift Coverage Matrix - ${api}`} style={{
    height: 'max(500px, 80vh)'
  }} className="w-full" allowFullScreen />
  <blockquote>
    <p>
      <strong>Matrix Legend 🧭</strong>
    </p>
    <table>
      <thead>
        <tr>
          <th>Status</th>
          <th>Meaning</th>
        </tr>
      </thead>
      <tbody>
        <tr>
          <td>✅ Implemented</td>
          <td>Endpoint is implemented and available.</td>
        </tr>
        <tr>
          <td>❌ Not supported</td>
          <td>
            Endpoint is not supported by the target software (connector
            limitation). Cannot be implemented.
          </td>
        </tr>
        <tr>
          <td>💬 On request</td>
          <td>
            Endpoint is not implemented but feasibility is validated. Can be
            implemented on request — contact your Chift point of contact to
            discuss scope and timing.
          </td>
        </tr>
        <tr>
          <td>🔎 To be analyzed</td>
          <td>
            Endpoint is not implemented and feasibility has not yet been fully
            assessed. Analysis is pending.
          </td>
        </tr>
      </tbody>
    </table>
  </blockquote>
</>;
};

export const OverviewLegend = ({showTitle = true}) => <blockquote>
    {showTitle && <p>
        <strong>Overview legend 🧭</strong>
      </p>}
    <table>
      <thead>
        <tr>
          <th>Column</th>
          <th>Value</th>
          <th>Meaning</th>
        </tr>
      </thead>
      <tbody>
        <tr>
          <td>Geography</td>
          <td>🇫🇷 FR · 🇧🇪 BE · …</td>
          <td>Countries where the connector is officially supported.</td>
        </tr>
        <tr>
          <td rowSpan={3}>Software type</td>
          <td>SaaS</td>
          <td>Through API.</td>
        </tr>
        <tr>
          <td>On-premise (local agent)</td>
          <td>
            Software running locally — installation of a local agent is
            required.
          </td>
        </tr>
        <tr>
          <td>On-premise (API)</td>
          <td>Software running locally — API available.</td>
        </tr>
        <tr>
          <td rowSpan={2}>Status</td>
          <td>🔵 Live</td>
          <td>Connector is generally available and production-ready.</td>
        </tr>
        <tr>
          <td>🟣 Beta</td>
          <td>
            Connector is in beta — usable in production but may still evolve.
          </td>
        </tr>
        <tr>
          <td>Multi folder</td>
          <td>✅ Yes / ❌ No</td>
          <td>
            Connection to multiple accounting folders at the same time (see{' '}
            <a href="/unified-apis/accounting/concepts/folder">
              accounting folders guide
            </a>
            ).
          </td>
        </tr>
        <tr>
          <td>Rate limits</td>
          <td>✅ No / ❌ Yes</td>
          <td>Whether the target software sets rate limits on API calls.</td>
        </tr>
        <tr>
          <td rowSpan={3}>API keys</td>
          <td>❎ No</td>
          <td>
            No API keys required (OAuth2 client secret and client ID). No
            requirements to activate the connector — you can create a
            connection.
          </td>
        </tr>
        <tr>
          <td>🔑</td>
          <td>
            Keys are required to activate the connector. Chift cannot act as
            intermediary to obtain them; we can still assist with steps to get
            keys directly from the software provider.
          </td>
        </tr>
        <tr>
          <td>🔑 ☑️ via Chift</td>
          <td>
            Keys are required to activate the connector. You can go through
            Chift to get the keys (intermediary or partnership keys). An
            approval process may still apply, but you do not need to request
            keys from the vendor on your own.
          </td>
        </tr>
        <tr>
          <td rowSpan={3}>Approval / certification process</td>
          <td>⚡ Instant</td>
          <td>
            No keys required, or Chift can encode their keys for you when
            requested. Activation is instantaneous.
          </td>
        </tr>
        <tr>
          <td>🟢 Approval — [Duration]</td>
          <td>
            Approval will be granted. The vendor may require information or app
            configuration in a developer portal before issuing keys.
          </td>
        </tr>
        <tr>
          <td>🟠 Approval — [Duration]</td>
          <td>
            Approval is not guaranteed — often due to integration strategy; the
            vendor may do a deeper assessment (competitors, partnership
            requirements, and similar).
          </td>
        </tr>
        <tr>
          <td rowSpan={2}>Activation time</td>
          <td>⚡ Instant</td>
          <td>
            If no keys are required, or Chift has keys ready to share with you.
          </td>
        </tr>
        <tr>
          <td>Time</td>
          <td>
            Estimated time to get the connector activated in production as a
            result of the approval or certification process (e.g. ⏱️ 2 days, 1
            week).
          </td>
        </tr>
        <tr>
          <td rowSpan={3}>Extra fees — software editor</td>
          <td>❎ No</td>
          <td>No fees charged by the software editor.</td>
        </tr>
        <tr>
          <td>💰 🕹️</td>
          <td>Fees associated with obtaining a testing account.</td>
        </tr>
        <tr>
          <td>💰 🔑</td>
          <td>Fees charged to get API keys.</td>
        </tr>
        <tr>
          <td rowSpan={2}>Extra fees — end-user</td>
          <td>❎ No</td>
          <td>The end-user does not pay extra to get integrated.</td>
        </tr>
        <tr>
          <td>💰 Yes</td>
          <td>The end-user must pay extra to get integrated.</td>
        </tr>
        <tr>
          <td>Comments on costs</td>
          <td>—</td>
          <td>Additional notes on fees or pricing when relevant.</td>
        </tr>
        <tr>
          <td rowSpan={4}>Sandbox account</td>
          <td>✅ via Chift</td>
          <td>Chift can provide you with a sandbox.</td>
        </tr>
        <tr>
          <td>🟠 Only through integrator</td>
          <td>Only the software's integrator can provide a sandbox.</td>
        </tr>
        <tr>
          <td>✅ Self-service</td>
          <td>You can create your own sandbox.</td>
        </tr>
        <tr>
          <td>✅ Trial account</td>
          <td>It is possible to create a trial account.</td>
        </tr>
      </tbody>
    </table>
  </blockquote>;

export const ConnectorCardIframe = ({api = 'accounting', connectors}) => {
  const [theme, setTheme] = React.useState('light');
  React.useEffect(() => {
    const checkTheme = () => {
      const isDark = document.documentElement.classList.contains('dark');
      setTheme(isDark ? 'dark' : 'light');
    };
    checkTheme();
    const observer = new MutationObserver(checkTheme);
    observer.observe(document.documentElement, {
      attributes: true,
      attributeFilter: ['class']
    });
    return () => observer.disconnect();
  }, []);
  const queryParams = new URLSearchParams({
    api,
    theme,
    ...connectors ? {
      connectors
    } : {}
  });
  const iframeUrl = `https://chift-coverage-matrix.s3.eu-west-3.amazonaws.com/connector-card.html?${queryParams.toString()}`;
  return <iframe src={iframeUrl} title={`Chift connector information - ${api}`} style={{
    display: 'block',
    width: '100%',
    height: '480px',
    margin: 0,
    padding: 0,
    border: 'none'
  }} />;
};

<ConnectorCardIframe api="accounting" connectors="Dinero" />

<Accordion title="Overview Legend 🧭">
  <OverviewLegend showTitle={false} />
</Accordion>

## Introduction

Dinero is a Danish cloud accounting and invoicing software developed by Visma. It is popular with small and medium-sized Danish businesses for its modern interface and open API, and covers invoicing, bookkeeping and VAT reporting.

<Info>
  Dinero organizes each company's data under an **organization**. One Chift connection maps to one Dinero organization.
</Info>

## Configure Dinero

### Prerequisites

To activate the Dinero connector, you need an **OAuth2 app** registered with Dinero (via Visma Connect). You have two options:

<CardGroup cols={2}>
  <Card title="Use the Chift OAuth2 app" icon="bolt">
    Reach out to your Chift point of contact. They will provide the `client_id` and `client_secret` of Chift's Dinero app and configure them on your Chift platform.

    **No additional requirement** — the fastest way to go live.
  </Card>

  <Card title="Create your own OAuth2 app" icon="key">
    Register your own app on the [Visma Developer Portal](https://oauth.developers.visma.com/) and get it approved by Dinero.

    Requires a Visma Developer account, a `web application` in Visma Connect with the right scopes and redirect URI, and a technical review by Dinero.
  </Card>
</CardGroup>

### Activation process

The steps below apply if you chose to **create your own OAuth2 app**. If you use the Chift OAuth2 app, your point of contact handles the setup for you — skip straight to [Test Dinero](#test-dinero).

<Steps>
  <Step title="Create your Visma Developer account">
    Sign up on the [Visma Developer Portal](https://oauth.developers.visma.com/). Set your team's country to **Denmark** and use your real CVR number, otherwise your application will be rejected.
  </Step>

  <Step title="Add a web application in Visma Connect">
    From **My Applications**, click **Add Application** and choose **Web application** (Dinero's only supported client type). Pick a `Name` and `Client ID` that clearly identify your company (e.g. `isv_yourcompany`); generic names like `isv_test` are rejected. Do not include "Dinero" in the name.
  </Step>

  <Step title="Configure grants, scopes and redirect URI">
    Use the `Authorization Code` grant with **offline access** enabled (re-use refresh token, 365 days expiration is recommended). Request the scopes `dineropublicapi:read`, `dineropublicapi:write` and `offline_access`. Set the redirect URI to:

    ```text theme={null}
    https://chift.app/oauth2/redirect
    ```
  </Step>

  <Step title="Pass Dinero's technical review">
    Thoroughly test your app, then submit it for review. Dinero verifies your scope usage and example calls before granting production access. See the [Dinero Getting Started guide](https://developer.dinero.dk/documentation/getting-started/) for the full flow.
  </Step>

  <Step title="Activate the connector on Chift">
    In your Chift back office, open the Dinero connector and paste your **Client ID** and **Client Secret**. End users are then redirected to Visma Connect to authorize access.
  </Step>
</Steps>

## Test Dinero

Go to [dinero.dk](https://dinero.dk/) and click **"Opret gratis test konto"** ("Create free test account") to create a test account. The trial is valid for one month.

## Connect Dinero

To activate a connection with Dinero, end users go through the following steps:

* English article: [Help Center - Dinero EN](/help/connectors/accounting/dinero)

## Pricing

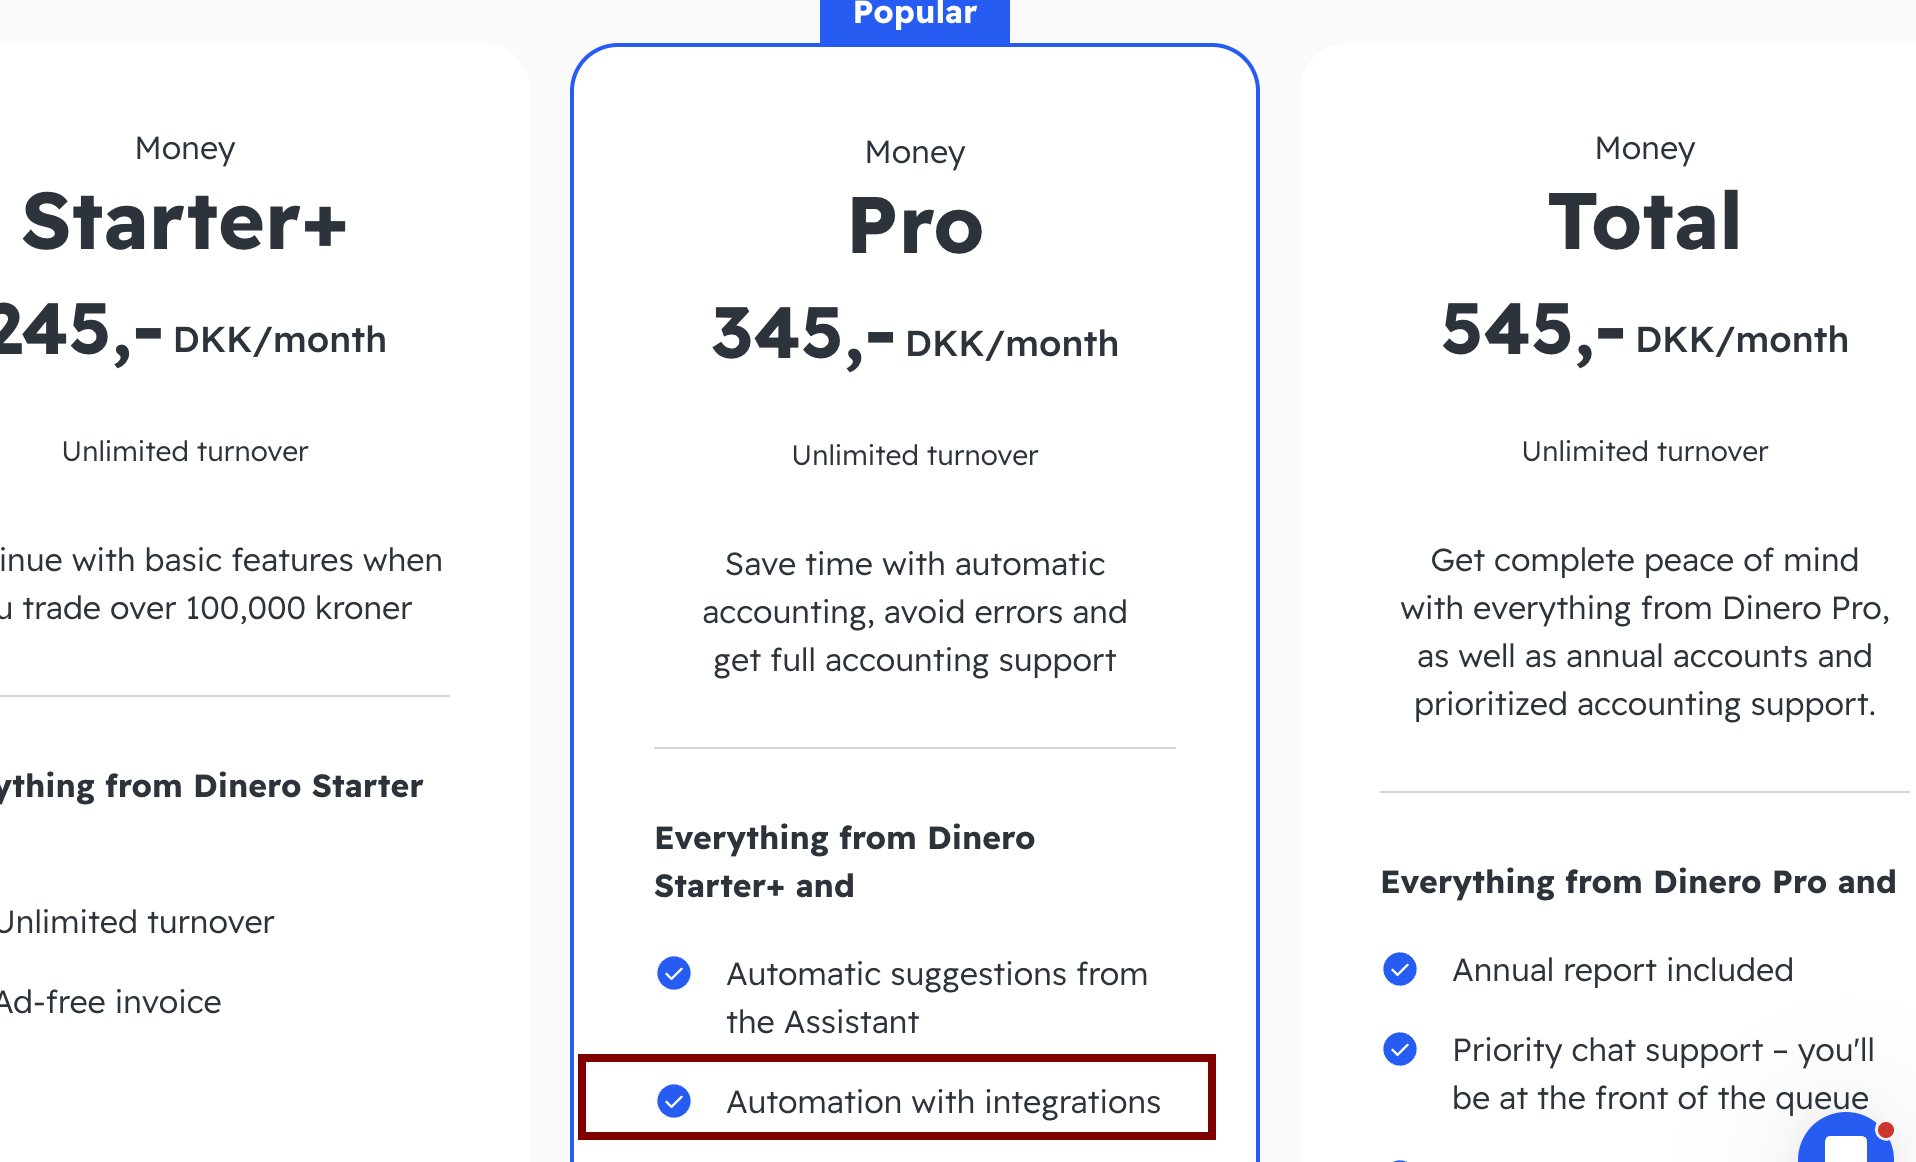
End users need a **Pro** plan subscription (the **Total** plan also works) to use the Dinero API:

<Frame>
  <img src="https://mintcdn.com/chift/KakZZx7yZ95TRQN1/images/connectors/accounting/dinero/dinero-pricing.png?fit=max&auto=format&n=KakZZx7yZ95TRQN1&q=85&s=1ccea49552de88b0dcf22675bef8bee5" alt="Dinero pricing plans — Starter+, Pro and Total" width="1916" height="1162" data-path="images/connectors/accounting/dinero/dinero-pricing.png" />
</Frame>

## Rate limits

Dinero allows **100 calls per minute per organization**.

## Technical limitations & specificities

### Bank feed

Dinero does not support a bank feed through Chift — Dinero only integrates directly with banks itself.

### Contacts model

`GET` customers and `GET` suppliers both read from Dinero's single **contacts** list — Dinero has no dedicated customer or supplier object. As a result, every contact is returned regardless of whether it's used as a customer or a supplier.

### Chart of accounts & VAT codes

Dinero requires a `vat_code` on every account that generates VAT (sales or expense accounts). When you create chart-of-accounts entries via Chift, you need to set a `vat_code` if this is relevant (sales/purchase accounts).

### Invoices by type

`GET` invoices by type does not return `supplier_invoice` or `supplier_refund` — these are only available through the journal entries object.

### Creating sale & purchase entries

* `invoice_number` can only be set on posted documents — draft invoices have no `invoice_number`.
* No exchange rate can be forced: Dinero always applies the day's exchange rate for the invoice currency.
* Dinero derives the `tax_code` and rate from the `account_number` and calculates `tax_amount` itself.
* Credit notes and refunds have no due date.
* `financial_period` cannot be used as a query parameter.

### Journal entries

* No native filter on `journal_id`.
* Dinero has no concept of "unposted" journal entries.
* `date_from` and `date_to` are both required when listing journal entries.
* `updated_after` cannot filter more than 1 month back.
* Amounts are always returned in the organization's currency (DKK), even when the underlying invoice or payment is in a foreign currency.
* `POST` journal entries and financial entries only accept amounts in the organization's currency (DKK).

## Coverage

<CoverageIframe api="accounting" connectors="Dinero" />