> ## Documentation Index
> Fetch the complete documentation index at: https://docs.chift.eu/llms.txt
> Use this file to discover all available pages before exploring further.
# Remote MCP server
> Connect an MCP client to Chift's hosted server over OAuth, scoped to a single consumer
## Overview
The remote MCP server is hosted by Chift at `https://mcp.chift.eu/mcp`. There is nothing to install: you point an MCP client at that URL and authorize through the Chift OAuth flow.
Each authorization is tied to a **single consumer**, and the tools an agent can see are limited to the [**scopes**](#scopes) granted during authorization. This makes the remote server well suited to productized, agentic use cases where an assistant acts on behalf of one of your customers with a deliberately bounded set of tools.
### Prerequisites
* A [Chift account](https://chift.app) with at least one consumer that has active integrations.
* An MCP-compatible client (Claude Desktop, Cursor, VS Code, Claude Code, or any framework that supports MCP).
## DataLayer
If the consumer you authorized is connected to the [DataLayer](/developer-guides/datalayer/overview), the server automatically uses it as the source of truth for read operations. Your agent's queries are served from Chift's synced data store rather than hitting the source system live on every request, which keeps responses fast and consistent. No configuration is required. When a consumer is connected to the DataLayer, reads route through it automatically.
## Authentication
The remote server supports **OAuth 2.0** with **Dynamic Client Registration ([RFC 7591](https://datatracker.ietf.org/doc/html/rfc7591))**. Point your MCP client at `https://mcp.chift.eu/mcp` and it handles client registration, the login redirect, and credential storage for you.
Point your MCP client at `https://mcp.chift.eu/mcp` (see [Connecting your client](#connecting-your-client)). On first use, the client opens a browser on Chift.
Log in, pick the **consumer** the agent will act on, and select the **scopes** to grant.
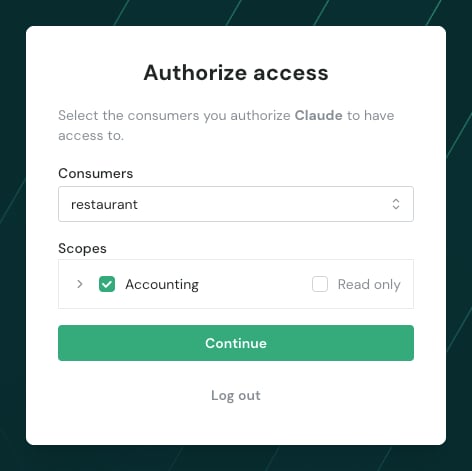 The client stores the connection and the agent can call the granted tools. Reconnecting reuses the saved credentials, so you will not be asked to authorize again.
#### Scopes
Scopes decide which tools an agent sees. They are defined at **two levels**:
* The set a **builder makes available** for their integration, configured on the [MCP settings page](/back-office/platform/mcp).
* The subset a **user grants** during authorization.
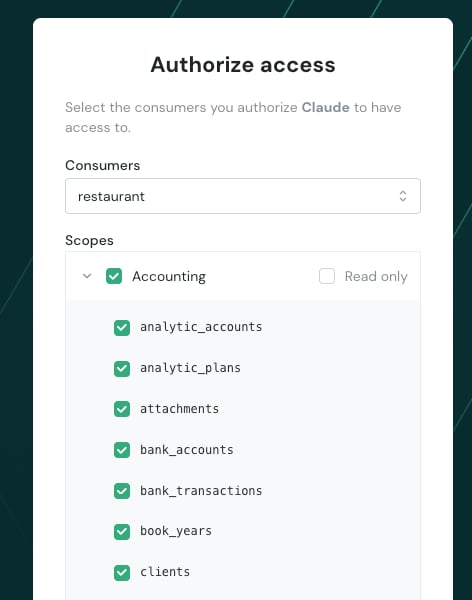
An agent only ever sees tools for the scopes granted at authorization, and never more than the builder allows. Each scope is a vertical (such as `accounting`) that you can narrow to **read only** or to **specific entities** (for example, only invoices and VAT codes).
The client stores the connection and the agent can call the granted tools. Reconnecting reuses the saved credentials, so you will not be asked to authorize again.
#### Scopes
Scopes decide which tools an agent sees. They are defined at **two levels**:
* The set a **builder makes available** for their integration, configured on the [MCP settings page](/back-office/platform/mcp).
* The subset a **user grants** during authorization.
An agent only ever sees tools for the scopes granted at authorization, and never more than the builder allows. Each scope is a vertical (such as `accounting`) that you can narrow to **read only** or to **specific entities** (for example, only invoices and VAT codes).
 This method is maintained for backward compatibility. We recommend the OAuth 2.0 flow for new integrations.
Request an access token with a POST to `https://api.chift.eu/mcp-token`, then pass it to your client as a bearer token.
```bash theme={null}
curl -X POST 'https://api.chift.eu/mcp-token' \
-H 'Content-Type: application/json' \
-d '{
"clientId": "your_client_id",
"clientSecret": "your_client_secret",
"accountId": "your_account_id",
"consumerId": "your_consumer_id"
}'
```
**Response:**
```json theme={null}
{
"access_token": "your_mcp_access_token",
"token_type": "bearer",
"expires_in": 1800,
"expires_on": 1234567890
}
```
Your Chift client ID
Your Chift client secret
Your Chift account ID (UUID format)
Your consumer ID (UUID format)
Optional environment ID (UUID format)
Optional marketplace ID (UUID format)
Add the token to your client with an `Authorization: Bearer ` header (see the examples in [Connecting your client](#connecting-your-client)).
## Connecting your client
Point your client at `https://mcp.chift.eu/mcp`. Each client sets up the connection and authentication slightly differently, so follow the tab for the one you use.
### IDE configuration
Claude Desktop cannot connect to a remote server directly, so it uses the [`mcp-remote`](https://github.com/geelen/mcp-remote) bridge. Add the following to your `claude_desktop_config.json`:
```json theme={null}
{
"mcpServers": {
"chift-remote": {
"command": "/path/to/npx",
"args": [
"mcp-remote",
"https://mcp.chift.eu/mcp",
"--transport",
"http-only",
"--header",
"Authorization:${AUTH_HEADER}"
],
"env": {
"AUTH_HEADER": "Bearer "
}
}
}
}
```
The example above authenticates with a [legacy token](#authentication) passed through `AUTH_HEADER`. To use OAuth instead, remove the `--header` argument and the `AUTH_HEADER` env var: `mcp-remote` then opens a browser for you to log in and authorize on first use.
[Install in Cursor](cursor://anysphere.cursor-deeplink/mcp/install?name=chift\&config=eyJ1cmwiOiJodHRwczovL21jcC5jaGlmdC5ldS9tY3AifQ%3D%3D)
Click install to open Cursor and add the Chift MCP automatically, or add the following to your `~/.cursor/mcp.json` file. See the Cursor [documentation](https://docs.cursor.com/context/model-context-protocol) to learn more.
```json theme={null}
{
"mcpServers": {
"chift": {
"url": "https://mcp.chift.eu/mcp"
}
}
}
```
Cursor connects to the hosted server directly and runs the OAuth flow in your browser on first use. To use a [legacy token](#authentication) instead, add a `headers` object with `Authorization: Bearer `.
[Install in VS Code](https://vscode.dev/redirect/mcp/install?name=chift\&config=%7B%22type%22%3A%22http%22%2C%22url%22%3A%22https%3A%2F%2Fmcp.chift.eu%2Fmcp%22%7D)
Click install to open VS Code and add the Chift MCP automatically, or add the following to your `.vscode/mcp.json` file. See the VS Code [documentation](https://code.visualstudio.com/docs/copilot/chat/mcp-servers) to learn more.
```json theme={null}
{
"servers": {
"chift": {
"type": "http",
"url": "https://mcp.chift.eu/mcp"
}
}
}
```
VS Code connects to the hosted server directly and runs the OAuth flow in your browser on first use. To use a [legacy token](#authentication) instead, add a `headers` object with `Authorization: Bearer `.
Claude Code connects to the hosted server directly. Run the following command, and it runs the OAuth flow in your browser on first use. See the Claude Code [documentation](https://docs.anthropic.com/en/docs/claude-code/mcp#configure-mcp-servers) to learn more.
```bash theme={null}
claude mcp add --transport http chift https://mcp.chift.eu/mcp
```
To use a [legacy token](#authentication) instead, add `--header "Authorization: Bearer "` to the command.
### Using with AI frameworks
You can integrate the remote server with popular AI frameworks to build applications on top of Chift's Unified API.
```typescript theme={null}
import { createMCPClient } from "@ai-sdk/mcp";
import { generateText } from "ai";
import { openai } from "@ai-sdk/openai";
async function getTools() {
const response = await fetch("https://api.chift.eu/mcp-token", {
method: "POST",
headers: {
"Content-Type": "application/json",
},
body: JSON.stringify({
clientId: "your_client_id",
clientSecret: "your_client_secret",
accountId: "your_account_id",
consumerId: "your_consumer_id",
}),
});
const { access_token } = await response.json();
const mcpClient = createMCPClient({
transport: {
type: "http",
url: "https://mcp.chift.eu/mcp",
headers: {
Authorization: `Bearer ${access_token}`,
},
},
});
return await mcpClient.listTools();
}
const result = await generateText({
model: openai("gpt-4"),
tools: await getTools(),
prompt: "List all accounting connections for my consumer",
});
```
```python theme={null}
import httpx
from pydantic_ai import Agent
from pydantic_ai.mcp import MCPServerStreamableHTTP
async def get_tools():
async with httpx.AsyncClient() as client:
response = await client.post(
"https://api.chift.eu/mcp-token",
json={
"clientId": "your_client_id",
"clientSecret": "your_client_secret",
"accountId": "your_account_id",
"consumerId": "your_consumer_id",
},
)
data = response.json()
access_token = data["access_token"]
return MCPServerStreamableHTTP(
"https://mcp.chift.eu/mcp",
headers={"Authorization": f"Bearer {access_token}"}
)
async def main():
tools = await get_tools()
agent = Agent("openai:gpt-4", toolsets=[tools])
result = await agent.run("Give me my orders of yesterday")
print(result.output)
if __name__ == "__main__":
import asyncio
asyncio.run(main())
```
```python theme={null}
import httpx
from langchain_mcp_adapters.client import MultiServerMCPClient
from langchain.agents import create_agent
from langchain_openai import ChatOpenAI
async def get_tools():
async with httpx.AsyncClient() as client:
response = await client.post(
"https://api.chift.eu/mcp-token",
json={
"clientId": "your_client_id",
"clientSecret": "your_client_secret",
"accountId": "your_account_id",
"consumerId": "your_consumer_id",
},
)
data = response.json()
access_token = data["access_token"]
client = MultiServerMCPClient({
"chift": {
"url": "https://mcp.chift.eu/mcp",
"transport": "streamable_http",
"headers": {
"Authorization": f"Bearer {access_token}"
}
}
})
tools = await client.get_tools()
return tools
async def main():
tools = await get_tools()
llm = ChatOpenAI(model="gpt-4")
agent = create_agent({
"model": llm,
"tools": tools,
})
result = agent.invoke({
"messages": [("user", "List all accounting connections")]
})
print(result)
if __name__ == "__main__":
import asyncio
asyncio.run(main())
```
```typescript theme={null}
import { MultiServerMCPClient } from "@langchain/mcp-adapters";
import { ChatOpenAI } from "@langchain/openai";
import { createAgent } from "langchain/agents";
async function getTools() {
const response = await fetch("https://api.chift.eu/mcp-token", {
method: "POST",
headers: {
"Content-Type": "application/json",
},
body: JSON.stringify({
clientId: "your_client_id",
clientSecret: "your_client_secret",
accountId: "your_account_id",
consumerId: "your_consumer_id",
}),
});
const { access_token } = await response.json();
const client = new MultiServerMCPClient({
chift: {
transport: "streamable_http",
url: "https://mcp.chift.eu/mcp",
headers: {
Authorization: `Bearer ${access_token}`,
},
},
});
return await client.getTools();
}
async function main() {
const tools = await getTools();
const llm = new ChatOpenAI({
model: "gpt-4",
});
const agent = createAgent({
model: llm,
tools: tools,
});
const result = await agent.invoke({
messages: [["user", "List all accounting connections"]],
});
console.log(result);
}
main();
```
The AI framework examples use the legacy token method for simplicity. For production applications, we recommend implementing OAuth 2.0.
## Tools and scopes
The remote server's tools mirror the [Unified API](/api-reference) one-to-one across accounting, banking, ecommerce, invoicing, payment, PMS, and POS.
The tools available in a session depend on the **scopes** granted during authorization. You only see tools for the verticals and operations you were authorized for, and read-only scopes expose read operations only. See [Scopes](#scopes) for how they are defined.
This method is maintained for backward compatibility. We recommend the OAuth 2.0 flow for new integrations.
Request an access token with a POST to `https://api.chift.eu/mcp-token`, then pass it to your client as a bearer token.
```bash theme={null}
curl -X POST 'https://api.chift.eu/mcp-token' \
-H 'Content-Type: application/json' \
-d '{
"clientId": "your_client_id",
"clientSecret": "your_client_secret",
"accountId": "your_account_id",
"consumerId": "your_consumer_id"
}'
```
**Response:**
```json theme={null}
{
"access_token": "your_mcp_access_token",
"token_type": "bearer",
"expires_in": 1800,
"expires_on": 1234567890
}
```
Your Chift client ID
Your Chift client secret
Your Chift account ID (UUID format)
Your consumer ID (UUID format)
Optional environment ID (UUID format)
Optional marketplace ID (UUID format)
Add the token to your client with an `Authorization: Bearer ` header (see the examples in [Connecting your client](#connecting-your-client)).
## Connecting your client
Point your client at `https://mcp.chift.eu/mcp`. Each client sets up the connection and authentication slightly differently, so follow the tab for the one you use.
### IDE configuration
Claude Desktop cannot connect to a remote server directly, so it uses the [`mcp-remote`](https://github.com/geelen/mcp-remote) bridge. Add the following to your `claude_desktop_config.json`:
```json theme={null}
{
"mcpServers": {
"chift-remote": {
"command": "/path/to/npx",
"args": [
"mcp-remote",
"https://mcp.chift.eu/mcp",
"--transport",
"http-only",
"--header",
"Authorization:${AUTH_HEADER}"
],
"env": {
"AUTH_HEADER": "Bearer "
}
}
}
}
```
The example above authenticates with a [legacy token](#authentication) passed through `AUTH_HEADER`. To use OAuth instead, remove the `--header` argument and the `AUTH_HEADER` env var: `mcp-remote` then opens a browser for you to log in and authorize on first use.
[Install in Cursor](cursor://anysphere.cursor-deeplink/mcp/install?name=chift\&config=eyJ1cmwiOiJodHRwczovL21jcC5jaGlmdC5ldS9tY3AifQ%3D%3D)
Click install to open Cursor and add the Chift MCP automatically, or add the following to your `~/.cursor/mcp.json` file. See the Cursor [documentation](https://docs.cursor.com/context/model-context-protocol) to learn more.
```json theme={null}
{
"mcpServers": {
"chift": {
"url": "https://mcp.chift.eu/mcp"
}
}
}
```
Cursor connects to the hosted server directly and runs the OAuth flow in your browser on first use. To use a [legacy token](#authentication) instead, add a `headers` object with `Authorization: Bearer `.
[Install in VS Code](https://vscode.dev/redirect/mcp/install?name=chift\&config=%7B%22type%22%3A%22http%22%2C%22url%22%3A%22https%3A%2F%2Fmcp.chift.eu%2Fmcp%22%7D)
Click install to open VS Code and add the Chift MCP automatically, or add the following to your `.vscode/mcp.json` file. See the VS Code [documentation](https://code.visualstudio.com/docs/copilot/chat/mcp-servers) to learn more.
```json theme={null}
{
"servers": {
"chift": {
"type": "http",
"url": "https://mcp.chift.eu/mcp"
}
}
}
```
VS Code connects to the hosted server directly and runs the OAuth flow in your browser on first use. To use a [legacy token](#authentication) instead, add a `headers` object with `Authorization: Bearer `.
Claude Code connects to the hosted server directly. Run the following command, and it runs the OAuth flow in your browser on first use. See the Claude Code [documentation](https://docs.anthropic.com/en/docs/claude-code/mcp#configure-mcp-servers) to learn more.
```bash theme={null}
claude mcp add --transport http chift https://mcp.chift.eu/mcp
```
To use a [legacy token](#authentication) instead, add `--header "Authorization: Bearer "` to the command.
### Using with AI frameworks
You can integrate the remote server with popular AI frameworks to build applications on top of Chift's Unified API.
```typescript theme={null}
import { createMCPClient } from "@ai-sdk/mcp";
import { generateText } from "ai";
import { openai } from "@ai-sdk/openai";
async function getTools() {
const response = await fetch("https://api.chift.eu/mcp-token", {
method: "POST",
headers: {
"Content-Type": "application/json",
},
body: JSON.stringify({
clientId: "your_client_id",
clientSecret: "your_client_secret",
accountId: "your_account_id",
consumerId: "your_consumer_id",
}),
});
const { access_token } = await response.json();
const mcpClient = createMCPClient({
transport: {
type: "http",
url: "https://mcp.chift.eu/mcp",
headers: {
Authorization: `Bearer ${access_token}`,
},
},
});
return await mcpClient.listTools();
}
const result = await generateText({
model: openai("gpt-4"),
tools: await getTools(),
prompt: "List all accounting connections for my consumer",
});
```
```python theme={null}
import httpx
from pydantic_ai import Agent
from pydantic_ai.mcp import MCPServerStreamableHTTP
async def get_tools():
async with httpx.AsyncClient() as client:
response = await client.post(
"https://api.chift.eu/mcp-token",
json={
"clientId": "your_client_id",
"clientSecret": "your_client_secret",
"accountId": "your_account_id",
"consumerId": "your_consumer_id",
},
)
data = response.json()
access_token = data["access_token"]
return MCPServerStreamableHTTP(
"https://mcp.chift.eu/mcp",
headers={"Authorization": f"Bearer {access_token}"}
)
async def main():
tools = await get_tools()
agent = Agent("openai:gpt-4", toolsets=[tools])
result = await agent.run("Give me my orders of yesterday")
print(result.output)
if __name__ == "__main__":
import asyncio
asyncio.run(main())
```
```python theme={null}
import httpx
from langchain_mcp_adapters.client import MultiServerMCPClient
from langchain.agents import create_agent
from langchain_openai import ChatOpenAI
async def get_tools():
async with httpx.AsyncClient() as client:
response = await client.post(
"https://api.chift.eu/mcp-token",
json={
"clientId": "your_client_id",
"clientSecret": "your_client_secret",
"accountId": "your_account_id",
"consumerId": "your_consumer_id",
},
)
data = response.json()
access_token = data["access_token"]
client = MultiServerMCPClient({
"chift": {
"url": "https://mcp.chift.eu/mcp",
"transport": "streamable_http",
"headers": {
"Authorization": f"Bearer {access_token}"
}
}
})
tools = await client.get_tools()
return tools
async def main():
tools = await get_tools()
llm = ChatOpenAI(model="gpt-4")
agent = create_agent({
"model": llm,
"tools": tools,
})
result = agent.invoke({
"messages": [("user", "List all accounting connections")]
})
print(result)
if __name__ == "__main__":
import asyncio
asyncio.run(main())
```
```typescript theme={null}
import { MultiServerMCPClient } from "@langchain/mcp-adapters";
import { ChatOpenAI } from "@langchain/openai";
import { createAgent } from "langchain/agents";
async function getTools() {
const response = await fetch("https://api.chift.eu/mcp-token", {
method: "POST",
headers: {
"Content-Type": "application/json",
},
body: JSON.stringify({
clientId: "your_client_id",
clientSecret: "your_client_secret",
accountId: "your_account_id",
consumerId: "your_consumer_id",
}),
});
const { access_token } = await response.json();
const client = new MultiServerMCPClient({
chift: {
transport: "streamable_http",
url: "https://mcp.chift.eu/mcp",
headers: {
Authorization: `Bearer ${access_token}`,
},
},
});
return await client.getTools();
}
async function main() {
const tools = await getTools();
const llm = new ChatOpenAI({
model: "gpt-4",
});
const agent = createAgent({
model: llm,
tools: tools,
});
const result = await agent.invoke({
messages: [["user", "List all accounting connections"]],
});
console.log(result);
}
main();
```
The AI framework examples use the legacy token method for simplicity. For production applications, we recommend implementing OAuth 2.0.
## Tools and scopes
The remote server's tools mirror the [Unified API](/api-reference) one-to-one across accounting, banking, ecommerce, invoicing, payment, PMS, and POS.
The tools available in a session depend on the **scopes** granted during authorization. You only see tools for the verticals and operations you were authorized for, and read-only scopes expose read operations only. See [Scopes](#scopes) for how they are defined.